Fabric Flowers!
I’m not normally a fabric gal (looove paper instead), but I’ve been experimenting a little. If you’ve read my recent posts you know I made these organza peonies using my Silhouette to cut them out, but I finally got brave enough to try fabric interfacing. I wasn’t sure what to buy, so I bought some Silhouette Clean Cut Fabric Interfacing and some Lite Steam a Seam 2 from JoAnn’s (thinking it might be the same as Silhouette’s Sewable Fabric Interfacing).
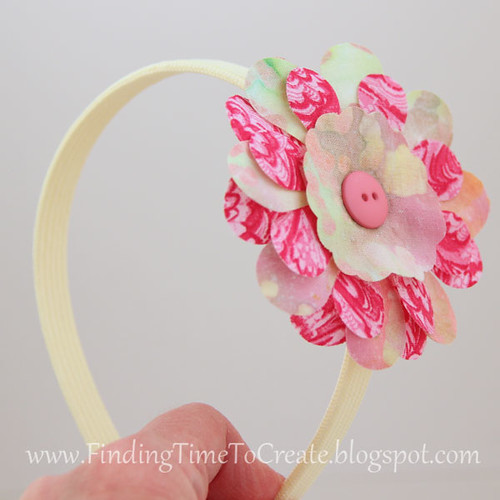
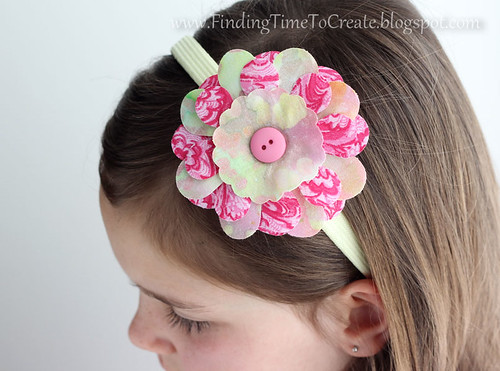
This is what I made with the Clean Cut interfacing:
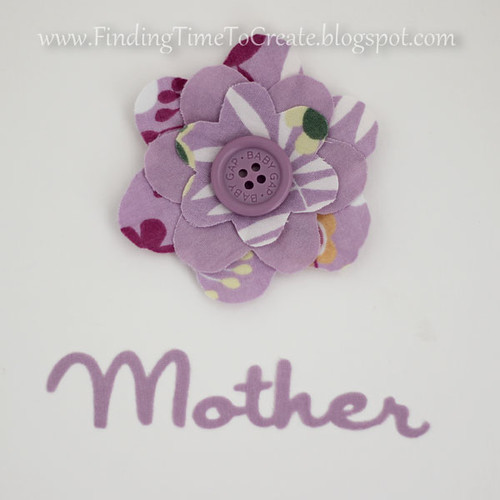
And with the Steam a Seam interfacing:
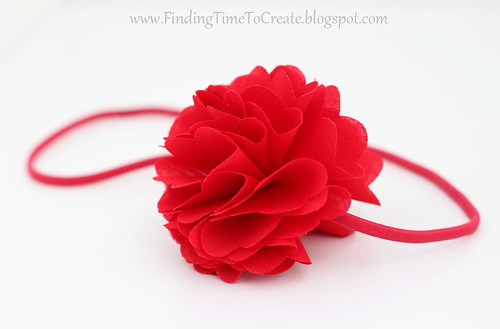
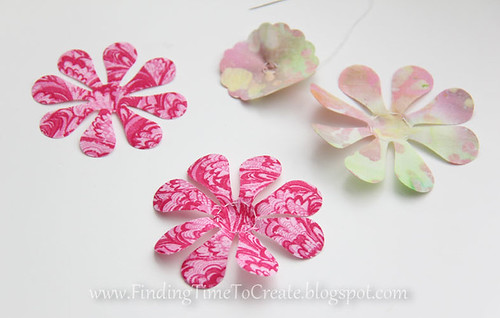
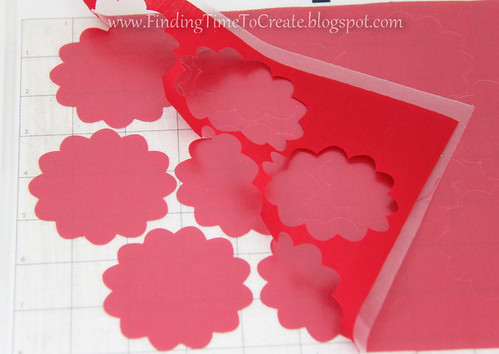
And with contact paper on top like the organza peonies (no interfacing):
These are my observations. For most of these tests I used plain ol’ thin cotton fabric, like for quilting (or so I assume, non-sewer that I am–two pieces were actual fat quarters).
The Clean Cut is pretty thick, and is intended to be ironed on to fabric or paper after cutting. Because it makes the fabric fairly stiff, you can cut more intricate shapes with it and is less likely to fray. It’s quite plastic-like on the back, so I’m not totally thrilled with the flower headband but I think it will be fine. I cut out other shapes like hearts that I’ll iron on to paper one of these days and see how it works. It cut very nicely with a sharp blade and the “Fabric (interfacing)” default settings in Studio. The flowers were a bit floppy and heavy, so I hand stitched a bit to scrunch the centers and give the layers dimension.
The Lite Steam a Seam 2 may be more like Silhouette’s sewable interfacing, but I think I’ll buy some of the real stuff just to see. It’s definitely thinner, and still cut nicely (I was worried because the fabric was pretty floppy when laying it on my mat compared to the clean cut stuff). It cut the word “mother” with no trouble, which is intricate enough for me. It’s pretty sticky on the back so the layers stick together, which I’m also not thrilled about for a flower on a headband. But one one of the flowers I was able to easily remove the interfacing so all that remained was the fabric flower. Not bad…
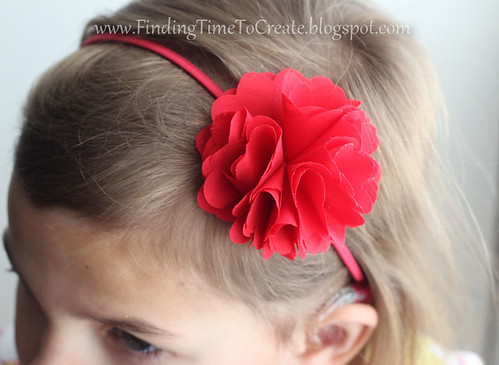
Which led me back to my previous trick of laying contact paper on top of the fabric, the same as for delicate fabrics.
1) I cut a piece of red cotton fabric 8.25″ x 11″ and laid it on my cutting mat (a sticky mat is necessary).
2) Then I laid a piece of 9″ x 12″ clear contact paper on top so the sticky edges extended beyond the fabric and stuck to the mat.
3) I cut 9-10 of these simple flowers (approx. 2.75″) with a sharp blade set on 3, speed 5, thickness 32.
4) I peeled off the excess fabric, then peeled off the contact paper from each flower.
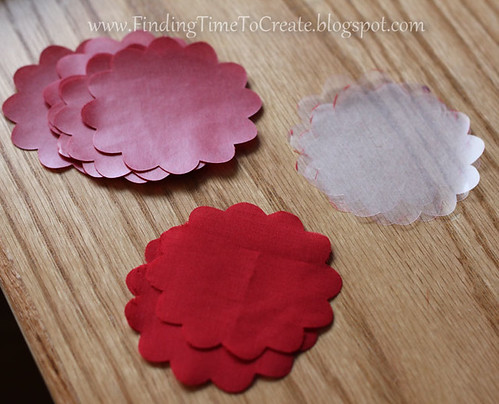
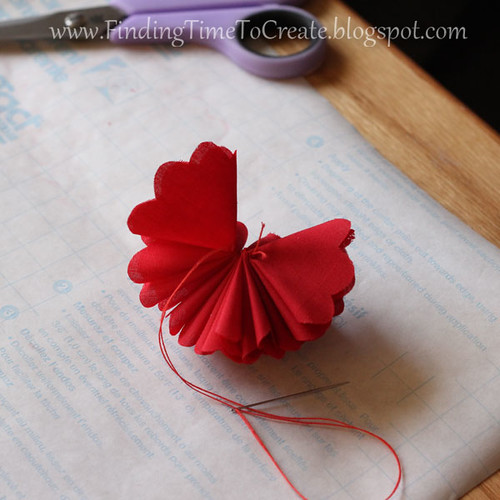
5) Next I folded each flower in quarters and threaded the stack together, one by one. (If you don’t want the fabric to fray, run a little Fray-Check along each edge before sewing. That’s good stuff!)
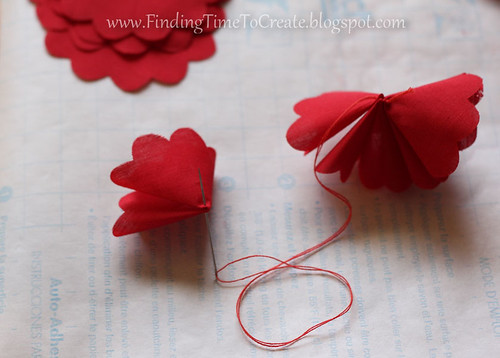
6) When I got to the last one I just sewed it back through the first flower, making kind of a circle. Then I stitched it to a stretchy headband, and that’s it!
And shown by my beautiful models:
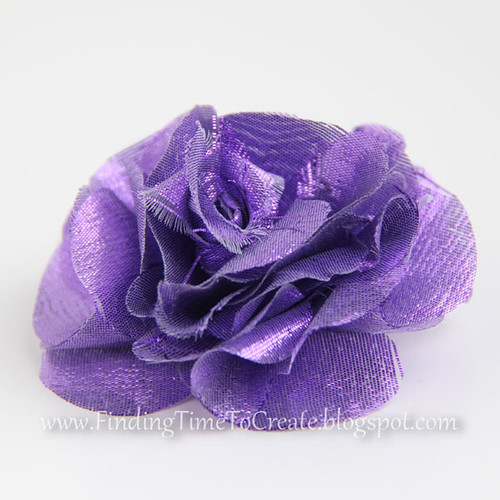
And one more similar flower, this time with another type of delicate fabric. I couldn’t do anything to get this one from fraying when I used the contact paper on top, but some people like this look:
For similar tutorials, read this Flower Hair Pin Tutorial by Rachel and this Ruffly Flower Tutorial by Mary. (I found both on Pinterest and just made my own flowers in Studio for my Silhouette to cut.)

Now I want to stay up and play with fabric instead of going to bed. Nice job! Thanks for sharing your experience.
Love the contact paper trick! I always have some laying around! Thanks for sharing!
I'm going to try your contact paper trick and make flowers for my sun hats and sun visors. They are a necessity in the Florida sun, and I love to dress them up with pretty ribbons and bows, and now I can do flowers, too! Thanks for your innovation, Kelly; I didn't want to make the flowers with interfacing on the back, and now I won't have to.
I personally think they all look gorgeous. And of course on some beautiful models.
Nice looking flowers, Kelly. Thank you for the tutorials, and for taking on the task of doing these comparisons. 🙂 I think I would go for the contact paper system.
Gorgeous! I'll bet the girls went nuts over them!
Kelly you did a fabulous job making these. Which interfacing do you like the best? Did the one from Joann's work well for you? I would like to try making some for some of my friends granddaughters and the neighbor girl.
I really like your Peonies, these are a favorite flower of mine in my yard. Of course I like all flowers and have a little of all in my yard.
So far I think I like using contact paper best. It's cheaper and doesn't leave a sticky back on the fabric. I bought several fabric remnants the other day so I'm going to make some more fabric flowers in different variations.
I have some peel and stick transparent paper from Walmart. They used to call it Duck laminate. I wonder if this is the same. you can use it to laminate like a business card anything you want to protect one side is sticky. I will have to give it a try.
That might be a bit too thick. The sticky materials I've tried are pretty thin and flexible. But then again, I've cut 7 mil acetate with my Cameo on heavy cardstock settings. Once you add a fabric layer, it will take more force and a deeper blade setting. Let me know how it works if you try it, Lora!
I love the flowers!! I think I would use the contact paper unless the stiffness of the interfacing didn't matter.
I wonder whether or not it can be done with freezer paper, I know some people iron on freezer paper when they have made stancils with it…..maybe it would stay ironed on to the fabric good enough for it to cut.
Mandy
I think the freezer paper would probably stay on well enough to cut, but the question is whether it will stick to the mat well enough to keep it all from sliding around. I should try it!
Thanks so much for sharing your comparison!
You're welcome. I'm actually working on another post that will show some more comparisons.
I make "silk" flowers (I don't always use silk, although that does work best). I dip my fabric in watered down gelatin (no flavor/scent – just the plain) before cutting out my shapes and heating them. I have not tried this fabric on the silhouette, but the gelatin does wonders for the fraying on things like chiffon. Might help with the purple fabric up above?
Ooh, thanks for the tip, Jamie!
Great post! I don't have a cutting machine, although now I want one! I stumbled across this post because I was looking up lite steam a seam.
The lite steam a seam will work great for appliques, because you can position and reposition the pieces before you permanently iron them on cards, fabric, T shirts, etc.
I'll definitely use it for appliques if I ever do that; it wasn't a perfect medium for the individual layers of flowers.
Beautiful work, and thank you for teaching me how to do, loved it!