Grandma Word Album Tutorial–Part 2
This tutorial is in response to those who have designed a word album in Silhouette Studio based on my instructions from this post, but who don’t have a Silhouette machine to cut it out. Please note that there are some tips for printing and some pointers for using fill patterns in this video that will help all Silhouette Studio users, but this is mostly geared for those just printing and not using a Silhouette machine to cut the designs.
I apologize for the glitchy sounds; my screencast software misbehaved every time I recorded this and I ran out of time to record the same thing more than 3 times. You get to hear what I sound like in slow motion. 🙂
Please let me know if you have any questions!
Here is the current version of Silhouette Studio available to download (Mac or PC). Choose the LEGACY option (2.9.45) if it is available.
EDIT 10-24-2012:
With the update to Silhouette Studio 2.7.0, Silhouette has removed the ability in basic Studio to drag digital pattern papers in and have them automatically fill the shape. You can still do it in the Designer Edition upgrade, but here are the steps to fill a shape with digital paper in the basic version:
- Open a digital pattern paper from the Studio “open” command or drag it in to the workpage from its open folder on your computer.
- It will most likely come in huge, so immediately go to your Scale Window to plug in smaller dimensions. Check the box for “Lock Aspect Ratio” and set the width or height to something manageable like 8.5″ (you can resize it more later if necessary).
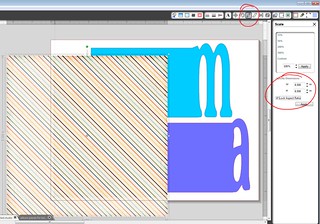
- Now bring your letter shape over the top of the pattern paper by selecting it and choosing “Bring to Front”. Position the letter over the digital paper so none of the letter’s edges are off of the paper.
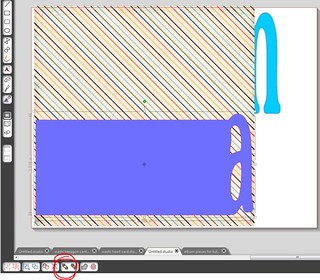
- Select both the letter and the paper, then to go the Modify Window and choose Crop.
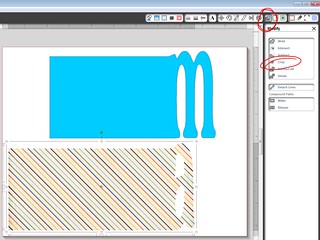
- Repeat this with all the letters. Now you’re ready to print. (If you’re cutting them with a Silhouette machine you’ll have to go to the Cut Style Window and turn on cut lines for all those cropped shapes before printing.)
UPDATE 4/20/2015: You can find an assembly tutorial for cutting and putting together this grandma album HERE.

Kelly this was great, thanks for taking the time to share your wealth of information, hugs
Hey Kelly ! Love your tutorial! But I´m getting problems when I´m about to drag a digital paper file over to the program. It doesn´t want to fill the letter, its just being copied as the whole paper. Do you have an advise on how to do it better? I´m currently using my macbook. Is there a difference?
Silhouette just changed this a couple of weeks ago so it no longer works that way in the basic edition of Studio. 🙁
I'll add a revision to my post above. I'm disappointed they took this feature away from the basic version, although you can still do it in the Designer Edition.
Hmm. That´s not good! I guess the Designer Edition is quite expensive to get as well. Do you have a tip on how to do it now without being able to just drag it?
I've just added instructions above on how to do this with the basic version. Let me know if you have any more questions!
I am a beginner and I came across this project and love it. I designed my work in Silhouette Studio but unsure exactly how I get the words from the computer into the thick letters you see online in the blog. Do I just print them off on regular paper and then glue them to either cardstock or thicker paper?
Rachael, yes, if you don't have a Silhouette machine to cut these out then just separate them out to fit on letter-size paper. Only the parts on the white workpage will print, so you can just print them one or two letters at a time per page.
There is a print function in Studio, and you can print them to regular paper or cardstock, then glue them to more heavy cardstock or thin chipboard like I used (from cut-up cereal boxes).
If you have more questions, please let me know!
Hi I admire yor work! I would like to ma make such album and I need Silhouette Studio 2.7.0 to download. Unfortunatelly the link above doesn"t work 🙁 Help
Joanna, I've added a link to my post above for the current version of Silhouette Studio. As of today, that's 2.7.4, which will work just fine.
Thanks, I will try:) O I think it works 🙂 Is it really for free?
Yup, really truly free! The catch is you have to buy a Silhouette cutter to actually have a machine cut out all the awesome things you can design in Studio. 🙂 But a printer and scissors still work if a cutter isn't in your budget!
But when I don't want, I am not obligatet, do I? 🙂
You can keep the software or just delete it from your computer if you don't think you'll use it again. No obligation to buy the cutter at all.
I think this version is older because in tutorial it has much more colours than in this version 🙁 Whoch tutorial should I use? I don"t have this Maschine wchich cuts. I can|t also choose a Pattern 🙁 And could You show how can I use these letters? Could I cut these with fiskars cutter?
Joanna, the patterns I use in the video are digital pattern papers I used from my own collection on my computer. In the "Edit 10-24-2012" section of my post below the video link, I describe how to use digital pattern paper you may already possess to fill the shapes you have created in the software.
If you don't have any digital pattern paper, you can do a Google search for "free digital scrapbook paper" and I'm sure you can find plenty to download. Then you can print these letters on white paper and cut them with scissors or a craft knife.
I used these letters to add photos and make a mini album, shown here and here.
Can you also use any already bought scrapbook paper and just use the silhouette to cut the shape of that specific layer and then glue it to the chipboard/cardboard? Its a shame that most printers won't just print to chipboard!
Yes, that's the best way to do it if you're like me and prefer to use scrapbook paper rather than printing anything. Design once, and cut as many times as you need to. Did you see my original word-album post? This particular post is for those without a Silhouette machine.
I'm having trouble bringing the letters up with the Control button and the right bracket. Is there any other way to bring them up?
If there are a lot of layers, it can take several repetitions of that function to see a difference. Make sure you have an object selected or nothing will change at all. 😉
In your menu bar at the top you can go to Object>Arrange to find all your options for bringing the selected object forward or backward one layer at a time, or to bring the selected object all the way to the front or all the way to the back.
You also have quick buttons at the bottom of your Studio screen to bring all the way to the front or all the way to the back. Those icons are stacked grey and yellow boxes.
Good luck! Let me know if you have more questions.