Silhouette Double-Sided Adhesive Sheets
I have wanted to try the double-sided adhesive sheets released by Silhouette last summer ever since I heard about them, and I finally got some!
Here are the simple instructions provided by Silhouette, plus my added observations.
1. Open or create an image in the Silhouette Software.
You will have to “weed” out the parts you don’t want, so keep that in mind when choosing a design. You’re better off with a design with as few separate sections as possible. Any part not attached to the rest of the design will have to be placed by hand unless you find a way to use transfer tape with this stuff.
2. Position a double-sided adhesive sheet onto a cutting mat with the white side up and feed it into the Silhouette.
I think your best bet is to cut down a piece close to the size of your final design so you’re not trying to pull off the entire sheet from your mat once it’s cut. The yellow backing tries to stay on the cutting mat, which isn’t a big deal unless you still have to try and trim it down.
3. In the Media settings, select “Silhouette double-sided adhesive sheets”, adjust the blade as indicated, and click “cut”.
I think their suggested settings are too deep; it was tearing my intricate design. I had much more success with speed 1-2, thickness 28, blade 6, and uncheck double cut. You will probably want to try a small sample cut yourself to see what settings work for you, just so you don’t waste a large piece of the adhesive sheet. (UPDATE: Speed 2, thickness 31-33, blade 5, UNcheck double cut has been working well for me consistently in all my recent cuts.)
4. After the image is cut, remove the yellow liner from the design and carefully place the design into position.
As I mentioned above, you’ll have to get the design you want away from the rest of the page by weeding before you can even work with the layers. This was a little more tedious than I was expecting–slower than weeding vinyl. It will depend on the design you choose.
5. Remove the white liner and apply a decorative material.
I used the Silhouette glitter for my first project, and it is ultrafine glitter and all that it implies! My craft table and I will be sparkly for quite a while, I think. 🙂 I’m going to try flocking powder next time.
6. Gently brush excess decorative material away.
Good luck with that. I hope the flocking powder I have is a little less clingy than the glitter. 🙂
Here is the snowflake card I made with the Silhouette adhesive sheets and Silhouette glitter. (You can find both in the Silhouette Store.) The card size is 5″ x 5″.
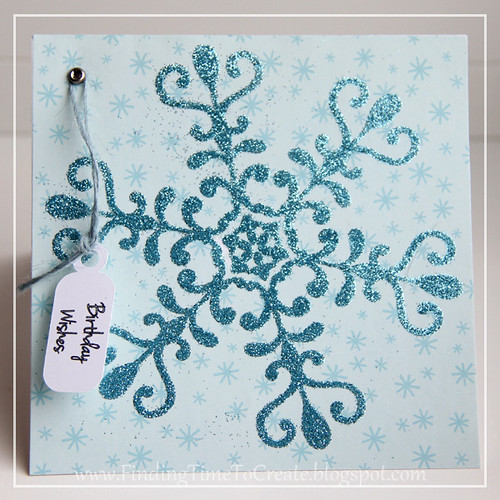
The snowflake is in the Silhouette Store (Snowflake by Hero Arts), and I made the tiny birthday tag with a sketch pen. You can grab my tiny tag with sketch instructions here.
Would I buy these adhesive sheets again? Oh, yeah. I have three sheets, and the full package comes with eight sheets. I can see all sorts of possibilities. If the flocking powder works well, I can forgive Silhouette for discontinuing their fuzzy vinyl, plus I can make fuzzy designs in all my different flocking-powder colors. I’m excited to work with these adhesive sheets some more!

Thanks for sharing your tips. I have some in a cart but haven't checked out yet. I saw it used with embossing powder and have also seen it used with mica powder or flakes.
I love how your card turned out. It is so gorgeous!
Thanks, Myoriah. 🙂 Good to know it works with embossing powder; I wasn't sure how the adhesive would hold up to the heat. I'll have to try that, too.
Hi Kelly. Thanks for the 'how to…'. A lovely tag.
Tine (Addie24)
Thanks for sharing the tips Kelly I'm pretty new to the Silhouette Cameo so I'm gleaning all the tips and info that I can…!!
Hi Kelly
This is very effective. I've used some other brand double sided sheets but I got a little frustrated. You make it all make it appear so easy, which for you haha, probably is.
You are going to make me drag my sheets out again, seeing as I DO have a little collection of glitteritz AND a container of red flocking I've never used.
Hope all else is going well for you, I keep you in my prayers.
♥ Barb
If you've got adhesive sheets and red flocking powder, what are you waiting for, Barb? Valentine's day is so close! 🙂
I have flocking powder that I bought probably 25 years ago to flock the inside of jewelry boxes with! I'm getting it out. Soon. Thanks, Kelly!
Great, Barbara! I did try flocking powder a couple of days ago, and it worked nicely. Less messy than glitter, although not as eye-catching as the glitter. 🙂
Kelly, beautiful card, thanks for the tips, hugs
Wow that is an incredibly unique use for release liners that I never thought of. Thank you for sharing such a creative idea. This will…"stick" with me for awhile!
I was having trouble with the Silhouette adhesive instructions. I was getting so frustrated that I almost gave up trying to make it work. Decided when all else fails ask for help, so I googled and found your site…."THANK YOU" for your added observations, it made my project so much easier.
I'm so glad to hear that, Ange! It sure makes my day when I find out my information has been helpful. 🙂
Hello – Does this work on fabric too? I wanted to use it on a baby onesie.
Hi Bea. Technically, it would work on fabric, but you would not be able to wash it. You would be much better off with heat transfer material or fabric ink if you are adding it to clothing that would be washed. (You can type those terms in my search bar to see projects I’ve made with heat transfer or fabric ink.)
Just want to thank you for the edited settings. I have been searching for quite a while to no avail. It was shredding the yellow liner & leaving it stuck all over my mat. I am getting really tired of their preinstalled settings, because they just ruin everything & waste $. I have ruined a bunch of vinyl, wood, stickers, paper, metal charms, etc in just a few days because of their settings. This is why I haven’t used my machines in so long, it leads to frustration & so much wasted $ and supplies. I have a Curio & Cameo, but going for another Cricut next time. My cricut is so old I am amazed it still works, at least the cartridges mine still needs are now all on clearance!
I’m glad you found these settings helpful.I try to test every new material I use and then write it down on the package whatever settings were successful for me. (I wish I remembered to keep my spreadsheet up to date and put the settings in all my blog posts, too!) I’m sorry your experience has been frustrating.