Slide to Side Interactive Card (Tutorial)
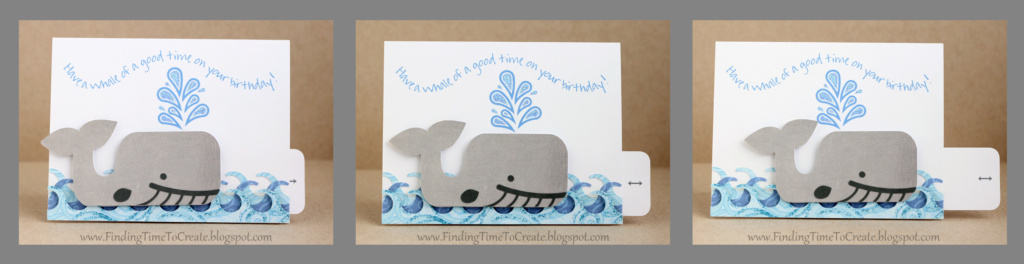
Here are the instructions to my interactive whale card. The whale and spout were Silhouette freebies so you can make this card just like I did, or you can use this template to create any kind of moving card you want! (Think cars, birthday cakes, airplanes, etc.)
Supplies:
- White letter-size cardstock (1 ½ pages)
- Pattern paper or cardstock for the cutout elements on the page
- Mini brad
- Adhesive (1/4” foam dots or other dimensional adhesive, plus your favorite paper adhesive or glue)
Instructions (included with the free download):
1. Download my print & cut file for Silhouette Studio here.
2. Cut a standard card base of 5.5” x 8.5” (half of a letter-size paper), then fold in half.
3. Use the print & cut file to design your card for both printable elements and to determine the size of the moving shape (i.e. the whale) . The shape you want to slide back and forth should fit reasonably in the area of the card face (piece A).
• I’ve included a wavy line if you want to use it for your sentiment by using the text-to-path function. (It will not print once you drag text to it. Only color-filled text and shapes will print on this page.) If you don’t want to use the wavy line, move it off the cutting area.
• If you don’t want this to be a print & cut file, just use pieces A, B, and C with colored or pattern papers of your choosing and turn off the Registration Marks. You will need to draw your own arrow on the pull tab, if desired.
4. As a print & cut, you will need to print and cut this file on white cardstock after you’ve included any background elements (i.e. text and a water spout for the whale). Be sure to check your Cut Style Window before printing and turn off the cut lines of any interior elements like text and printable shapes. Selecting all of the pieces on piece A and choosing “Cut Edge” is the simplest way to do this.
5. Cut (and assemble, if necessary) the shape(s) of your choosing for the moving focal feature (i.e. the whale). If you use a cutout background element like the waves, you will need to trim off any portion that covers the slot on piece A. Glue those pieces down to piece A.
6. Piece B will go behind piece A, and piece C will go in front of piece A. Use a mini brad to secure those 3 layers through the slot (don’t make it too tight or it will be hard to slide the pull tab).
7. Use dimensional foam adhesive (optional—you can glue it flat) to secure your moving focal element onto piece C.
8. Add glue to the back of piece C, avoiding the pull tab (piece B) so it has room to slide. Glue the entire decorated card front to the card base.
And for you visual learners, I’ve even made a video tutorial for you:
Shapes used on my card:
My template (download here)
Whale with waves (design ID# 42518)
Flourish (design ID# 41916)
Font: Amanda’s Hand
You may also like this template with instructions for another interactive card (click on the image to go to my blog post):


I am so excited! Thank you for this template and tutorial to make this fabulous card. I am going to go make it now!
Thank you, Trish! I'd love to see your finished version. 🙂
Thanks for sharing the instructions & the template too, Kelly. The video tutorial is a bonus!
Tine 🙂
You're welcome, Tine! I'm glad you like it.
Thank you Kelly. The instructions are fabulous! And the Cutting file and tutorial are above and beyond fabulous.
Thank you so much, Linda. "Beyond fabulous" is what I was going for. 😉
Thank you Kelly. You are so generous with your talent.
Hi Kelly,
What a fun card – I don't think I've made an interactive one before. I apologise for my neglect of your blog of late, life keeps getting busier. But I think of you lots and lots.
Big hugs,
Barb
Hi Kelly,
I really appreciate you taking the time to make this tutorial and instructions on the Whale interactive card. I have all the pieces printed and cut out and everything went well. Thank you very much! I will get the card assembled tomorrow. You are wonderful!
D.
I'm so glad to hear it! Have fun assembling it tomorrow. 🙂