Letterpress Success!
I don’t often impulse buy, but when I found a special one-day deal on the Lifestyle Crafts L Letterpress set (replaced with this letterpress starter kit) with extras, I bought it. The video made it look so easy and cool! After my order was placed, only then did I start reading about it. Uh-oh.
I didn’t hear very many good things about it, and found out it was one of those purchases for many that was sitting unused on a shelf somewhere, gathering dust. But my impulse buy was not returnable, so I decided to give it a shot and see if I could make it work.
And I’m pretty happy with the results. I’d like to share what worked for me in case you have one of these Letterpress kits from Lifestyle Crafts and haven’t been happy with it.
I have a Cuttlebug embossing machine by ProvoCraft, so that’s what I’m using to run the press through. It’s a tight fit, but it works.
First, I experimented quite a lot to get the right amount of pressure. The Letterpress has a clear grid piece sitting in the black base that opens so you can insert different thicknesses of paper or chipboard. These are what they refer to as packing sheets. I cut several papers to the correct size and used a corner rounder tool to make the corners fit. The magic combination of packing sheets that works for me is one piece of heavy cardstock and two pieces of very thin chipboard (they came in some old pack of 12×12″ paper). I just ran my plates through the press onto letterpress paper without any adhesive or ink, trying different combinations until I was happy with the amount of impression.
Based on a suggestion from a friend, I bought 140 lb. watercolor paper instead of real letterpress paper. Both times I went to Michael’s looking for it, it was buy-one-get-one-free, so that was a real cost saver there. The kind I bought is “Strathmore Watercolor Paper (cold press) 140 lb. (330 g/m2), 400 Series”. It’s got a brown cover, and it contains 12 sheets of 11″x15″ (27.9 cm x 38.1 cm) paper. I can cut it with my Silhouette, but have only tried simple shapes. The blade settings I used for my Cameo are speed 3, thickness 12, blade 10, double-cut option. (It’s pretty thick stuff!)
Now on to the techniques for inking and running pages through.
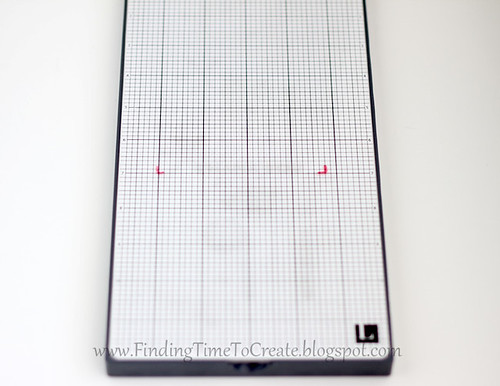
I read that the foam guides weren’t much help, so I decided to just mark my grid and place the paper in the same place each time. I marked the grid on the base with a dry-erase marker, which was the perfect solution for me. It will stay on as long as I need it to, but it wipes right off when I’m done. I did not have trouble with my paper shifting; I just made sure to check its position on the marks immediately before closing the letterpress hinged lid.

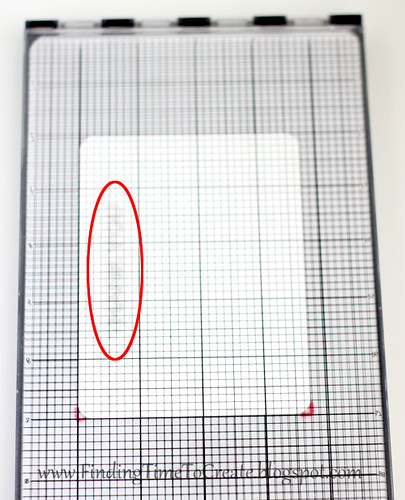
To get the impression plate in the correct position, I put some of the included adhesive cut to size on the back of the plate, placed it where I wanted it on my paper (not the side with the adhesive), and just closed the lid so it stuck to the lid in the right spot. It may be a bit hard to see, but I’ve circled the “thank you” plate in its correct position as I clamp the lid down on it to pick it up (no ink yet).
Now for the ink. This can get a bit messy, so be ready to do a lot of the same plate to make it worth it. 🙂 You really do need just the tiniest bit of ink. The amount of ink shown in this photo got me through 25-50 cards at a time (with the small “thank you” sentiment). Put a tiny bit down, then use your brayer to spread it thinly across the ink base. It stays wet for a long time.
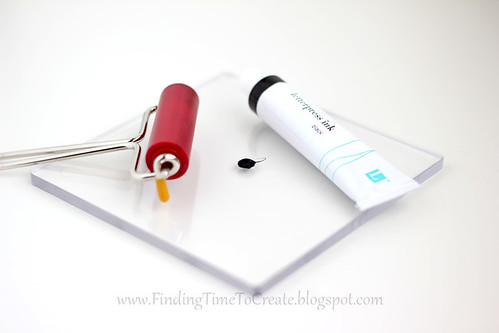
Use the brayer to roll it across your printing/impression plate, and try to get an even coating. If you used just a little amount of ink on the ink base, you should be able to roll across the printing plate several times without too much ink build up. With the black ink I was able to see through the hinged lid before closing it onto my paper if some areas of the plate needed a bit more ink.
When I got marks of ink onto the hinged lid, I found it easiest to use a finger to wipe it away before closing the letterpress lid each time. (This is the messy part.) I was careful then to not use that finger to touch any of the cards I was handling. If you leave those ink marks from the brayer, they will show up on your paper after rolling it through. If you wipe it away so only a light smudge remains, it doesn’t show up on your project.
I did not feel the need to tape my lid shut as I read in one suggestion, but I only rolled the press through my Cuttlebug once. There was enough shifting that if I ran it through backwards for a second pass, I did not get a clear impression. If you have the right amount of ink and the right amount of packing sheets, you’ll hopefully experience the same success I had.
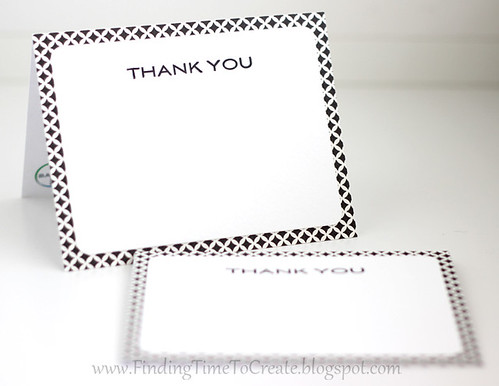
I have not experienced cracking plates like I read about, but I haven’t run any through very many times except one “thank you” plate. That one from the basic starter kit set has not cracked, and I’ve made at least 75 cards with it so far.
For clean up, I tried the widely recommended Goo-Gone and have been very happy with it. Everything except my brayer has come completely clean again with spraying, sitting for a few minutes, wiping, and washing with soap and water. And the brayer still gets easily clean enough to use again without worry of mixing colors. FYI, I found Goo-Gone at my local Walmart for a lot cheaper than Amazon.com sells it.
So those are my tips. I hope if you already have a Letterpress kit by Lifestyle Crafts that you might give it another try.
This post may contain affiliate links. If you make a purchase after following my links, I may get a small commission. Thanks for your support!

Lovely cards and a very pretty box. I too have an L letterpress and have made some cards using it. I have to laugh at all the work that goes in to letterpressing two words. Congratulations on being a Silhouette Design team member. I have been to your blog a couple of times via pinterest. I really loved your card box kit, it is awesome.