Stenciled Valentines for the Kids
My kids and I made these Valentines using the new Silhouette stencil material. I created the stencils using my Silhouette Cameo, and they painted them with watercolors. It was a great kid-friendly project! (And our 75 homemade Valentines are done ahead of schedule.)
Original post featured on the Silhouette blog 1/31/2014:
Today I’ve got a kids’ craft tutorial for you using Silhouette’s new stencil material. I love this stuff! I know you’ve seen how versatile it is if you’ve been reading all the Silhouette blog posts lately, but do you know how resilient it is? Let me tell you how my kids (ages 4-10) and I used a total of 7 cutout stencils to make about 75 homemade Valentines!
First, let me give you some magic words when looking for appropriate designs in the Silhouette online store: Stencil. Overlay. Mask. You can use these search terms to find some great files. An appropriate stencil design has you weed out all the inner pieces and has no detached “floating” pieces like centers of letters.
I found three great heart shapes that could be easily transformed into beautiful stencils to fit my 3″x3″ watercolor cards. Here are the steps to make a cutting file into the stencil shape you want. The outer edge of your stencil should be large enough to mask off the surface you are painting on (especially if kids are doing the painting).
For the heart on this Will You Valentine Card, you need to separate the heart from the rest of the card. I resized the design first so the heart would be small enough to fit in a 3” square. The quickest way to make the heart a part of your own square instead of part of this card is as follows:
- Draw a 3” square around the heart design (eyeball it to center it).
- Select both layers and choose Crop in your Modify Window (make sure the square is the top layer).
- Delete any stray pieces from the original design. Done!

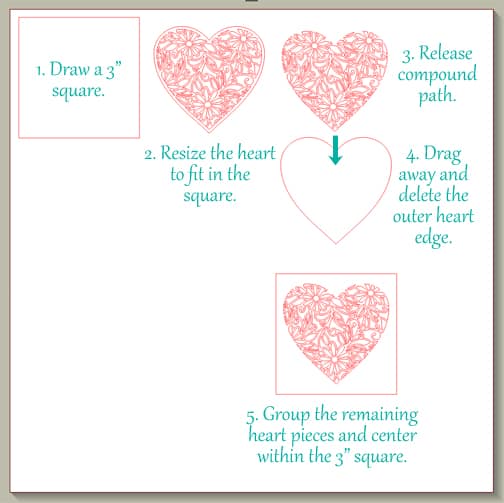
For both the Valentine Heart and the striped heart from 4 Hearts with Patterns, you just need to remove the outer edge of the heart. In both of these, ungrouping alone isn’t enough, so do the following:
- Draw a 3” square.
- Resize the heart to fit in the square.
- Ungroup and/or Release Compound Path (in the Modify Window or right-click for a popup menu).
- Drag away and delete the outer heart edge.
- Group the remaining heart pieces and center them within the 3” square. Group the square and heart together. Done!
Now you can cut these stencils out of stencil material with your Silhouette machine. This is fairly thick material, so it likes a good, sharp blade. If your blade has seen better days, either opt for a double cut or bump up the blade setting and thickness. It’s a good idea to do a practice cut on materials you haven’t tried before. I did not have my blade settings deep enough for one of the hearts, but it still popped every piece out with a little more time and effort, and none of the delicate lines split in the process. I found my Silhouette spatula tool to be the best tool for the job.
Now here’s where you get the kiddos involved. After you’ve cut as many pieces of watercolor paper you need and have cut and weeded your stencils, place a stencil on the paper and hand it to your child with a set of inexpensive watercolor paints.
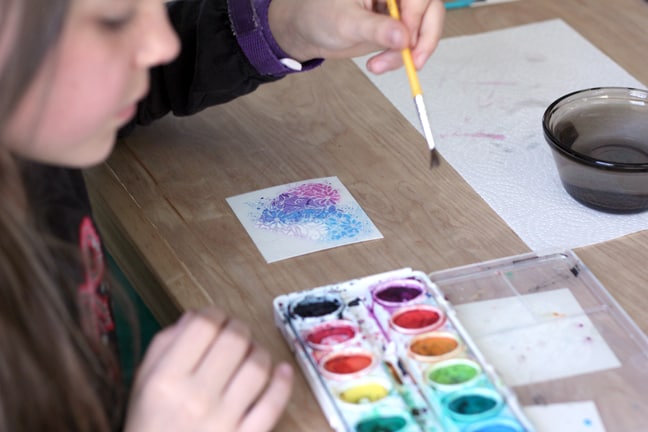
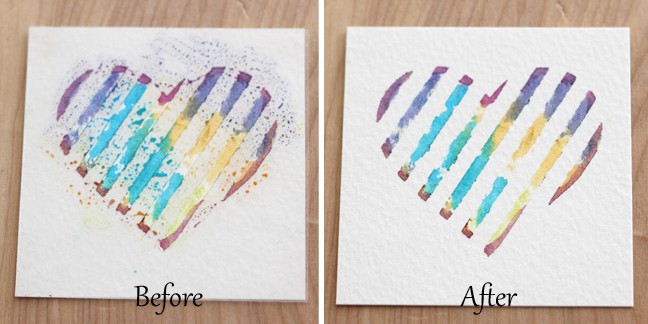
We painted a heart, let it dry for a few minutes (it depends on how wet it is and how bold you want the colors to be), then peeled off the stencil. You can blot the wet paint with a paper towel to speed up the process before removing the stencil, but that generally results in softer colors.
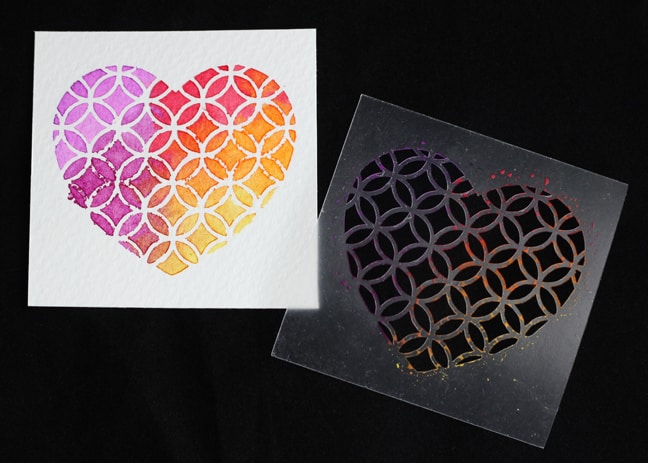
This stencil material really shines in a project like this. You can simply wash off and re-use the stencil! A wet paper towel works fine, but I discovered I could just run my stencil under the faucet for a few seconds, shake it off, and let it air dry sticky-side up for a couple of minutes. The sticky side is not affected by water!
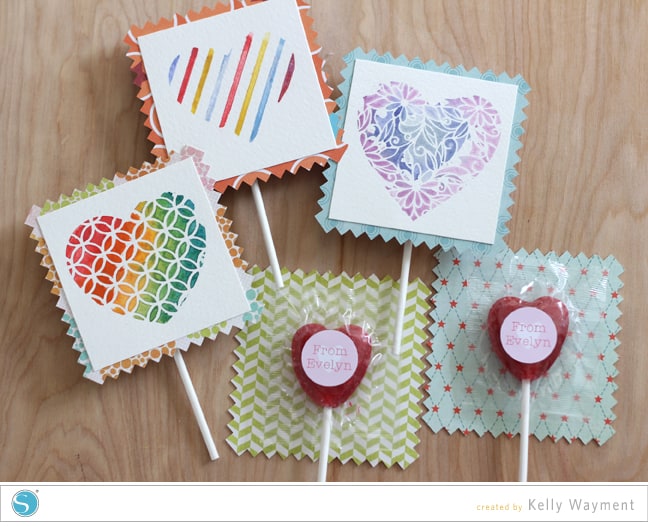
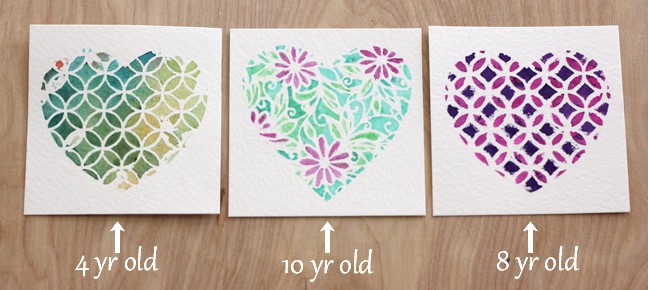
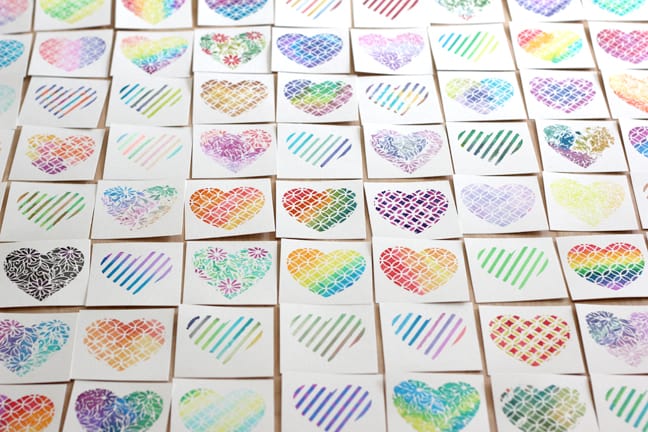
We painted over 70 hearts with the same 7 stencils (I had to make that many to keep 4 painters busy with a constant flow of clean papers and stencils). And every single Valentine is unique! Here is a sample of the end result.
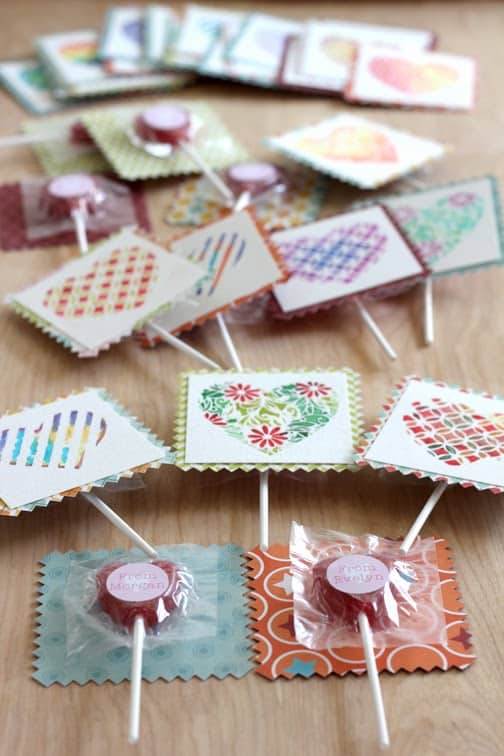
To finish the Valentines, we glued each painted heart to a zig-zag square, then we flipped them over and added heart suckers with personalized print & cut labels (thank you, Silhouette white sticker paper). My kids were happy to put the stickers on, too. 🙂
I hope this inspires you to make your own unique stenciled art with watercolors. I can imagine so many shapes that would look great with this technique, and it can keep the kids in your life busy for a long time!
Silhouette Shapes:
Heart by American Crafts
4 Hearts with Patterns by Lori Whitlock
Will You Valentine Card by Jennifer Wambach
Valentine Heart by Sophie Gallo
7 Lori Whitlock Label Shapes
Pattern:
Small Pink Dot by American Crafts

I LOVE how these turned out. I bet the kids has a GREAT time. 🙂
I can't wait to see them.
Grandma
Those are so cute.