Baby Boy Nautical Shower Invitations

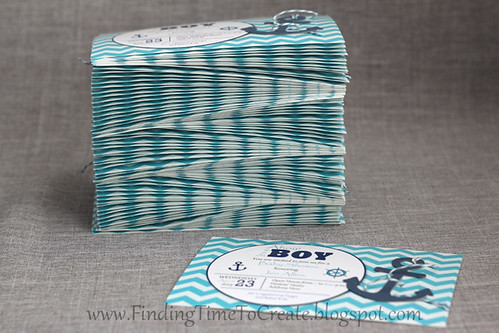
I was asked to make baby shower invitations for a soon-to-be mom in our neighborhood. I was happy to do it! …But they had to be inexpensive, done in a week, and there needed to be 90 so we could invite all the ladies in the neighborhood. I’m pleased to say I was able to do all of that, with just a few hiccups.
Normally I do my designing in Silhouette Studio, but I thought the best mass-production option was to design it as a 4×6 photo print to be printed at my local Costco photo lab, and to add a single embellishment to each print for the handmade aspect. So I designed my print in Photoshop Elements and turned to my Silhouette Cameo for the embellishments. (I got my inspiration for the text design from a combination of about 5 different similarly-themed invitations on Etsy.com. I just picked my favorite aspects of each and came up with this design.)
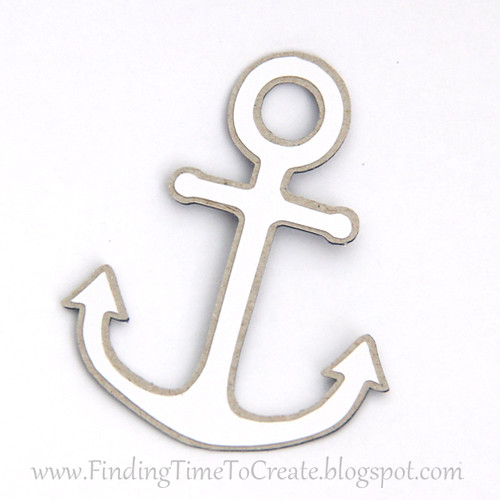
My original plan was to cut a chipboard anchor and cut an identical anchor from navy adhesive cardstock to quickly stick on top of the chipboard. Unfortunately because of the short notice (and because my original design was not intended for as many as 90 recipients), I did not have enough adhesive cardstock on hand. That meant cutting and gluing all 90 navy regular cardstock cutouts to all 90 chipboard cutouts. I will mention here that my wonderful husband stayed up late with me gluing all those pieces together after I had spent the day buying the supplies and cutting out the pieces with my Cameo. I’m sure that using the adhesive cardstock would have saved me an hour or more on this project. I’m so spoiled with the stuff; I obviously need to expand my collection! 😉
To save a little time in applying the chipboard anchors to the photo prints (and because I wasn’t sure if liquid glue would work well), I cut out 90 anchors with double-sided adhesive to turn each anchor into a sticker. I used my inner offset tool in Studio to make them fit easily on the chipboard backs without applying them all precisely.
Because of time constraints again, my husband spent an hour or more applying all of those double-sided adhesive cutouts to the chipboard anchors–while I was at work. What a guy! Once I came home I was able to take those 90 anchors, pull off the sticker backing, wrap the twine around them, and slap them onto the prints. It was more work, but I really love the extra dimension and texture the chipboard anchors and twine give to the invitation.
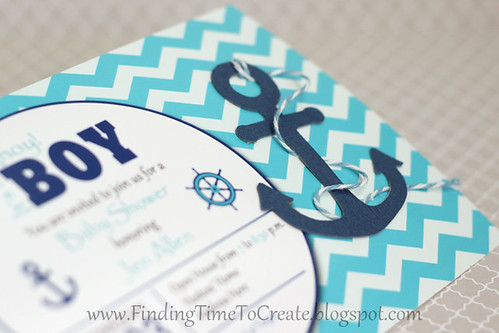
Once I was deeply involved in the project, my daughter noticed that I put the year as 2013 instead of 2014. Aagh! My Instagram followers know the dilemma I faced as to whether to fix it or just to leave it. Several people had already seen the design and no one had noticed. I decided, since it was a work of heart instead of a work of art, to just leave the wrong year and laugh about it with whoever notices. It’s pretty small and not likely to confuse people who want to come even if they notice, so that’s that. Proofread better next time.
I was able to finish all 90 invitations in time to have them passed out by a few willing volunteers. I’ll probably forget how much work it was by the time the next opportunity arises, and now that they’re done I am so pleased with the result. 🙂
Shape Used: Nautical Set by Snapdragon Snippets

I love you baby shower invitations! They are great and look so fun. hugs, Patty
Thanks, Patty!
Kelly. Do you take orders. What’s the cost?
I sent you an email, Lidia. 🙂
This a a lovely invitation, Kelly! A great idea to get them printed and you're lucky to have such a willing helper to finish them.
Thank you, Gilda, and I do feel lucky to have him. 🙂
A typo with the year is better than a typo for the day of the event! What a lot of work but I bet it was really appreciated because they came out beautiful!
Hello! Love these! Do you take orders? mariaegri0409@yahoo.com
I’m afraid I don’t take orders, Maria.