Craft Along: Paper Floral Wreath
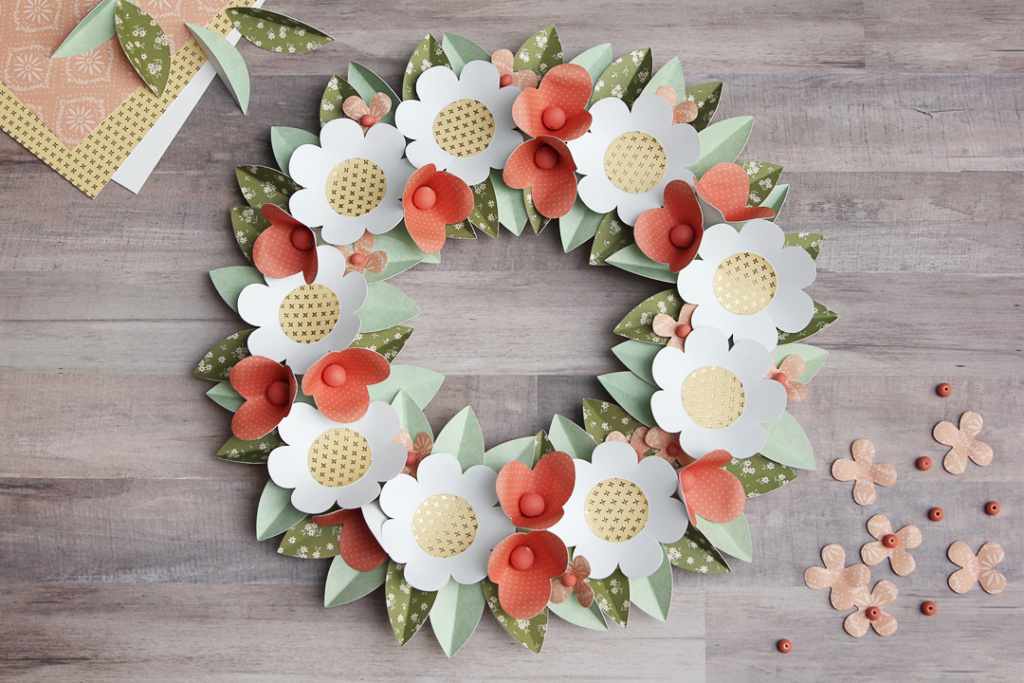
I’m excited to share this sweet floral project with you! This free Craft Along Silhouette Class will guide you through making a paper floral wreath. I love making a range of flowers, from realistic to colorful and charming. This project uses pattern paper, so its falls under “colorful and charming.” 😉
Watch the video below to craft along with me! I’ve included a supply list and written instructions below the video.
Craft Along: Video for Paper Floral Wreath
Supplies:
(Includes some affiliate links)
- Design ID #297432 Floral Wreath
- 12 beads (~12mm) or balls or rhinestones
- 10-20 beads (~8mm) or balls or rhinestones — I bought this mixed set of wooden beads here!
- Solid or pattern cardstock (65 lb.) in 12×12: 4 coordinating flower colors + 2 shades green (It’s a good time to use a 12″ x 12″ paper pack like this one)
- 12″ x 12″ chipboard
- Scraper tool
- Ball shaping tool (~12mm and ~7mm ends)
- Soft surface, like a piece of craft foam
- Strong white craft glue
- Hot glue gun (low temperature)
- Silhouette Cameo
- Silhouette Studio Software
Instructions:
Software –
- Purchase and open Design ID #297432 in Silhouette Studio
- Page Setup 12″x12”
- Move full design to side and Ungroup
- Group slice with white flower
- Move white flower to virtual mat and Fill Page [Ctrl/Cmd + Shift + F] or use Replicate Panel
- Select all white flowers, Group, move off page
- Move yellow flower to virtual mat and Fill Page again
- Select all yellow flowers, Group, move off page
- Move small flower to virtual mat and Fill Page again
- Select all small flowers, Group, move off page
- Move leaf to virtual mat and Fill Page again
- Manipulate to fit more rows (delete one leaf from second row and move up, etc.) – can fit 5 rows total
- Select all leaves, Group, move off page
- Yellow center – Replicate to 3 rows of 3 (9 centers of white flowers)
- Group and move off page
- Resize circle base to 11.9”
- Select one set at a time, Center to Page, and cut
- Send Panel: Patterned Paper, Medium (65 lb); Blade 4, Force 30, Speed 15
- Cut 2 layers of chipboard or one layer thick chipboard
Assembly –
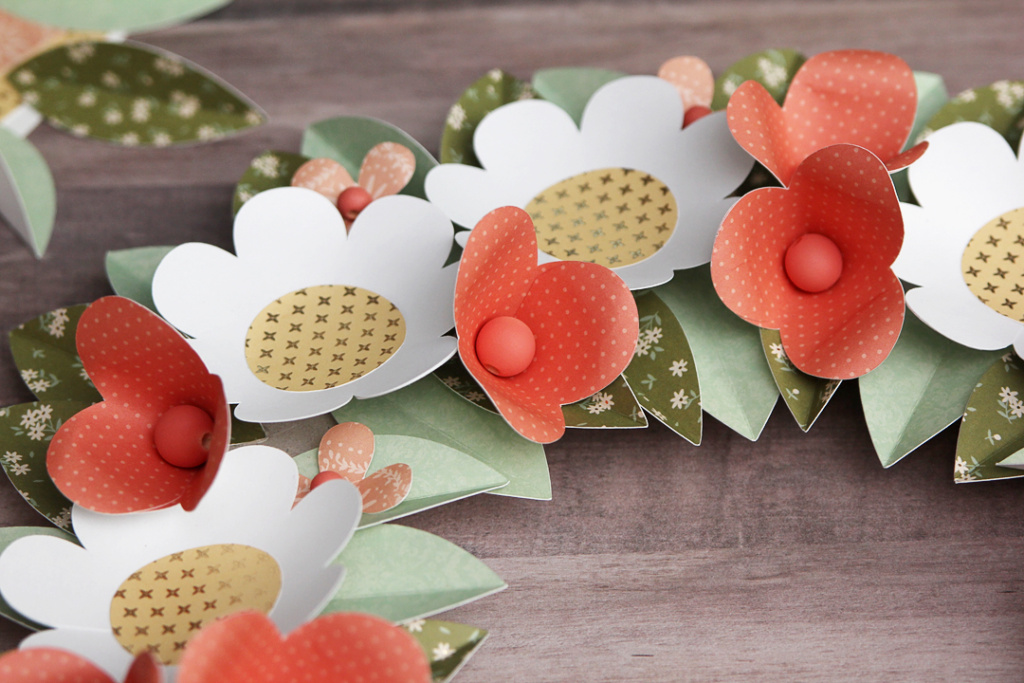
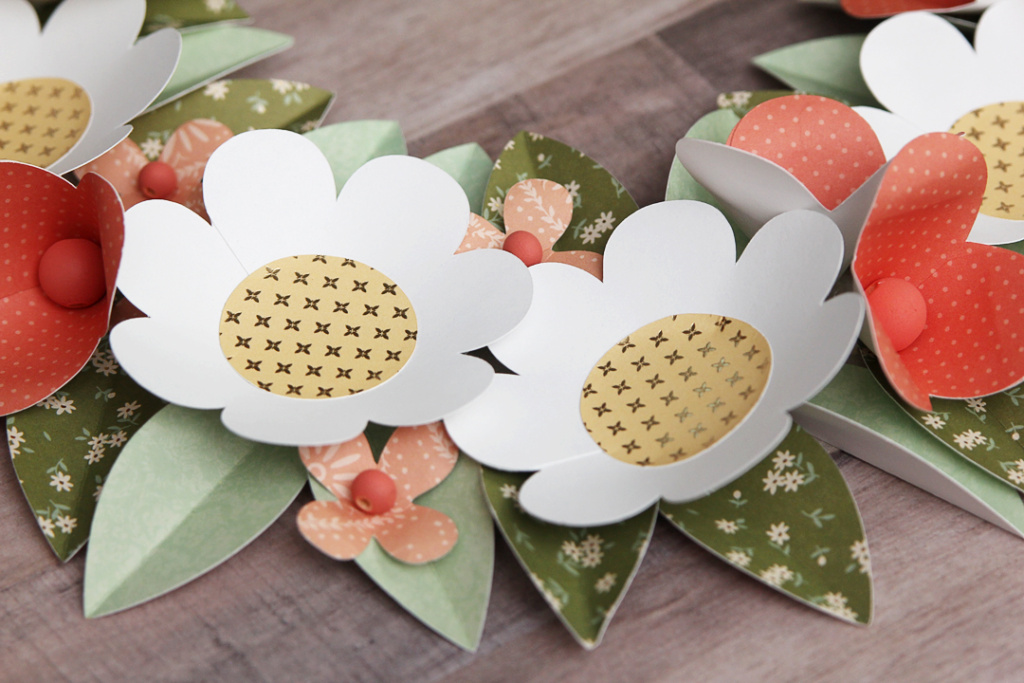
- White flower: Fold white petal over to cover full petal at split, hot glue in place. Repeat with all.
- Pink/coral flower: Fold petal over to cover full petal at split; hot glue in place. Repeat with all.
- Light pink flower: Use larger steel ball tool to cup outer edges of petals (flip upside down to roll against back side), then smaller steel ball tool to press center down
- Leaves: Crease along center with scraper tool and fold upwards
- Yellow centers: White glue and place in center of each white flower (apply glue along outer edge on underside)
- Dark pink/coral flower centers: 12mm beads/balls/rhinestones
- Light pink flower centers: 8mm beads/balls/rhinestones
- Hot glue leaves onto chipboard ring to cover gaps on edges inside & out (OK for gaps in center)
- Hot glue large white flowers to wreath
- Hot glue medium flowers to wreath
- Hot glue small light pink flowers to fill in (10-15)
- Finish with any additional leaves to fill in, if necessary
I hope you enjoy this floral wreath project! Let me know if you have any questions. Don’t forget to tag me @kraftingkelly on Instagram if you make this, or on my Facebook Page: Finding Time To Create.
Find my other Craft Along classes at the end of the post HERE.
This post contains affiliate links. Your price is the same, but I may receive a small commission when you use my links. Thanks for your support!
