Student Owl Card | Print and Cut Tutorial
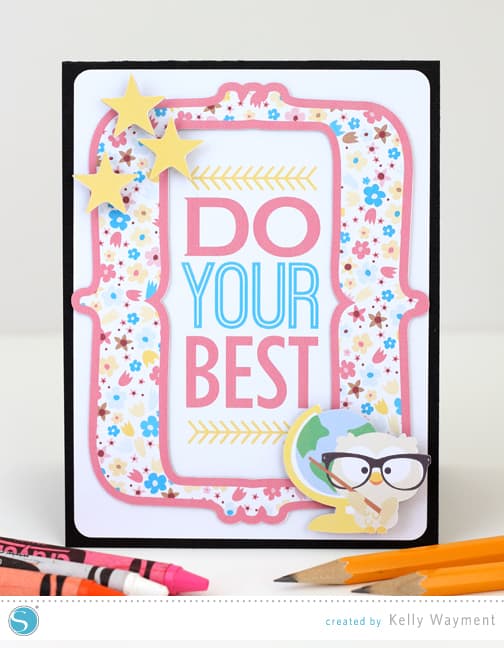
Here’s a fun card you can use for students of any age using this week’s free shape. I chose to fill one of the frames with a cute pattern, used printable white sticker paper for all of the print-and-cut elements, and mounted them on chipboard for dimension.
Have you ever tried Silhouette’s print-and-cut feature? Let me share a tutorial with you (this is with Silhouette Studio version 3).
Print and Cut Options
You have a couple of options to prepare designs to be print and cut.
- Purchase a ready-made print-and-cut design from the online store (designated with a “P”), which already has the coloring and cut lines in place.
- Fill any shape with solid colors, gradients, or patterns. You can turn any regular cut file (like the frames freebie) into a print-and-cut design this way.
- Remember that line colors, by default, will not print unless you increase the “Line Thickness” above 0.0 OR check the box for “Print Lines of Selected Shapes.” Both of these options are in the Line Style Window.
I often choose the second option and fill cut files with colors and patterns. For me, the Fill Window (especially with its eyedropper tool) and print and cuts go hand in hand. That’s the process I’m going to share, using this card as an example. (If you’re using a file already made as a print and cut, you can go straight to Step 5, but it’s great to know how to make your own.)
Turn a Regular Cut File into Print and Cut
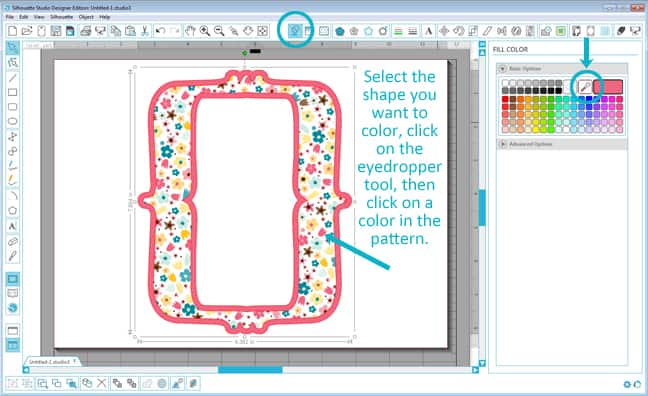
1- Open your design and fill the pieces with colors or patterns. Select the shape you wish to color, then click a color or pattern (Fill Color Window or Fill Pattern Window). For my frame I selected and filled the inner frame with a pattern first, and then I selected the outer frame and used my eyedropper tool in the Fill Color Window to choose a pink from a flower in the pattern.

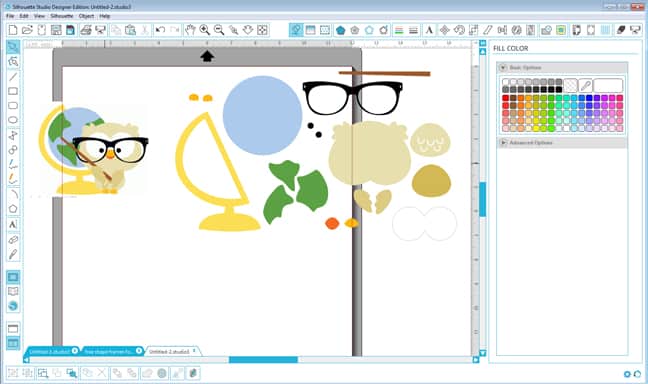
2- You can follow the same process to color the phrase for the middle (use the eyedropper tool in your flower colors to color the words). To color the owl the same as is shown in the online store image, just copy and paste a screen shot of the image, and use your eyedropper tool to color the appropriate pieces. Then drag all the colored pieces into place so they look like the image and group them together.
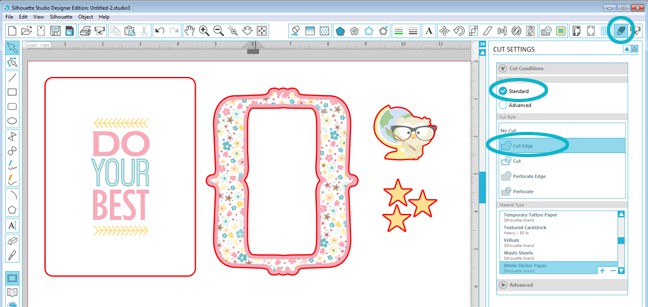
3- At this point, you can see in the Cut Settings Window a cut preview of how your shapes are set to cut. You don’t want that all to cut, so it’s time to separate the parts and set the lines to cut only the outer edges.
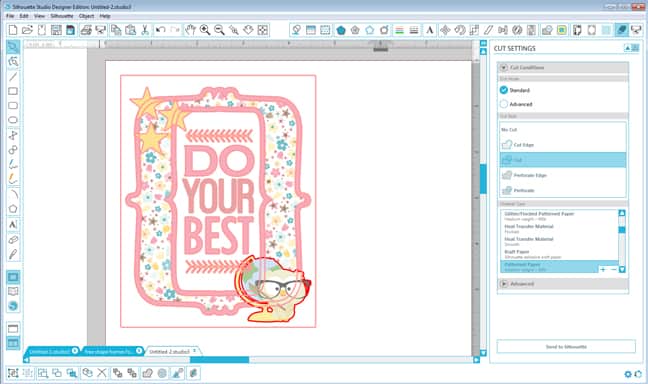
4- You can get your Silhouette machine to cut only the edges by choosing each section and selecting Cut Edge in the Standard option for cutting. This makes any overlapping shapes just cut along the outer edge. (See how the bold preview cut lines have disappeared from the wording in the rectangle and from the inner layer of the frame?) If it doesn’t behave how you want, you can ungroup things and set individual pieces to Cut or No Cut.
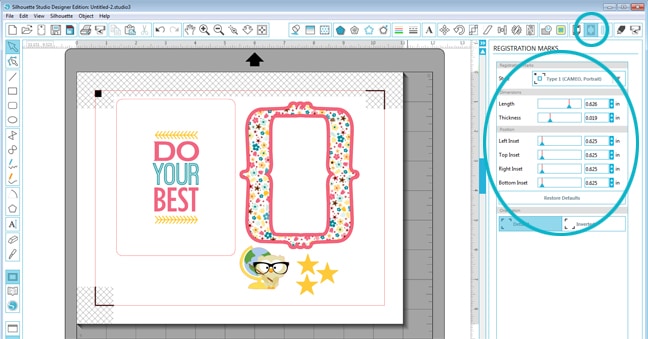
5- An important part of a print and cut is turning on the Registration Marks.
- Make sure your paper size (in the Page Window) is set to your printer’s paper size.
- In the Registration Mark Window, select the correct Registration Mark style (e.g. CAMEO or SD)
- Adjust the sliders for the mark placement, length, and thickness if you want to use only a partial sheet of paper or if you need more room for your designs. Otherwise, leave them at their defaults.
- Don’t let the designs go into the crosshatch areas or cross the red cut border.
- TIP: Sometimes the registration-mark reading can fail if you adjust those placement sliders too much. Your best success for manually reading the registration marks will come if you position your blade directly over the upper left black square before selecting manual detection. (Use the on-screen arrows or your arrows physically on the machine.)
6- Print the page (make sure the orientation of your Studio document matches the orientation in your Print Settings).
7- Place your printout on your cutting mat the same as is shown on your screen.
8- In the Cut Settings Window, choose the correct material, adjust your blade as necessary, and choose Send to Silhouette. Your machine will scan those registration marks and will then cut it out!
Card Assembly
I printed then cut all of my designs out of printable white sticker paper to make it easy, then turned off the registration marks and cut the same shapes out of chipboard.
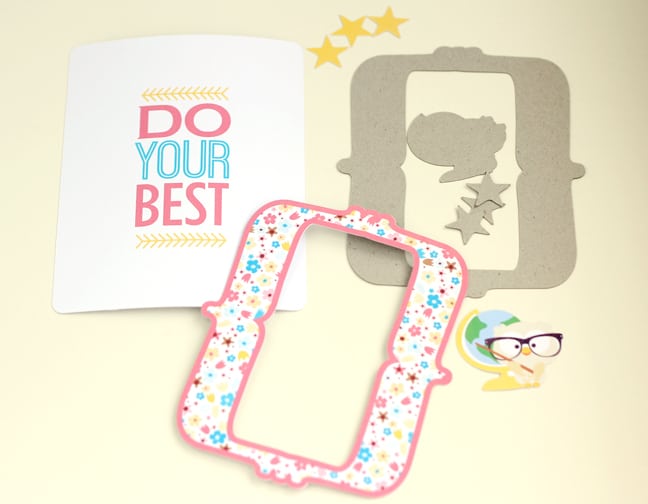
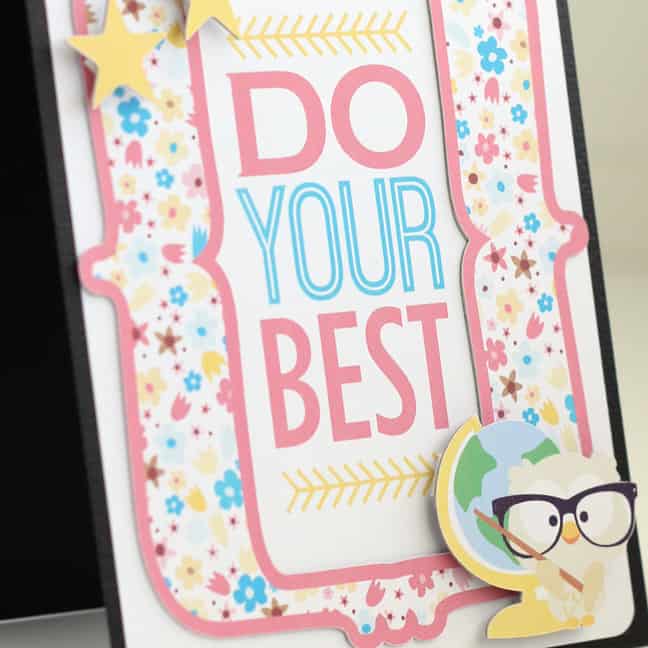
I put the stickers on their chipboard pieces and assembled it all on a black card base, using foam adhesive behind the stars and the owl for extra dimension. This was such a fun card to make with this week’s free shape and a little print-and-cut magic!
Shapes used:
- Frames (ID #66344)
- Owl with Globe (ID #64757)
- Do Your Best – Phrase (ID #63748)
- Colorful Flowers pattern (ID #22309)
- Stars (ID #63953)
Pssst! Here’s a printable PDF with the same instructions for your reference:
Student Card PNC Tutorial_FindingTimeToCreate
Originally featured on the Silhouette blog 9/9/2014 as part of the design team.

Hi Kelly
Love this owl card, is it possible to download the instructions as I am a beginner to Silhouette and need the instructions next to my while working.
Hugs
Carol
Sure, Carol! Please send me an email (see the About Me tab at the top) and I'll email you a PDF of the instructions.
This is adorable! I love the great flower paper you used for your frame 🙂
Have a fabulous and crafty day!
Amber
Stampin On Stuff
Thanks, Amber!