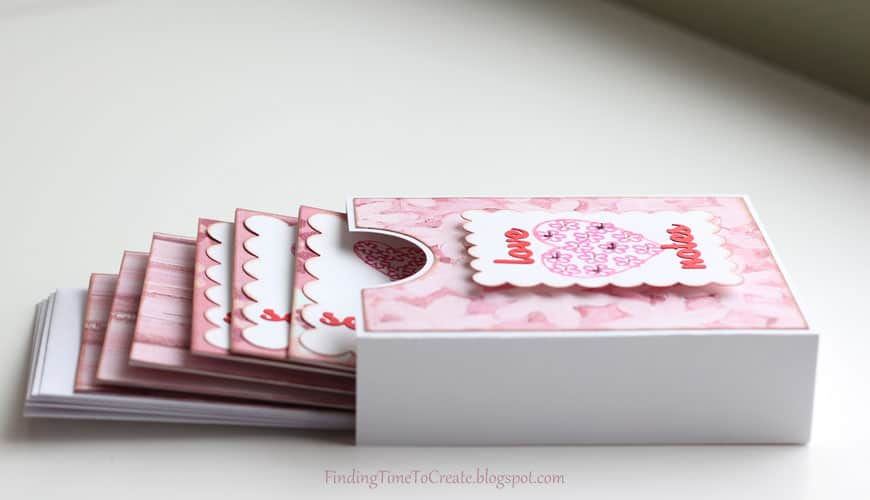
Love My Cameo Blog Hop: Card Gift Set

Welcome to my stop along the “Love My Cameo” blog hop. If you have just come from Lisa’s blog at Pretty Paper, Pretty Ribbons, you’re in the right place. If you just stopped by my blog today, click on this link to Amy Chomas to head to the start of this blog hop so you won’t miss anything along the way!
I’m so glad you’re here, because I truly do LOVE my Cameo! I try to post about all the different crafts I do on my blog, but somehow my Silhouette sneaks into just about every project I make. You’ll hear many of the reasons I love my Cameo as you read through this tutorial. And as much as I love my Cameo, I did love my original Silhouette until it died so the templates I’m providing here can all be cut on the original or SD Silhouette machines as well.
I’ve got a project for you with links to download the Studio files and a printable PDF for the tutorial I’m about to share. This is a card set in a box, which you can keep for your own ready-made cards or you can give away. I’m using sketch pens for the main attraction on these cards, so this tutorial will go over sketching and cutting the files.
Note: This tutorial was written for Silhouette Studio v3, so things will look a little different if you are using a newer version.
Materials:
- 2 pieces coordinating double-sided 12″x12″ pattern paper, or 3-4 pieces single-sided 12″x12″ coordinating pattern paper. One side needs to not be too “busy” in its pattern.
- 6 pieces 8.5″x11″ plain white cardstock (I like Wausau 110# Exact Index)
- Colored cardstock, adhesive cardstock, or vinyl in coordinating color for the phrases (I used red)
- 1 ½ pieces lightweight printer paper for the card inserts, trimmed to 6 pieces of 4″x5.25″
- 6 invitation-size (A2) envelopes
- Sketch pens (Silhouette sketch pens, or regular gel pens to go in the Chomas Creations adjustable holder) in pink glitter, red glitter, and black glitter—or substitute as desired.
1. Download these CUT FILES I’ve created. (I used the sketch function of Studio DE to create these sketch shapes.) Apparently the sketched shapes of the design won’t open without the Designer Edition, so I’ve updated the files and regular studio users will choose the files that have an extension for regular studio. So sorry they aren’t as “sketchy” looking!
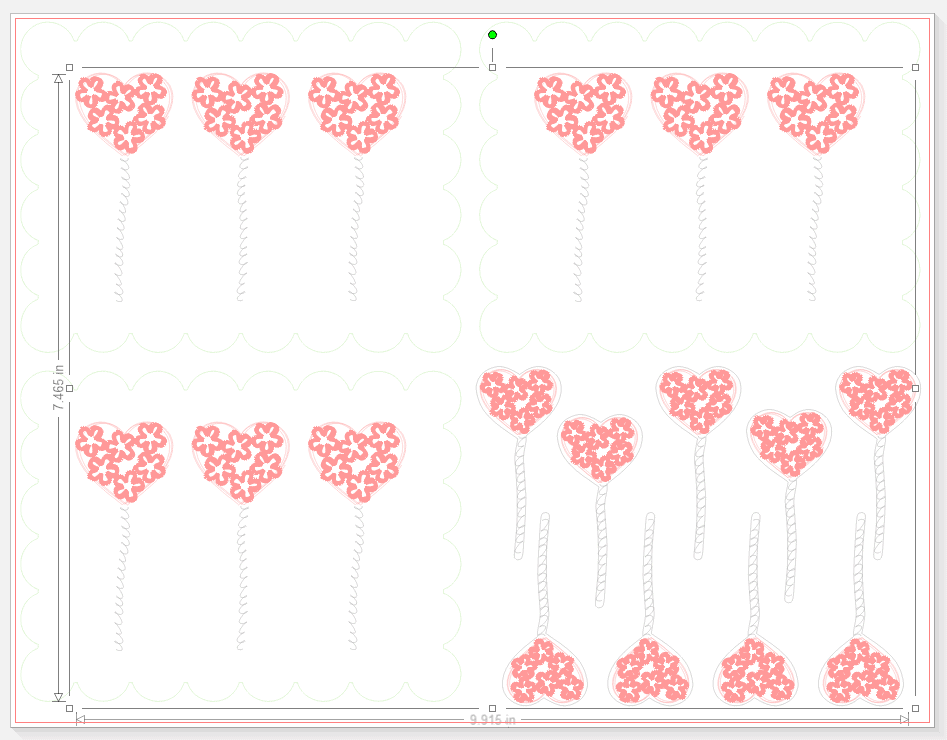
2. Open the four Studio documents and go to card box kit 3_hearts.
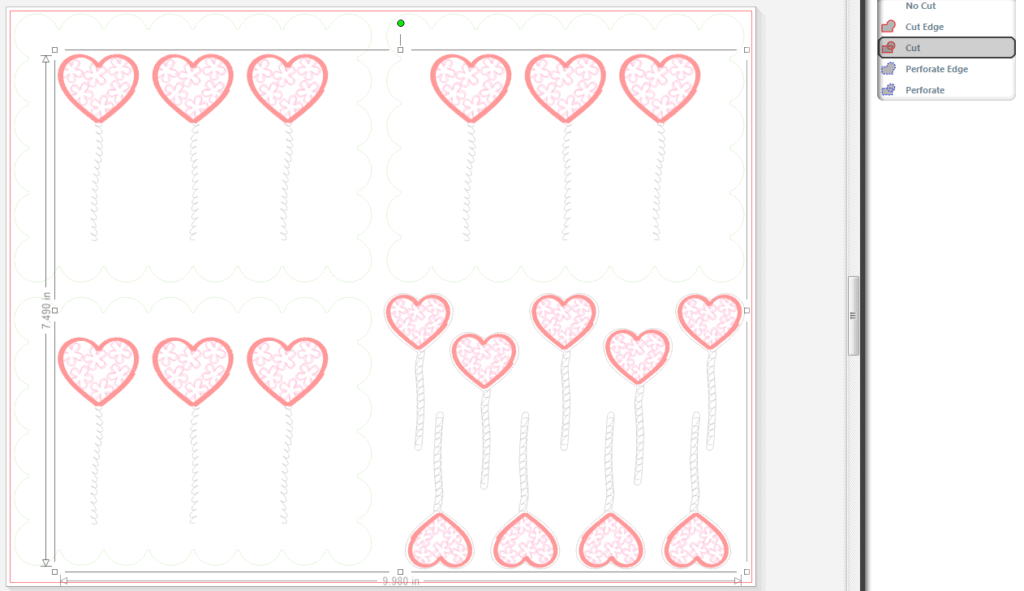
3. Go to your Cut Style window.
a. Select everything on the page (except the sentiment on the side).
b. Choose No Cut.
4. Click on one little pink flower.
a. Choose Cut.
b. All the tiny flowers on this page should turn bold red because I grouped them for the ease of sketching. In fact, all the shapes are grouped by color for sketching purposes so if you’re trying to move anything you’ll have to reorganize it all.
5. Go to the Silhouette Cut Settings window. (Don’t panic when the bold lines go away. They only show up in that one screen but the information is still there.)
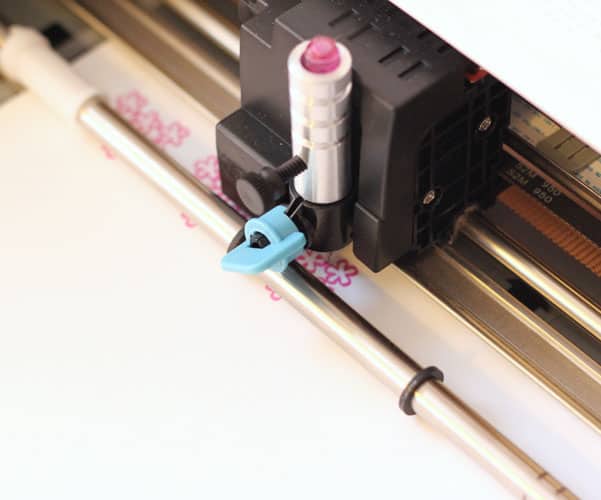
6. Place a piece of white cardstock on the mat as shown and load it into your Cameo (or Silhouette).
7. Choose Sketch Pen from the media options (near the bottom of the list). The defaults will change to Speed 10, Thickness 10, and Sketch Pen instead of a blade. I’ve decreased the thickness setting to as low as 6-7 for sketching, but you can leave it at 10. (Note: Original Silhouette users need to always cut at a maximum speed of 3 for everything in order to avoid lengthy pauses.)
8. Put a pink glitter sketch pen into the blade holder of your Silhouette, or use the instructions for the Chomas Creations adjustable pen holder to use a regular pink glitter pen. I used the Chomas Creations mini gel pens for the pink and red. Make sure to lock the knob so the pen stays in place!
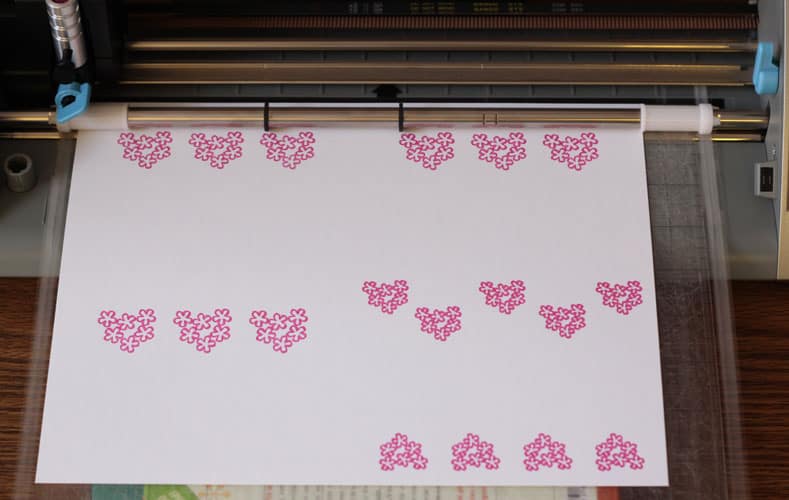
9. Click Send to Silhouette. That brings you to a list of instructions to make sure you follow before cutting. Click Cut Page. Now watch it draw! (I love this part.)
10. When it’s done, DO NOT UNLOAD THE CUTTING MAT! It will have sketched everything that was in bold red on your Cut Style window.
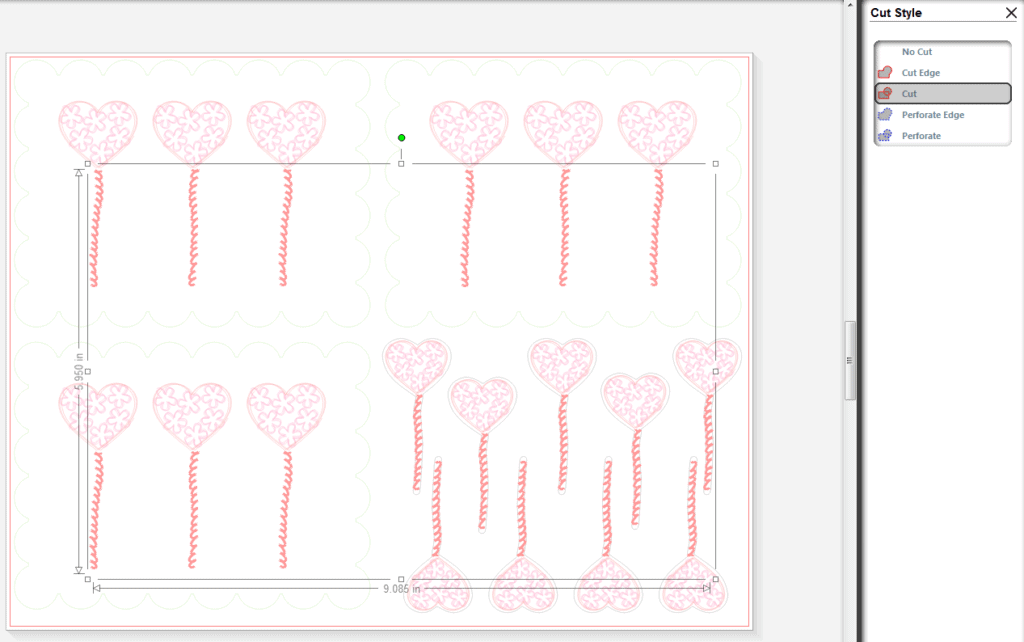
11. Go back to your Cut Style window. You need to turn off the pink flowers and turn on the cut lines for the red hearts.
a. Select the pink flowers (or they may still be selected). Choose No Cut.
b. Select the red hearts. Choose Cut.
12. Go again to your Silhouette Cut Settings window. Leave the sketch-pen settings the same, but remove the pink pen and replace it with a red glitter pen.
13. Send to Silhouette, and Cut Page. This will draw all the red hearts.
14. DO NOT REMOVE THE MAT when it’s finished.
15. Go back to the Cut Style window.
a. Change the hearts to No Cut.
b. Select the black swirls and choose Cut.
16. Again, go back to the Silhouette Cut Settings window and exchange the red pen for black. Cut/sketch again.
17. Still DO NOT UNLOAD the mat when finished.
18. Go once more to the Cut Style window. We’re actually going to cut with the blade this time!
a. Change the black swirls to No Cut.
b. Select the scalloped rectangles and the small heart outlines, and choose Cut.
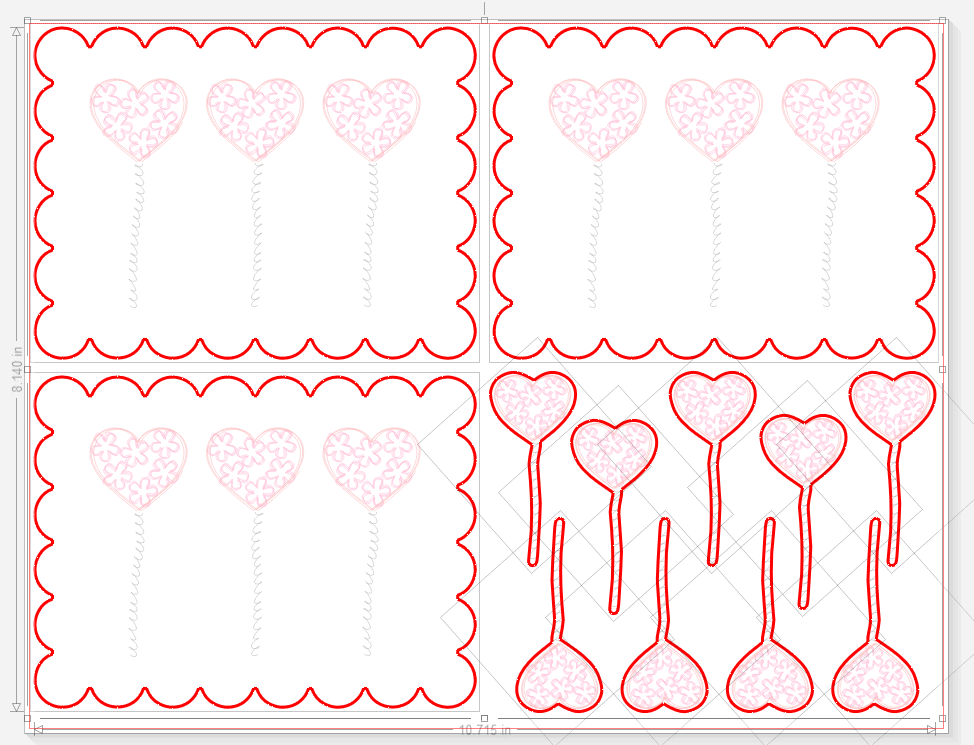
19. Go to the Silhouette Cut Settings window one last time. This time you will choose a cardstock setting based on the cardstock you’ve chosen. For the Wausau paper I chose heavy cardstock, which has you turn your Cameo blade to a 3 (= pink cap for older blades), Speed 3, and Thickness 33.
20. Remove the sketch pen and replace it with your blade, which you’ve adjusted to the correct setting or cap color.
21. Send to Silhouette. Cut Page.
22. Finally you can unload the cutting mat!
Now, before you give up on the sketch pens as a tedious, time-consuming way to get a design on your paper and figure your printer is so much faster (that’s how I felt the first time I sketched in plain black on a speed of 3)…just take a look at the color and shimmer these glitter pens give to a project (and if you can’t see the glitter in all of these pictures, trust me, it’s very visible in person):
![]()
![]()
Back to the tutorial…
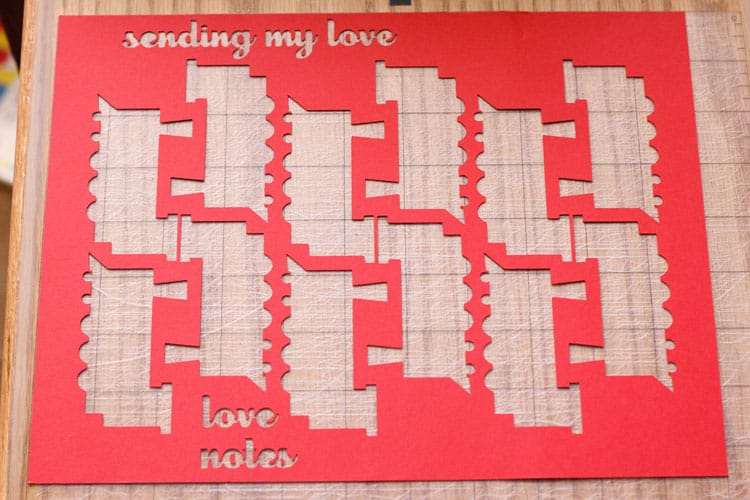
23. Cut out the sentiments from the card box kit 3_hearts page and the card box kit 1_love page from the cardstock or vinyl you’ve chosen.
Here’s another thing I love about my Cameo: It is so easy to cut from scraps! I had this red paper I had been cutting trains from for my kids’ valentines and still had enough room on the borders to cut these sentiments, so I didn’t have to start on a new page of red or let these uncut borders go to waste. This is how I arranged it on my screen (I revealed the cutting mat on the Page window to see where exactly it would cut)…
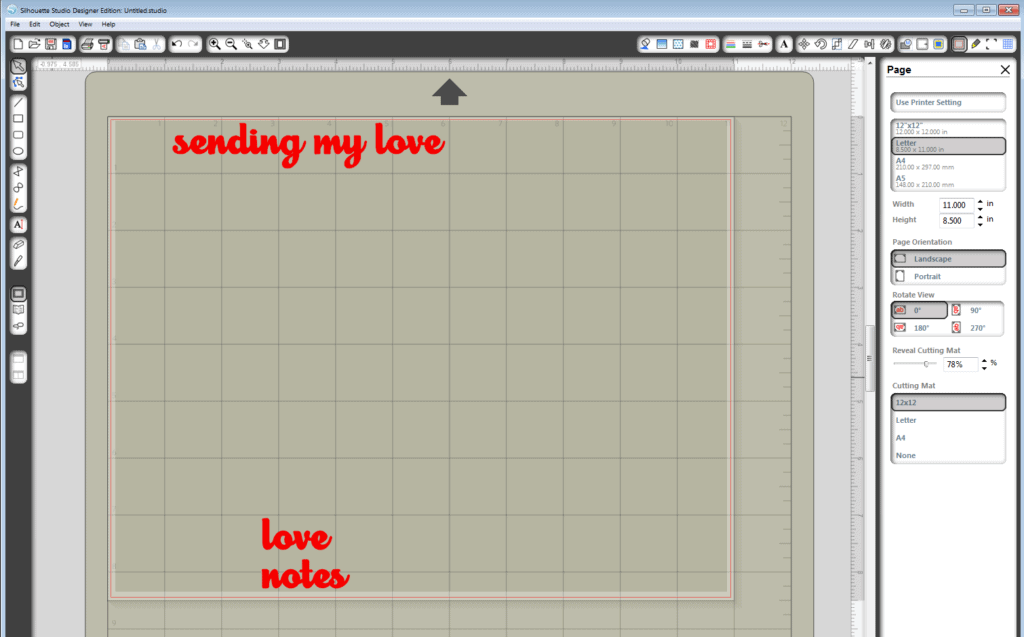
And this is how close I was able to get it to the holes already in the paper and still use up that area on the sides. I LOVE that! (I never could get it that close so easily with my original Silhouette.)
24. Go to the card box kit 1_love document.
25. Go through the same sketch process as before: turn off all but the red cut lines and sketch it with red, then turn off all but the pink cut lines and sketch it with pink, then enable just the cut lines for the box front and scallops and cut it with the blade. You could do pink first and then red; the color order doesn’t matter. (Remember not to remove the mat after sketches.)
26. When all of the pieces for this page are cut out, go to card box kit 2.
27. Cut the whole page from white cardstock.
28. Go to card box kit 4_pattern.
29. If you have a Cameo, you can cut the pieces from 12″x12″ pattern paper on your mat. (Cut the 3 pieces off to the side on a second page). If you don’t have a Cameo or want to conserve paper, you can just cut the six rectangles to exactly 4.25″x5.5″ with a paper trimmer and only cut the decorative box front cover with the Silhouette.
30. From your two pieces of double-sided 12″x12″ pattern paper you will end up with the following. You can arrange your cuts however you need to in order to have:
a. Pattern A: box front decorative piece
b. Pattern B: 3 rectangles (this could match Pattern A if you only have 3 papers)
c. Pattern C: 3 rectangles
d. Pattern D: 3 small scalloped rectangles–from a non-“busy” pattern
Another thing I love about the Cameo: unlike metal dies that leave a tiny ridge on the edges, you can’t tell which direction your blade cut from with this machine–so when it cuts a shape from double-sided paper you can use either side. There isn’t a right or a wrong side.
31. Cut the remaining 3 pieces of white cardstock in half (to 8.5″x5.5″) with a straight trimmer, and fold each in half to make 6 card bases.
32. When all the pieces are cut out, you will have:
a. Card A (3 of these): 3 pattern-paper rectangles for the card front, 3 large scalloped rectangles in white with sketched hearts, 3 sentiments (“sending my love”) in red (or other), and 3 plain-paper inserts
b. Card B (3 of these): 3 pattern-paper rectangles for the card front, 3 small scalloped rectangles from non-busy pattern paper, 3 white scalloped rectangle offset mats, 9 mini sketched hearts (3 for each card), and 3 plain-paper inserts
c. Box: 1 front in white, 1 back in white, 1 large sketched heart on a scalloped rectangle in white, 1 decorative cover piece in pattern paper, 1 “love notes” sentiment
33. Ink the edges if you want, and glue the pieces together. I like the look of foam adhesive dots for dimension on the smaller scalloped rectangles. This is how you glue the box:
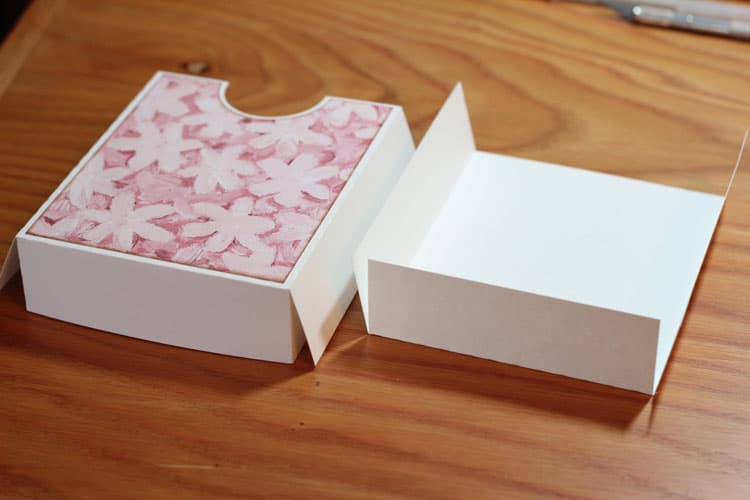
Fold the pieces on the perforations like this.
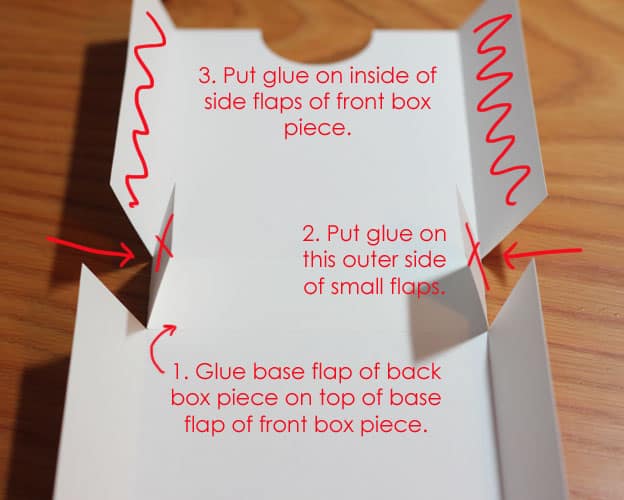
Glue the bottom tabs of each together, then add glue as shown and fold it all and hold it until dry.
Now for how they look when completed:
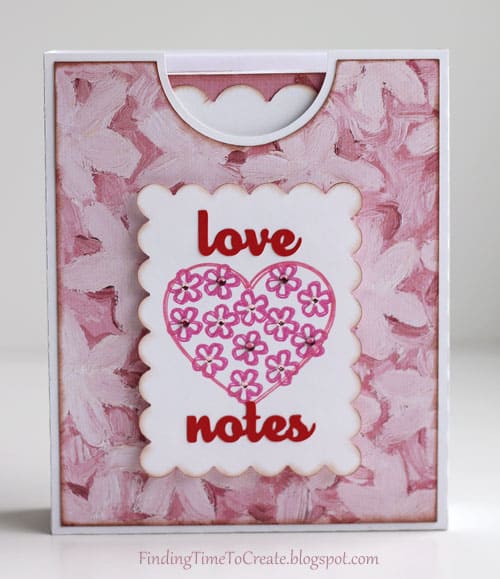
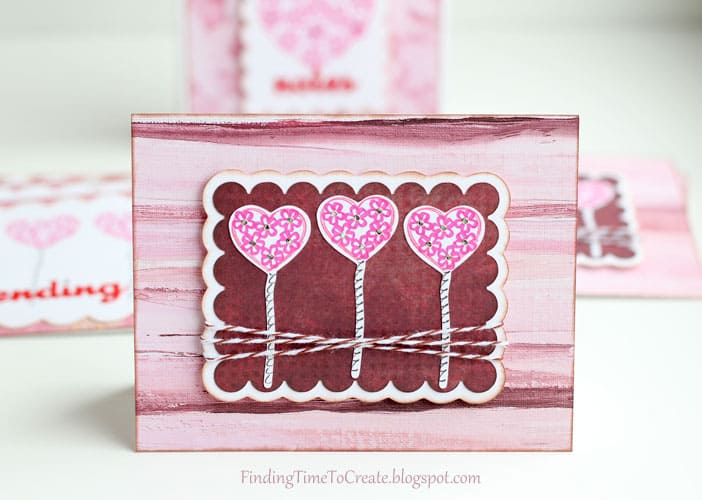
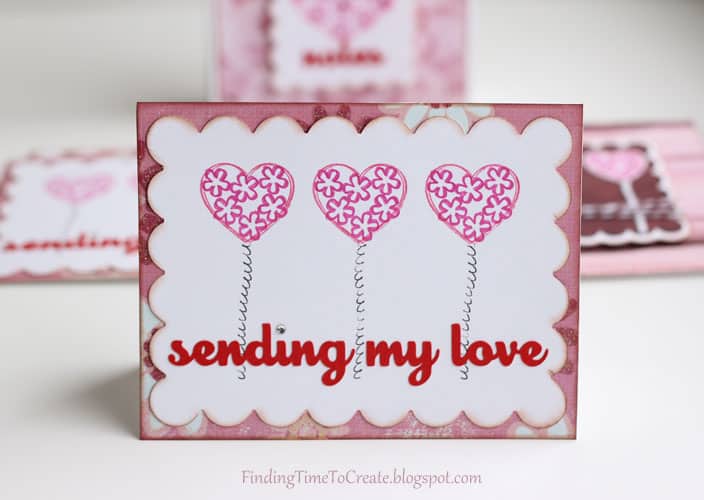

As you can see, I added some rhinestones to the centers of some of the flowers. Some are Silhouette rhinestones I applied individually with my i-Rock heat setter, some are self-adhesive rhinestones, and some are flat rhinestone-looking stickers. You can never have too much sparkle!
Now it’s ready to give away (or keep)! You could even give it to your husband so he has no excuse not to send you random love notes. 🙂 I’ve also got a thank-you card gift set using these same templates and more sketch designs, so come back soon to see that project as well!
If you download my Studio templates for this kit, I’d love to hear a comment from you and add you as a follower on my blog. The files are free, but please link others here if you want to share.
Here’s a PDF you can print for this tutorial.
Click Here to go to the next stop along the blog hop. If you get lost, here is the list of all the blogs in the blog hop:
Amy: Chomas Creations
Sarah: Sarah Hamer Designs
Lisa B: Scrap til your Heart’s Content
Lisa N: Pretty Paper, Pretty Ribbons
Kelly: Finding Time To Create (YOU ARE HERE)
Rebekah: Crafty Teacher Mom
Gaby: Gaby Creates
Tonya: Nonna’s Craft Corner
Cecilia: Crafting in the Night
Candace: Scrappin’ 2 Little Princesses
Font used: LHF Cosmic Cursive
Shapes used: my own designs (please link back here if you want to share)
Box pattern based on dimensions of this box from The Rubber Cafe (altered slightly to reduce bulk and to change the final look a bit).
Edit: Sorry for the file problem if you have Basic Studio. I believe it’s fixed now, but if you still have trouble let me know (leave a comment or see my email address on the Contact tab at the top) and I will email the files directly to you. I triple checked everything on this tutorial except trying to open the files in Basic Studio. Oops!

Wow Kelly! You never fail to amaze me! I'm so getting your cute heart flower file!! Great job girl!
What a pretty notecard set!
What an adorable project…and awesome tutorial! Thanks so much for sharing your file with us! So glad to be a part of this hop with you!
Lisa
http://prettypaperprettyribbons.blogspot.com
lnorris21 at hotmail dot com
Great project Now a follower thank you
So stinking cute! can't wait to get my new Cameo.
I kept getting an error when I tried to download the Cut files. I'll try again later.
Darlene
desaucier at bellsouth dot net
Wow amazing project!
Super cute Idea. I'm wow'ed by the versatility of the cameo.
mbchoj at aol dot com
love these!!! I just got my cameo so I haven't had a lot of time to play with it…. Would love to try the sketch pens!!
Candace
Kelly- I love all of your stuff! Your tutorials are great-I can always do it right by following them, Thanks!
Kelly, thank you very much for this tutorial! I was trying to cut a shape that was drawn with my pen holder but couldn't remember how to draw/cut! Thanks for the reminder lol. I am definitely save the PDF for further reference.
Beautiful job! Love all the detail. Definitely going to have to get the pin holder 🙂
Thanks for the clever project! I already follow you 🙂
There was a problem opening a couple of your files in regular Silhouette Studio – something about sketch or rhinestone shapes requiring the Studio Designer Edition.
Do we need to have the Designer Edition to use your files? If so, I may have just been pushed over the edge to purchase the upgrade 🙂
Oh, drat. I'll see if I can fix that. Thanks for letting me know. It will work for sure with the Designer Edition, but I'll try to modify them to work with regular Studio as well.
So far I'm not having any luck converting them. The sketch shapes won't open without Designer Edition, but the rest of the files will (the box and scallops). I'll try to fix this, so please check back later! (So embarrassing.)
Fixed. Sorry!
Really cute!! Super tutorial, thank you!!!!
Love the note holder and your instructions are great. Thank you.
This is so super cute!! Awesome tut as well!! I cannot wait to try all of these wonderful ideas out!
Kristy : )
marketateer@gmail.com
scraptasticalkreations.blogspot.com
Thanks for this fantastic tutorial – now all I need is to find some time to try it out. The free time I get seems to be spent reading blogs and getting ideas. Storing them all in the old head for one day when I get to 'do' the 'stuff'.
Absolutely adorable! I love this cute little boxed set of cards…so sweet! Thank you so much for such detailed instructions, I am still learning how to use my Cameo and really appreciate the step by step instructions!
It's fixed as of right now (I hope), so any regular Studio users who have trouble if they downloaded before now will need to click the link again to get the updated version. They won't be as "sketchy" looking, but will still be cute when used with the sketch pens.
Your project is soooooo nice! I just signed up to follow you by Email so I can learn about my Cameo because when I grow up, I want to be just like you!! LOL
I love this idea! It came out so cute 🙂
s.futch12@gmail.com
I don't have a Cameo at the moment but I love what you have done with yours thanks for sharing your talent lindawilliamson19@hotmail.com
You're Awesome, Kelly…Can't wait to make this. Your Tutorials are always easy to understand and I'm always learning something new with each. Thank you so much for the time you spend to put these together for us.
LOVE this set of cards! the box is just icing on the cake. Thank you so much for the tutorial also, I just need to find time to to make me some of these.
Thank You
Mandy
What a lovely set! and great tutorial!! Glad to be in this hop with you!
Love the note cards and box for them. Thanks for sharing the files and your wonderful tutorial.
Thank you so much for the lovely kit, Kelly! Iknow it's going to be great fun to make!
Thank you for the kit! I enjoy reading your blog.
Kelly, this is fantastic!!! I so want to try this!!! Thanks so much!
hugs,
joni
Super cute!
Thanks Kelly! I love the box, it would really make giving someone a set of cards a bit more special.
Wow, are you ever talented! That is a fantastic card set and will definitely print out the PDF when I get home after work. (shhhh, don't tell the boss I'm blog hopping, tee hee.) And I must come back to study instructions on your tissue boxes also. Excellent!
These are awesome!
How do I know what pens fit my Silhouette? Or do any gel pens go into the Chomas Creations adjustable holder?
You can use Silhouette brand sketch pens with no adapter, or skinny (standard) gel pens go into the Chomas Creations adjustable pen holder. Thicker pens might work better with the adjustable marker holder. You can certainly ask Amy, whose link is at the beginning of the post.
Wow, this is an awesome tutorial!
Wow, Kelly! Wonderful project and so much work. Thanks for sharing your files with us and the awesome PDF tutorial. I am a new follower. patnbobcuddy at gmail dot com
Love it! Thanks for sharing and thanks for being part of the hop.
Love this! The hop is really convincing me that I need to get a Cameo!!
Tanya
Phenis2031 at yahoo dot com
Wow, this is amazing, love the detail of the directions. I am so new to my Cameo, scared actually but this looks fabulous. Thank you.
http://pammejo-scrapbookflair.blogspot.com/
Kelly, thank you for sharing such a fabulous project!!! You are awesome!! I LOVE your tutorials as you make every project so easy to recreate. You can't even know how much all your time and effort is so greatly appreciated :O) Thank you for all you do!
thanks for such an indepth tutorial. such a cute card!
Love you card box. I'm going to do this soon!
I love this project! I'm book marking this so I can come back when I have time to try it!
Thank you Kelly for sharing your awesome files and PDF tutorial. I apreciate all the hard work and inspiration you put in your projects!!!
WOW Kelly – this is just amazing. What a tremendous amount of work and love and care you put into this project. Thank you sooo much!
What a great project!
pruttybird at comcast dot net
Wow… thanks for the VERY detailed tutorial. You are so kind to share your files with us… I can't wait to give it a try! 🙂
Lori
got2bcrafting at gmail dotcom
What a fun tutorial and beautiful cards!
I'm a NEW follower
Come and BEE a follower on my blog
http://buzzybeedesigns.blogspot.com
Rebecca Minor
buzzybeedesigns(AT)yahoo(DOT)com
Hi Kelly,
Thank you so much for taking the time to post a great tutorial!!! 🙂 Your card set is fabulous!
Jennifer
partridgelu at yahoo dot com
Great idea, project and tutorial, TFS! neldacnm at yahoo
Thanks for the file and project ideas. Yours is my favorite stop on the blog hop.
Kelly, this tutorial is amazing! It must have taken a long time to put together but how lucky for us to get a step by step! Love the glitter pens and the bling, I love anything that sparkles! The box and notecards are adorable, thanks for sharing!!!
I haven't tried the drawing feature on my Cameo yet. It's a must do now that I see what it can do. TFS.
If you'll find the solution then please let me know about that.