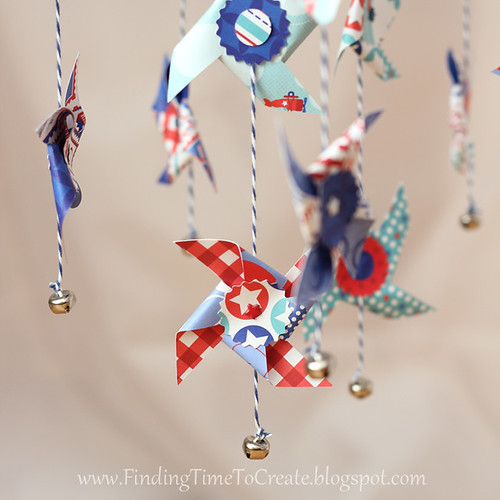
Pinwheel Mobile Tutorial
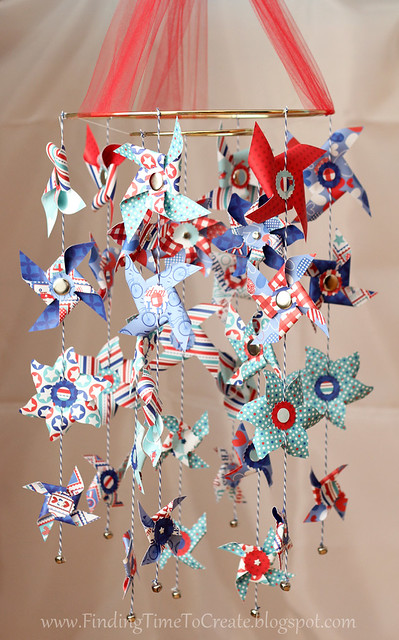
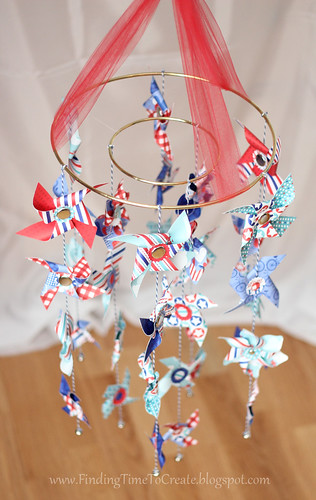
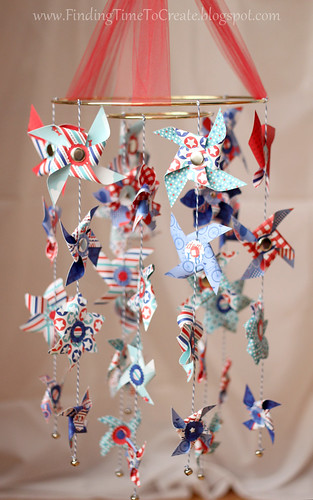
I love making mobiles. For this one I went with a Red, White & Blue theme. As a summertime mobile, I thought pinwheels would be pretty fun. Here’s how to make a pinwheel mobile of your own.
Supplies:
6 pages 12×12 Doodlebug “Stars & Stripes” double-sided pattern paper
3 yds red tulle ribbon
5 yds blue baker’s twine
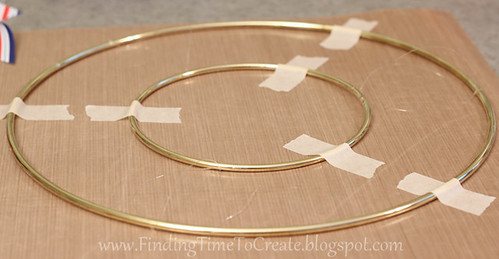
2 metal rings, 10” and 5” (these are made by Darice)
Clear plastic beading thread or fishing twine (48”)
Brads:
15 American Crafts Elements large brads—silver
9 medium silver brads
12 small star brads in red, white, blue
Small jingle bells (9.5mm by Darice)
Hot glue gun
Fray Check by Dritz
Super glue
Needle threader (optional)
Silhouette cutting files: Pinwheel #2007, and Six Petal 3d Pinwheel #27840
Instructions:
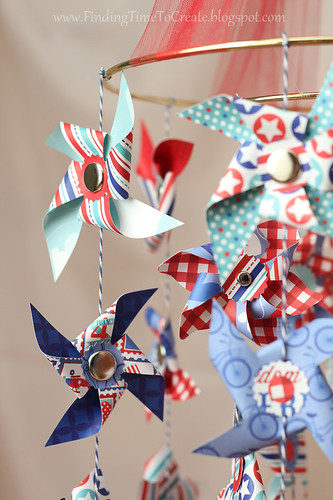
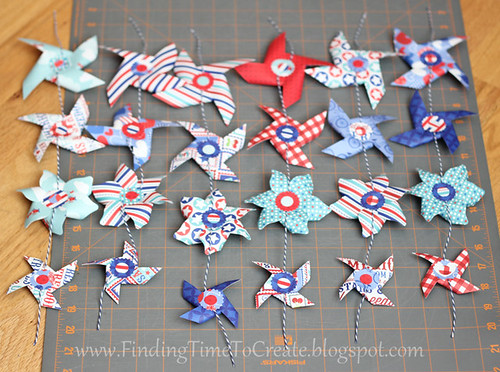
1. Cut and assemble 36 pinwheels:
a. 6 large, 9 medium, 9 fancy medium, 12 small
-For large pinwheel, resize the pinwheel #2007 file to 3.500” tall
-For medium pinwheel, resize the same file to 3.000” tall
-For small pinwheel, resize to 2.250” tall
-For fancy pinwheel, resize “six petal 3d pinwheel” to 4.410” wide by 6.305” tall before ungrouping. The scallop circle center should be about 1”.
b. You will need to cut 72 of the 1” scallop circles and 72 ½”-plain circles (for the front and back of each pinwheel). I recommend cutting more than that so you have a good variety to choose from when assembling all the coordinating pieces.
c. Use a large brad on all the large 3.5” pinwheels and all the medium plain 3” pinwheels.
d. Use a medium brad on all the fancy medium pinwheels.
e. Use a small star brad on all the small plain 2.25” pinwheels.
2. Cut the baker’s twine as follows:
a. Six 19” strips for the outer strands.
b. Three 21” strips for the inner strands.
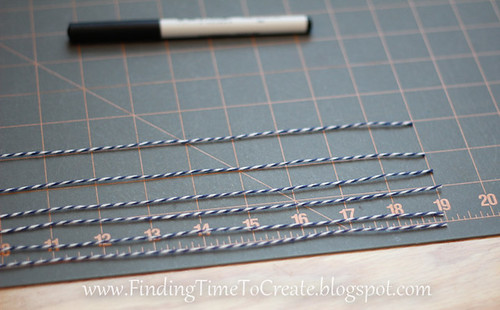
3. For the outer six 19” strands, measure and mark with a marker on the twine every 4”, starting from the top.
4. Flip the assembled pinwheels brad-side down and hot glue the baker’s twine at the marked dot to the center of the pinwheel (in the middle of the folded-back brad legs). Hot glue a scalloped circle on top of the twine, and a ½” plain circle in the center of that to give a finished look to the back side of each pinwheel. The order will be as follows:
a. Large plain pinwheel with its center at 4” from the top of the strand
b. Plain medium pinwheel with its center at 8”
c. Medium fancy pinwheel at 12”
d. Small plain pinwheel with its center at 16”
e. Tie a jingle bell at the bottom of the strand. A needle threader is very helpful here if you have one.
5. For the inner three 21” strands, measure and mark with a marker from the top: 6”, 10”, 14”, 18”. The order of these pinwheels are as follows:
a. Fancy medium pinwheel with its center at 6” from the top of the strand
b. Plain medium pinwheel with its center at 10”
c. Small plain pinwheel at 14”
d. Small plain pinwheel at 18”
e. Tie a jingle bell at the bottom of the strand.
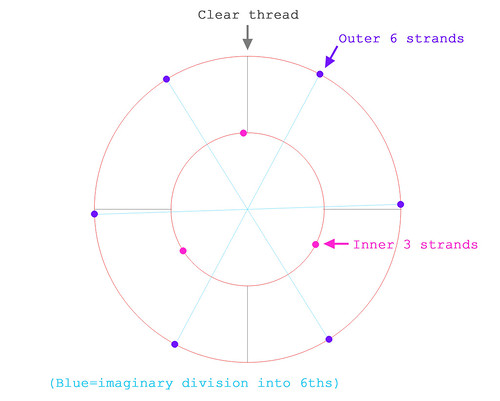
6. To tie the metal rings together, I used a clear plastic thread so it would look nice with the inner ring “floating” inside the other.
a. Tape down both rings so the smaller ring is centered within the larger ring.
b. Cut four pieces of 12” clear plastic thread (there will be quite a bit sticking out of your knots at each end, but this gives plenty to work with).
c. With each thread, slide it under the rings and make a secure knot on each ring. Keep the thread taught so the spacing remains even; it will stretch with the weight upon hanging so the inner ring will hang slightly below the outer ring.
d. The four threads should be evenly spaced (think of lines at north, south, east, and west).
e. Add a dab of superglue to each knot.
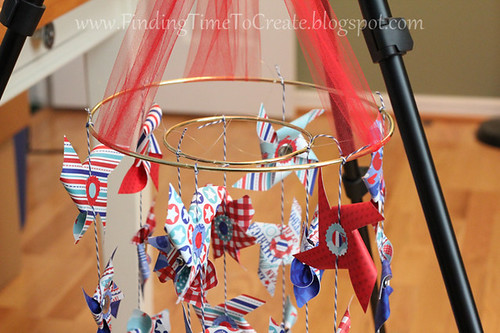
7. At this point it’s best if you can find a place to hang the mobile that’s up high enough to leave room for both the 20”+ strands and the tulle for hanging. Or find someone who can hold it for you while their arms get tired. 😉 I used my camera tripod at full extension that also has a hook in the center.
8. Hang the rings with three pieces of red tulle ribbon, 1 yd each. Simply fold each piece of tulle in half, enclosing the outer ring, and tie all three strands together in a knot at the top. The tulle should be equally spaced around the outer ring, dividing the ring into thirds.
9. Tie the six outer strands full of pinwheels at equal points around the outer ring. Try to tie the knots so each strand has about the same amount left over at the knot so they hang at equal lengths.
10. Tie the three inner strands full of pinwheels at equal points around the inner ring, making sure to place them evenly to divide the inner ring into thirds. There will be excess string at the top compared to the outer-ring strands to give room for manipulation so the pinwheels hang nicely in relation to the outer strands.
11. Secure all knots on the baker’s twine and dab with Fray Check on each knot.
Here is a view of my mobile before all the knots were finished and ends trimmed (you can also see the edge of my tripod I was using as a temporary hanging point).
12. Once dry, trim all the excess string close to the knots; the Fray Check will keep it from unraveling.

what a fab project and great tutorial, hugs
This mobile is so darn cute!! I love pinwheels, but I've never seen them used in this way. Very creative! 🙂
This would be really cute for a 4th of July event. I like the paper you have used. And it could be enlarged for a windsock and make out of fabric. O I can see the wheels turning. TFS
Wow – I love this. Pinwheels are a favorite of mine. I love the clever way you added the center. Great tutorial – pinned it already 🙂
Congratulations on the win on the Silhouette blog – well deserved! I love this!!!
This is just plain adorable! I love the bells on the ends! I haven't been to the Sil blog in a month; guess I'd better see what it is that you won! Congratulations anyway! But you have always been a winner in my book! Hugs!
Thanks, but I didn't actually win anything on the Silhouette blog; I was just the first one to submit my photo for the summer party challenge.