Thankful Mini Card Set
Here’s a thankful mini card set originally posted on the Silhouette Blog, which I’m now including here in its entirety.
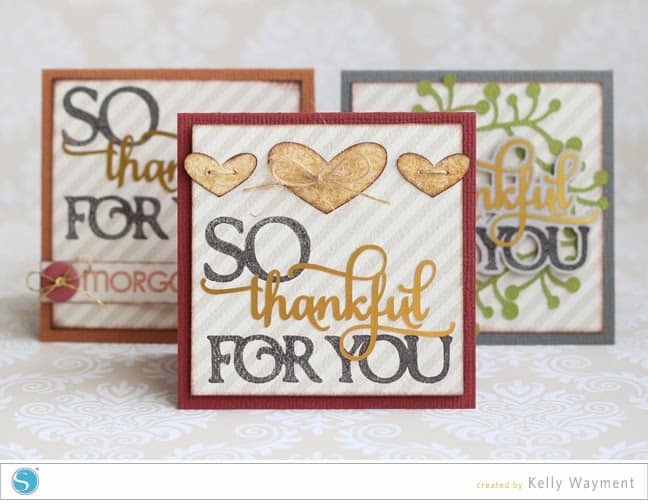
Hello! Kelly here to share another card project with you. Thanksgiving is quickly approaching here in the U.S. so I made a little set of “thankful” cards. I chose fall colors so they can be placed out for guests at my Thanksgiving table, but the great thing about this set is you can customize these little 3″ x 3″ cards to have a stack ready to give out to anyone you’re grateful for. You don’t need a Thanksgiving holiday to do that!
I used the Silhouette stamping starter kit with the So Thankful for You – Layered Phrase file to create a stamping layer and a tactile layer. This file is so perfect for the stamping kit! (1) I resized the file to 2.2″ H x 2.545″ W before ungrouping it. (2) After ungrouping, I rearranged the words to have the amount of overlap I liked for my cards. (3) I selected all the words and created a fairly narrow offset of about 0.050″. This will depend on your personal preference and how you arrange the words. Then cut the stamp image from stamping material, the accent word from gold foil, and the offset from paper.

Even if you don’t plan on using an offset behind your stamps and prefer to stamp directly on your background, the offset is important for your stamp alignment with intricate words like this. The CAMEO cuts the stamping material flawlessly, even with skinny little letters like this, but because the material is soft and flexible you may have a hard time placing it on the block exactly the way it looks on your screen. Here’s my little trick. Cut the offset of your stamp image out of paper, then use it as a guide to place the stamp material down in the correct position. Once you’re satisfied with the placement, simply press the appropriate size of stamp block down on top of it. The stamping material will stick to the block, and the paper stays behind.

Here are the individual cards. I plan to make a lot of each of the three cards so I have a variety to choose from. This red card has the stamp directly on the square block (sized 2.75″ x 2.75″) with Silhouette printable gold foil as the accent word. The accent word looks pretty out of paper or vinyl as well, but the gold foil on these adds just the right amount of sophistication. To fill up the extra space at the top I added some hearts cut with the CAMEO and stitched with a little twine.

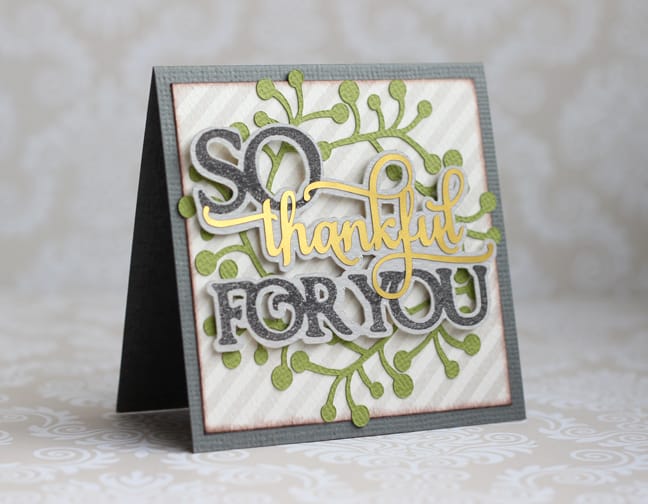
This grey card has the stamping on an offset, with the whole phrase lifted off the background with dimensional foam adhesive. The wreath is dot branch wreath cut from Silhouette adhesive-backed cardstock in leaf green.
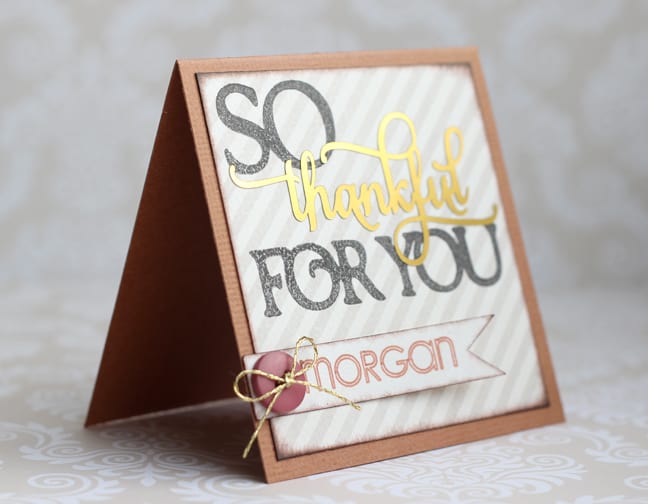
This final card is what I intend to put at each place setting at my Thanksgiving table. It’s personalized with the guest’s name, but because it’s a card I can write inside why I’m thankful for that specific person. The name is written with a sketch pen in a metallic brown to match the card base. This is where sketch pens are so much better than printing; I got the sparkle that a printer can’t give and I was able to use a small scrap of paper that wouldn’t fit through my printer. There are sketch fonts in the Silhouette online store really suited for text, but I like this LD Woodland font sketched at this size.
I hope these cards inspire you to create a set of your own so it’s easy to say thanks to those around you. Finished card size is 3″ x 3″.
Shapes:
So Thankful for You – Layered Phrase by Kolette Hall
11 Hearts by Lori Whitlock
Dot Branch Wreath by Jamie Koay
3 Tags by Silhouette
Font: LD Woodland by ScrapNFonts
This post contains some affiliate links, but your price is the same. I’ve linked to the products I used just in case you want to purchase them. I appreciate your support!

I really like these, Kelly! And, the tip about aligning the SIL stamps on the paper offset is such a great tip. I'll be using that one for sure.