Fall Pumpkin Vinyl
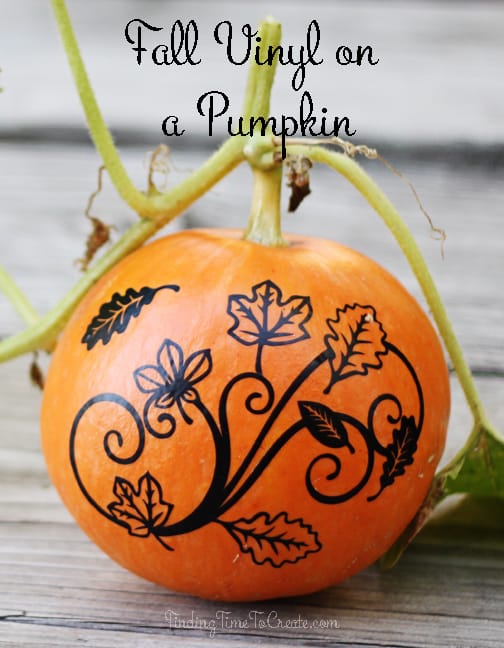 We had a pretty good garden this year, but we only got one single pumpkin. One. So I had to make it extra fancy when my husband brought it in. I added some pretty vinyl with a fall theme, cut with my trusty CAMEO, of course. I’ve got some pumpkin vinyl application tips below.

Tips for Applying Vinyl to a Curved Shape:
Applying vinyl to a curved shape can be pretty tricky, so here are some tips.
- First, choose a design that is not connected at its outer edges. The design will conform to the curved shape, so if it has a central connected point and what I call “arms” or “spokes” (like a wagon wheel or bike tire), then those arms can take the path they choose along the curved surface.
- When applying the vinyl that’s connected at a center point, be sure to start at that center point and press out the spokes from that point. Try to press down one arm at a time. Some surfaces are not very forgiving once the vinyl has touched down. This pumpkin was easy to lift and rearrange some vinyl areas. Smooth glass usually has a strong grip and does not release vinyl very well without stretching or tearing the vinyl.
- The design also works best if it isn’t filled with much solid area. You can see this design has a lot of open space, including within the shapes.
- Finally, have a craft knife handy to split any connected parts that are giving you trouble. Tiny slices in the design are not nearly as visible as the warping you are trying to correct. You can also poke holes in bubbles that may show up in your vinyl. (Note: be careful with a craft knife on a pumpkin; if you slice the skin it will “weep”. Glass is much more forgiving when slicing vinyl against your curved surface.)
 Hopefully these tips will help you in adding vinyl to curved shapes. Have you ever decorated a pumpkin with vinyl? Do you have any more suggestions to add?
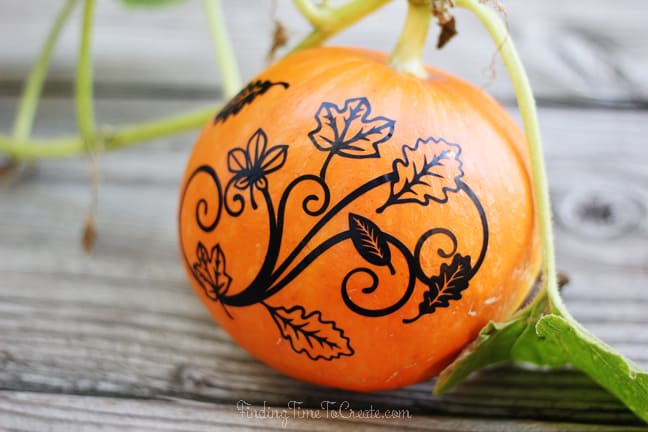
Here’s one last view of my little pumpkin, in all its viney glory. 😉

Silhouette Designs Used:
Leafy Fall Flourish (Design ID# 93153)
Fall Leaves (Design ID# 93518)

Wow! I’ve seen vinyl on pumpkins, but had no idea how the look was achieved. (I haven’t worked with vinyl except the one time on a display board.) I appreciate your tutorial. I love how your one and only home-grown pumpkin turned out! Thanks for sharing.
Thanks, Dawn!
Your pumpkin is so cute! Thank you for sharing the “how to” on applying vinyl on a curved surface.
Thanks, Marilyn, and you’re welcome! It can be pretty tricky to do so I thought the tips would be helpful. 🙂
I am going to do this.
I bought the pumpkin and I am going to use the same design as you.
I love how it turned out.
I am going to give it to an elderly couple across the street.
She has stairs to their front porch, and has two (boy and girl) scarecrows sitting on the steps.
So, this will look amazing right there.
Best part????? It is facing our house, so I get to see it all the time.
LOLOL
I do have a quick question.
How did you measure to know how big or small to go on the face of the pumpkin?
I would rather go too big? Too small?
I too want to say thank you for the tips.
I have had your blog letter in my inbox but hadn’t read it, just knew I wanted to do it.
As I was driving home from the pumpkin patch, I was thinking “I will have to “Google” curved surfaces for vinyl”
Thanks again.
**U**
Nance
That will be wonderful! You can both enjoy it. 🙂 I kind of just guessed for the size. I measured my pumpkin’s main visual area with a fabric tape measure and decided based on that. I had about 5-6 vertical inches to work with and about 7-8 horizontal inches; my design ended up about 5.8″ h x 7.7″ w. Probably OK to go a little bigger horizontally, but you don’t want to run into the stem or have the design go under the pumpkin, so your vertical measurement is probably a little more important.
Thank you my dear…..I will let you know how it works out.
**U**
Nance
Ok it all worked out just fine. Really really great.
I had black vinyl but went with the dark brown.
I used the exact design and placement of yours.
It was perfect.
I did take it across the street to the sweet people there.
They loved it.
They have people in from out of town and are putting it as a center piece on their table.
I kinda of measured a rough measurement for the pumpkin then….decided to cut it out of plain paper to see how the size was.
Made it a bit smaller and worked out great.
I don’t know what was up with my vinyl.
It weeded beautifully.
But it wouldn’t stick to my transfer paper, without it leaving a light layer of the paper.
It took forever to get that off.
I have had my vinyl for a few years, so I don’t know if it was old or what.
But…….so happy with doing it, and how it turned out
Thank you so much for the idea and the layout of the design.
My friends think I am a rock star.
LOLOLOL
**U**
Nance
You are a rock star, Nance! I’m glad they liked it and that it turned out so well. It sounds like your blade thickness setting may have been just a little too deep for that particular piece of vinyl if it was pulling up a thin layer of paper backing.
I do come across small variances in vinyl based on brand, age, or even color. I try to do a test cut with an intricate shape for each vinyl project before committing a large piece, but I don’t always remember and most of the time no adjustments are necessary. So happy you did this project!
I have a bunch of vinyl in 8×11 sheets- zebra print. I want to put it on a pumpkin. How do I do that and get it to lay flat?
What a great way to use patterned vinyl! The tips to get it to lay flat are in the tutorial above.