UV Fabric Inks Tutorial
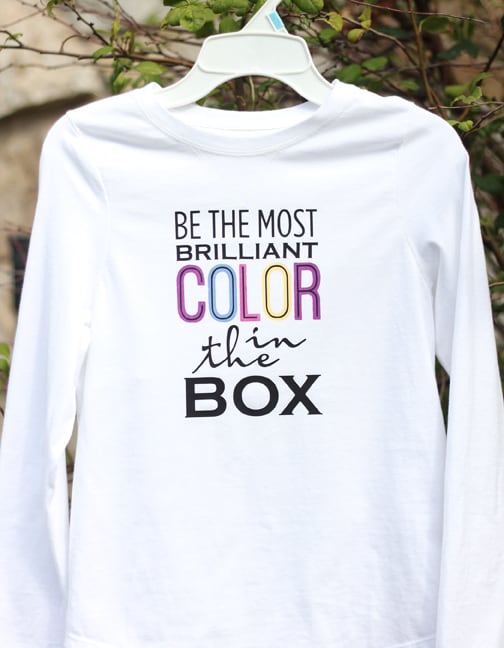
Here’s the step-by-step tutorial I promised for making this shirt with Silhouette UV light-sensitive fabric inks and smooth heat transfer material. I used my Silhouette Curio, but you can do this project with a Portrait or CAMEO as well.
Are you ready? You can do this project in 20 steps and less than an hour.
To prepare the design in Silhouette Studio (approximately 5 minutes):
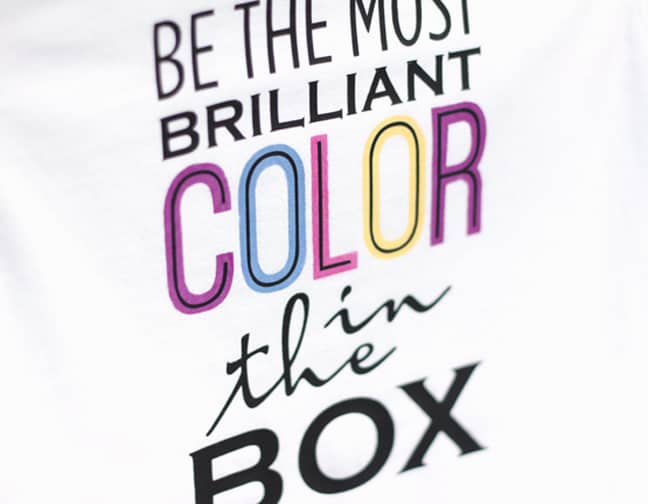
- Open the design: Be the most brilliant color phrase. Our end goal is to separate the skinny inner letters from the larger offset of the word “COLOR” because they will be cut from two different materials.
- Ungroup and delete all but the clear (red outline) portions of the design; you won’t need the colored parts this time.
- Select the full design, right click, and choose release compound path. (You’ve just released the centers from all the letters and disconnected every piece, but we’ll fix that later.)
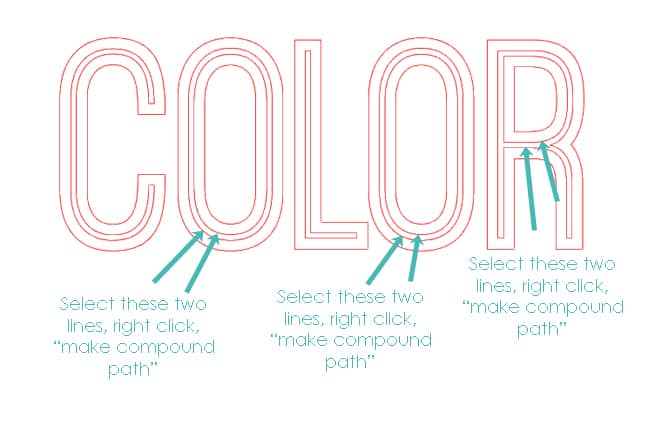
- Zoom in on the word “COLOR” so we can break it into the components we need.
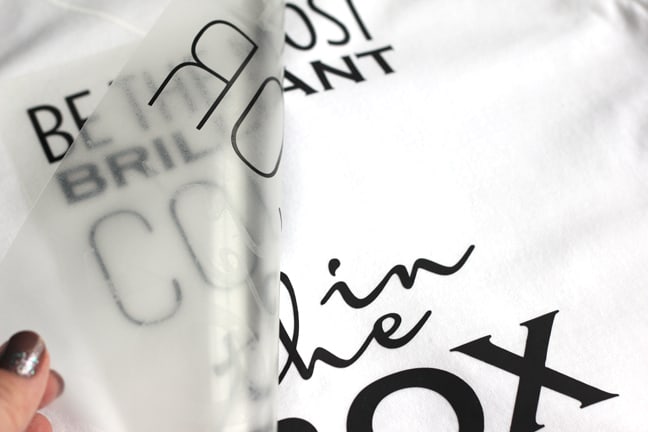
- The C and the L of “COLOR” are ready for us to grab the inside portion, but we need to convert parts of the O’s and the R so they are not just stacked shapes. Follow the image below to select the two lines that make up the skinny inner letter and convert each to a compound path (a single layer instead of stacked layers). Hold your Shift key to select both pieces at the same time.
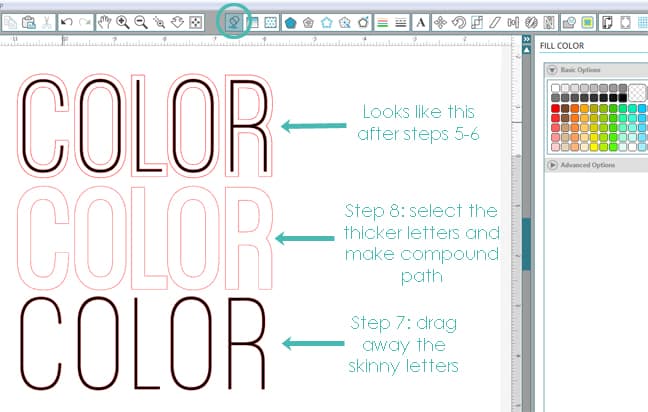
- Select the skinny centers of each letter of “COLOR” (hold Shift) and fill them with a black fill color, then Group (See image below.)
- Drag those skinny black letters away from the thicker offset. Zoom out and in as necessary.
- Select all of the thick “COLOR” letters (make sure you include the insides of the O’s and R), right click, and choose make compound path . (See image below.)
- Position the skinny black letters back inside the thicker offset so they go back to their correct place in the full phrase. The two sections of the word “COLOR” should be in their place with the rest of the full phrase.
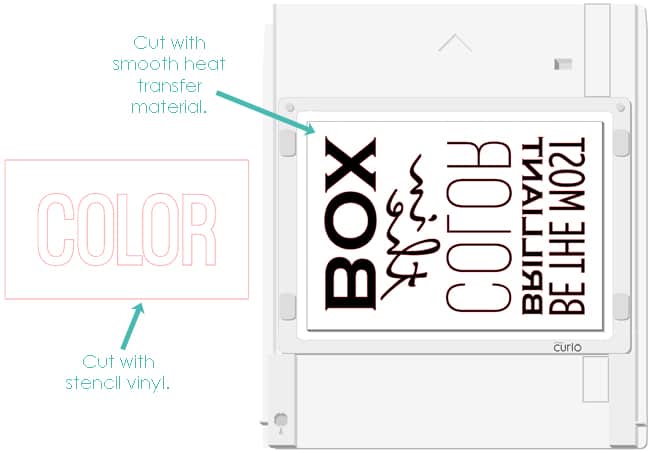
- Once you’re happy with the position of the whole phrase, drag away the thick offset “COLOR”, leaving the skinny black letters behind. The thicker “COLOR” word will be cut from stencil vinyl.
- Select the entire phrase “Be the most brilliant color in the box” (excluding the portion removed in step 10). Right click and choose make compound path. Finally, Fill with black. This will be cut from smooth black heat transfer material.
The hard part is done! Now everything is ready to cut and apply to a white T-shirt.
To Cut (approximately 5-10 minutes):
- To cut the heat transfer phrase on the Curio, Rotate it 90 degrees, mirror the image (right click, choose flip vertically), and Center it on the Curio mat (Align Window: Center to Page). You can also, of course, cut this with the Portrait or CAMEO.
- Place your heat transfer material, trimmed to 8.5” x 6” onto the cutting mat, dull side up and shiny side down. Curio users: when choosing smooth heat transfer material in the Cut Settings Window, you will see that it suggests a platform of 6. Use two of the #2 platforms, one of the #1 platforms, and your regular Curio cutting mat (which is a #1 platform).
- Cut the heat transfer material with suggested settings and weed away the excess.
- Cut the offset word “COLOR” from stencil vinyl, leaving at least a 1” border on all sides of the word so you can avoid getting paint outside of the stencil area. Be sure to change your blade settings for vinyl in the Cut Settings Window. (I cut stencil vinyl with my Curio using Blade 2, Speed 8, Thickness 5. Same platform combination as above.) Weed away only the letters, leaving the vinyl background and letter centers as a stencil.
To Apply (20-30 minutes, more or less for dry time):
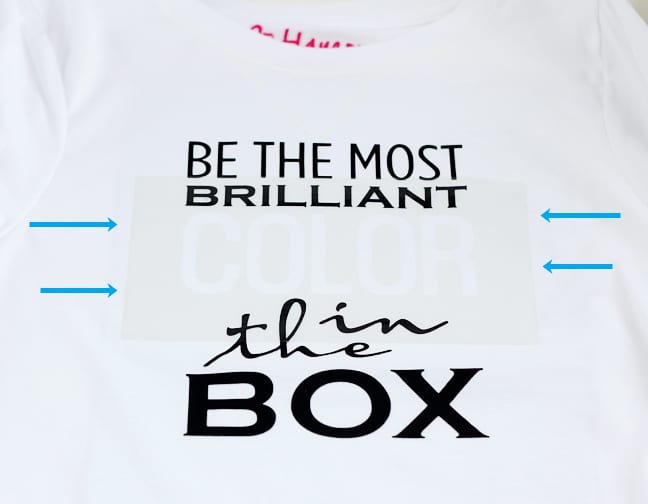
- Here’s my trick for keeping everything positioned nicely, even though the skinny word “COLOR” will be applied AFTER the fabric ink has been stenciled on. You just have to be careful when ironing. Iron ONLY the top and bottom of the phrase. Do NOT iron down “COLOR” yet. Once you are sure the top and bottom portions of the phrase are well-secured to your shirt, peel away the heat transfer backing, which will still have “COLOR” attached. Save that until Step 20 once the fabric ink is applied and dry.
- Using transfer tape with the stencil vinyl, position the “COLOR” stencil vinyl into position between the black phrase on the shirt. Remove the transfer tape.
- Use a sponge applicator to apply the UV light-sensitive fabric ink to each letter. (Place something inside the shirt like a piece of cardboard to prevent bleeding through.) Any of the UV ink colors would look great on their own, but I went for maximum impact and used all four colors. Tip: Use masking tape to cover adjacent letters if you are worried about keeping your paint exactly inside the letter in which it belongs.
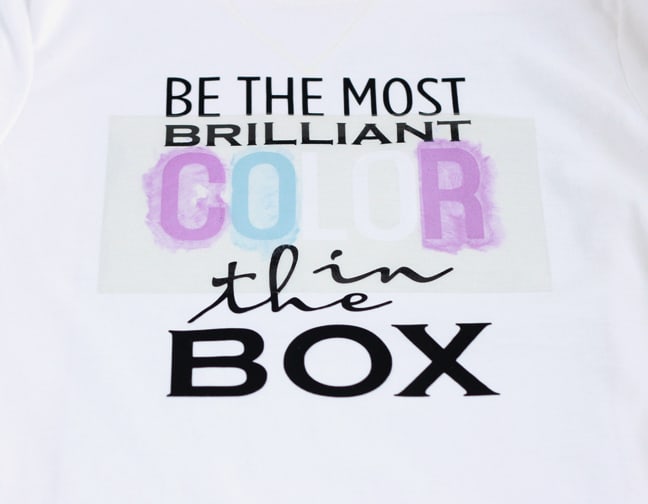
- Let the fabric ink dry completely before going on to the last step. This is how faint the colors are when indoors and away from sunlight.
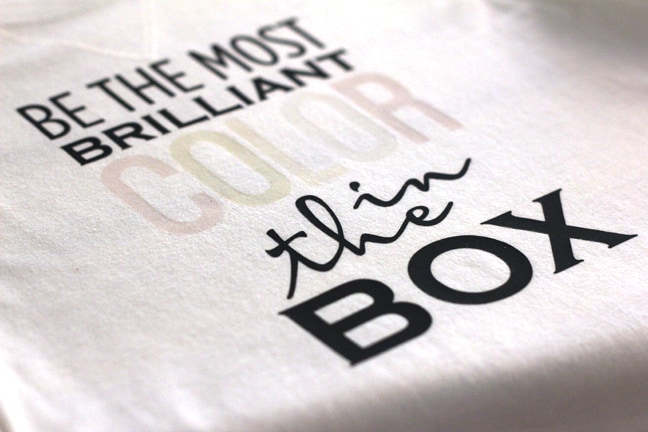
- Iron the remaining heat transfer material on top of the stenciled letters and step outside into the sun. The colors pop out in mere seconds!
In case you are wondering how these UV fabric inks behave on a variety of background colors, I tested that for you. I tend to do that. 😉 I think it looks best on white, but it also shows well on medium colors. On black backgrounds you need to apply a layer of white fabric ink first (my black swatch has a row that’s applied on top of white and a row directly on the black background).

Designs used:
Be the most brilliant color phrase (design ID #74105)
Products/tools:
Silhouette Curio
Curio cut mat 8.5×6
Black smooth heat transfer material
Stencil vinyl
UV light-sensitive fabric ink
