Kids’ Church Bag
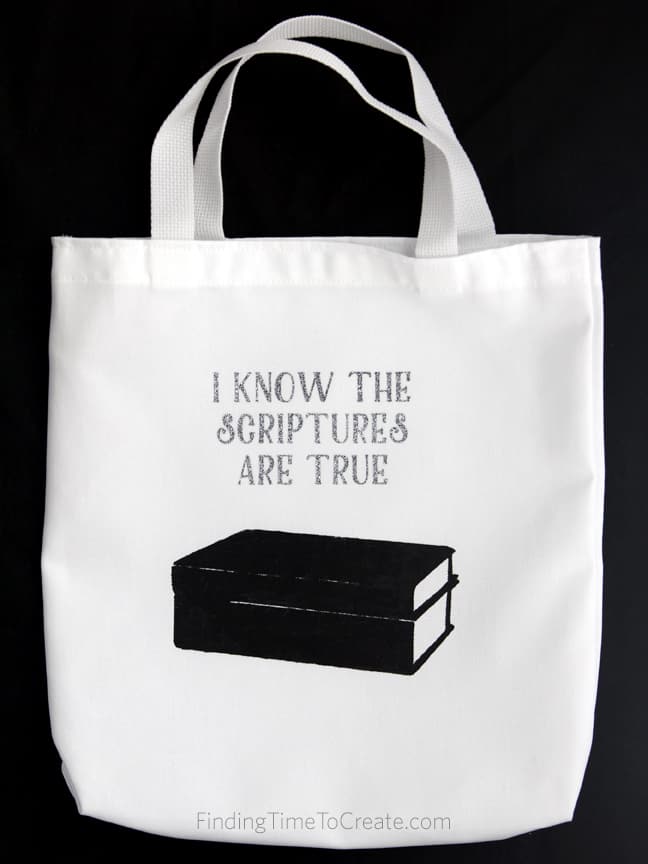
I’m doing a little 10-minute presentation tomorrow at our LDS Stake Relief Society conference. The theme is “Delight On the Sabbath,” so I chose to share a kids’ church bag idea. I’ve created a free design with the LDS 2016 Primary theme that can be applied to a plain tote bag.
Below, you’ll find instructions for using my design to decorate a tote bag with heat transfer material or fabric ink. I’ve also included links to download this free cutting file and printable template.
Here are the supplies you’ll need to make the bag (contains some affiliate links):
- Plain cotton tote bag (I found mine at JoAnn’s, or find similar tote bags from Amazon). Mine is 13.5″ x 13.5″ x 2″, so something close to that is good.
- Something to decorate the bag, like acrylic paint and a vinyl stencil/mask, fabric ink, heat transfer material, etc.
- Tools for your chosen medium, like a hook tool for weeding and/or a foam paint applicator.

You can decorate the church bag several ways, depending on what you have available for your use. Here is the free design I’ve created for you:
Silhouette machine owners: Silhouette Studio cutting file
Other digital cutting machine owners (if able to use SVG files): SVG cutting file
To print then cut by hand: Printable PDF
The digital cutting files come with one image as you see on the bag, and one image in reverse. The reverse image is to be used if you use heat transfer material. The regular image is to be used if you use vinyl or other stencil material as a mask for fabric ink or acrylic paint.
I used heat transfer for the text in my samples and fabric ink for the scriptures. You’re welcome to mix mediums like I did, or do it all heat transfer or all stenciled fabric ink.
Heat transfer:
1- Cut image in reverse with the glossy side down.
2- Weed the excess.
3- Iron on to the fabric tote with cotton settings and a thin cloth or paper between the iron and the heat transfer. (Note: this type of canvas shrinks a lot when washing! Either wash and iron the bag before using heat transfer, or do not plan to wash the bag after applying heat transfer.)
4- Once the heat transfer material is sticking securely to the bag, remove and discard the clear transfer piece. (If the heat transfer pulls up while removing the clear transfer backing, keep ironing until it sticks. I usually let it cool a little bit but pull it up while still warm.)
Iron-on heat transfer comes in lots of colors and textures (smooth, glitter, flocked). I think glitter is my favorite. Look at that sparkle!
Check out my Silhouette heat transfer and vinyl classes here.

Vinyl mask:
1- Cut the image out of vinyl (any kind–the uglier the better, because it will be thrown away when you’re done). The vinyl should have plenty of room around the edges of the design so your paint doesn’t go over the outside border. For this scripture design, your vinyl piece should be about 9-10″ wide by 6″ high.
2- Weed away the excess (including the book shape–you want to keep the outer edge and the skinny little lines and book ends as a mask).
3- Use transfer paper to pick up the vinyl so you don’t lose any of the inside pieces.
4- Place the vinyl on to your fabric and rub so the vinyl sticks well to the fabric.

5- Carefully remove the transfer paper.

6- Place a piece of cardboard inside the church bag so paint doesn’t leak through to the other side.
7- Use a foam applicator to apply fabric ink or acrylic paint to the unmasked part of the vinyl design. Use up-and-down motions so the paint doesn’t creep under the edges of the vinyl.
8- Once dry, remove the vinyl, and the scripture design will be there on the fabric. Don’t worry if it looks a little rough. The lines are really there just for a highlight, and this is a handmade piece, after all! If you want really crisp lines, use heat transfer material instead.

No cutting machine? Here’s the workaround (using vinyl):
1- Print the PDF (link above) on plain copy paper. (You may not want to cut all the letters by hand, but the scriptures portion can be cut with a craft knife.)
2- Tape it to the top of a piece of vinyl. (Note: Con-Tact paper is an adequate substitute, but it’s pretty easy to find good vinyl these days at craft stores and vinyl sign-supply shops.)
3- Use a craft knife to cut the thick lines of the scriptures as indicated on the template.
4- Discard the center piece (the scriptures), saving the book ends and tiny highlight lines.
5- Remove the backing from the remaining vinyl and place the vinyl on to the tote bag. You will have to place the loose book-end pieces by hand.
6- Once the vinyl is secure, follow steps 6-8 in the “vinyl mask” instructions above.
Tip for involving kids: You can use all sorts of shapes to cut out of vinyl and use it as a mask. Once the vinyl mask is on the fabric, it’s a great kids’ craft to have them apply the paint to their church bag themselves.
I hope you enjoy this free design! My husband’s 7-8 year old kids in his primary class will be getting these bags for their birthdays this year.
This post contains some affiliate links. The cost to you is the same, but I may get a small percentage if you use my links. Thanks for supporting me!
