Metal Etch Butterflies
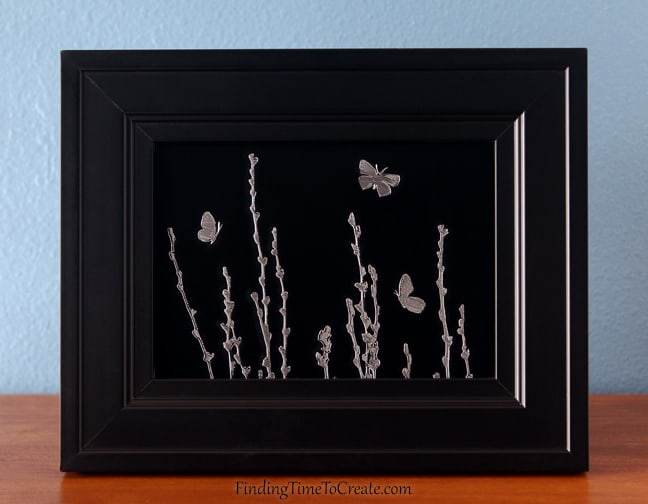
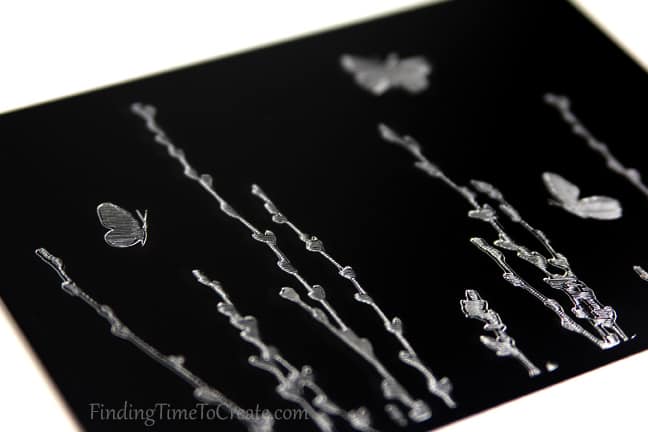
I love how this metal etch project turned out on this black metal sheet! In case you missed my original post on the Silhouette Blog, I’ve got a step-by-step tutorial for metal etching with the Silhouette Curio here. Read on!
Here is what you’ll need to create this project:
- Silhouette Curio™
- Silhouette Curio™ basic base and cutting mat (8.5 in. x 6 in.)
- Curio 5 in. x 7 in. metal etching sheets
- Curio stippling & etching tool
- 5 in. x 7 in. frame
- Butterfly field (design #42668)
1 – PREPARE YOUR DESIGN
In the Design Page Settings Window, set the Page Size to 7 in. wide and 5 in. high to match your metal etching sheet. Make sure your Cutting Mat is also set to Curio (cut) 8.5 x 6 in.
Choose a design you wish to etch. I chose butterfly field.
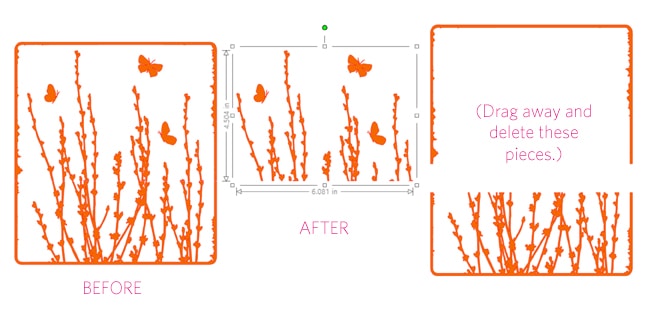
Because the design is a different shape than the metal sheet, I resized it to approximately the correct 7-inch width, then used my knife tool to cut away the bottom portion. (It’s best to make your design a compound path before slicing. Select the design, right click, choose Make Compound Path.)
- Click on your Knife
- Set it to Straight and Treat Unfilled Shapes as Solid. (Designer Edition and Basic Edition both have these two important options, but Designer Edition has a few more knife features.) Your designs must be closed shapes to use the emboss fill, which is why we chose the Solid
- Click and drag your knife tool across the design to cut off the unneeded portion. (Hold the Shift key while dragging for a perfectly horizontal line.)
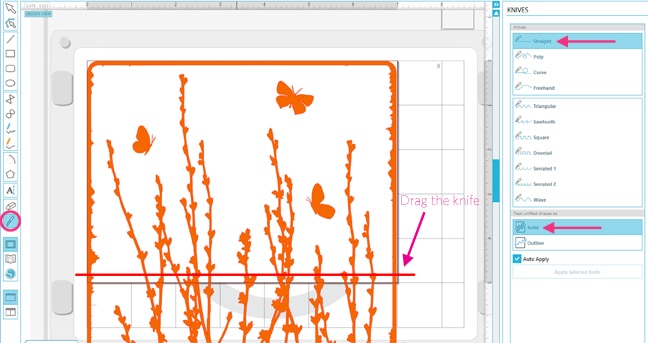
Drag away and delete the extra pieces. Group the remaining design you wish to etch. (See below.)
2 – CHOOSE AN EMBOSS EFFECT
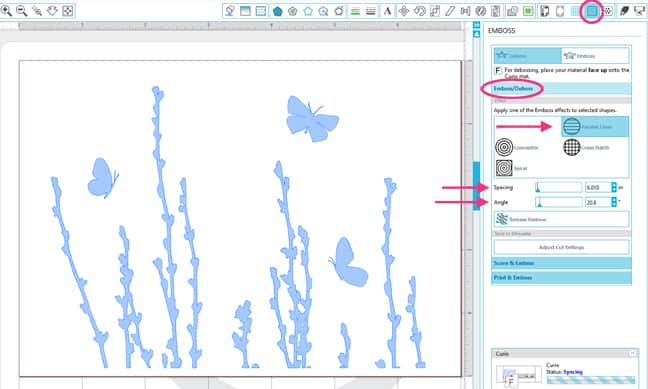
To etch out the design, choose an Emboss effect. In the Emboss Window, under Emboss/Deboss, choose an Effect. I chose Parallel Lines, reduced my Spacing to 0.010 in. (you can type the numbers in if your slider doesn’t go as small as you wish), and on this design I also adjusted my Angle to 20.8°. (These effect settings are all personal preference, so don’t be afraid to change them to what works for you.)
3 – CHOOSE CUT SETTINGS
In your Cut Settings Window, set Tool 1 material type to metal etching sheets.
You will need to place platforms 2 + 2 + cutting mat onto your base, with the metal etching sheet placed on the mat exactly as you see on your work page, and insert the blue stippling/etching tool into the Curio’s Tool 1 holder (look for the red circle).
TIP: You should use a sticky mat, or the metal could slip on your mat while etching. Another option is to choose the emboss mat instead of the cut mat, because it tends to grab the metal a little better.
4 – SEND TO SILHOUETTE
Load the base into the Curio, click Send to Silhouette, and watch it etch!
TIP: Gently blow away the bits of metal, and if you choose to brush away the metal “burrs” off the finished design, please make sure you don’t rub them against the uncut surface or you might get light scratch marks on the metal sheet.
Add the etched metal piece to a frame and admire your beautiful artwork!
Questions? Please ask!
This post contains affiliate links. It won’t change your price, but it helps you by getting exactly the product I used, and it helps me by giving me a little kickback. Win-win. 🙂

Thank you once again. I’m learning so much. I received lots of bits for Christmas and birthday, now thanks to you I’m learning how to use them. Learnt so much more in the last 4 months than I ever managed with my Craft Robo.
I’m so happy to hear that, Chris! Creating is so much more fun when you feel like you know what you’re doing and when the available technology doesn’t hold you back. 🙂
This looks beautiful! Really great on black 🙂
Thanks, Terrie!
🙁 I just attempted to do a very similar pattern with the same settings you used here, but my blade just wiggles in a hole in the same spot.
Any ideas on what I might have done wrong?
Sorry to hear that, Brenda. First, make sure you are not using too many platforms. The etching tip should only go deep enough to scratch the surface. Other than that, I suggest sending an email to support@silhouetteamerica.com to see if they have further suggestions (and to let them know there is a problem). I have had a couple of times where my etching did not behave, and Silhouette needs to know when there are issues.
Thanks Kelly … I figured it out this morning .. I don’t actually have the etching sheets, I was using the stippling metal sheets, so that was the problem. My husband had bought me the curio for Christmas, along with odds and ends of goodies to go with it, and I assumed it was the etching sheets, but it wasn’t. Hence the problem!
I attempted a stippling project this morning, and it went mostly ok, I think I used to intense of a design for the amount of stipple I specified, so I still had a few problems, but I know the path I need to go down now at least! 🙂
Ah, I’m glad you figured it out! Yes, there’s a bit of a learning curve with the Curio and new materials, but I’m glad to hear you’re diving right in and continuing on so those little problems don’t hold you back. You go, girl!