Fuzzy Vinyl Monogram Tutorial
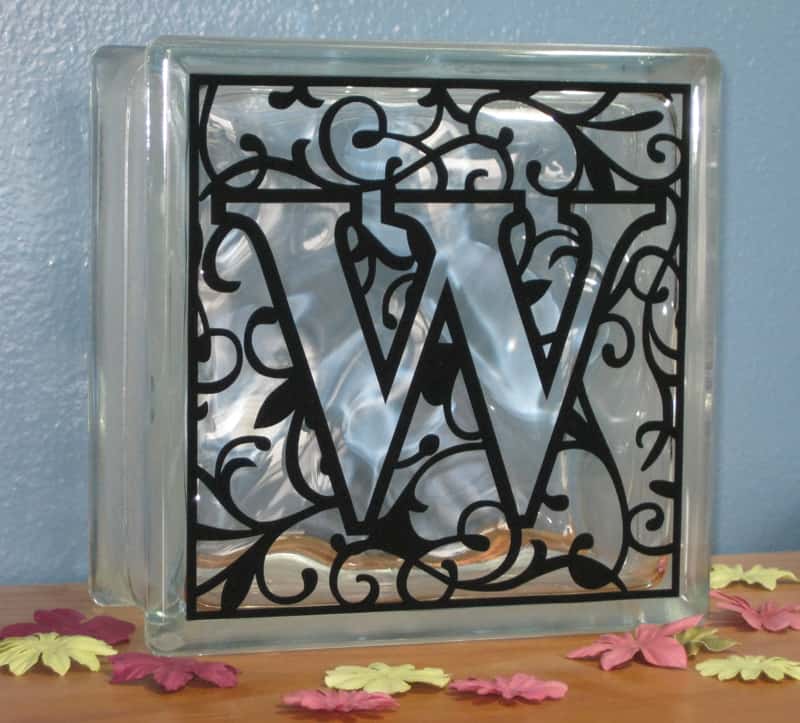
I am so thrilled to show you this! This is the project I worked on in December before getting to my Christmas cards. This is fuzzy vinyl on a glass 8×8″ shower block. I finally made one for myself.
My sister-in-law wanted to make these for her family and I figured I could get the Silhouette to do it. She had an example with regular vinyl on a shower block, with the W monogram and a different design. So I got to work designing. It was not as easy as I thought it would be, but after hours and hours of trial and error with the “modify” tools in Silhouette Studio software, I feel like I’ve finally got a better handle on what those tools will and won’t do.
I’ve made instructions to make your own background pattern square with a welded letter outline inside. Keep in mind that not all designs will work exactly like this, and you have to be working with the Silhouette Studio software. For this block I purchased the “design block flourish” shape, and used “Perpetua” font, turned bold and stretched to fit. Are you ready?
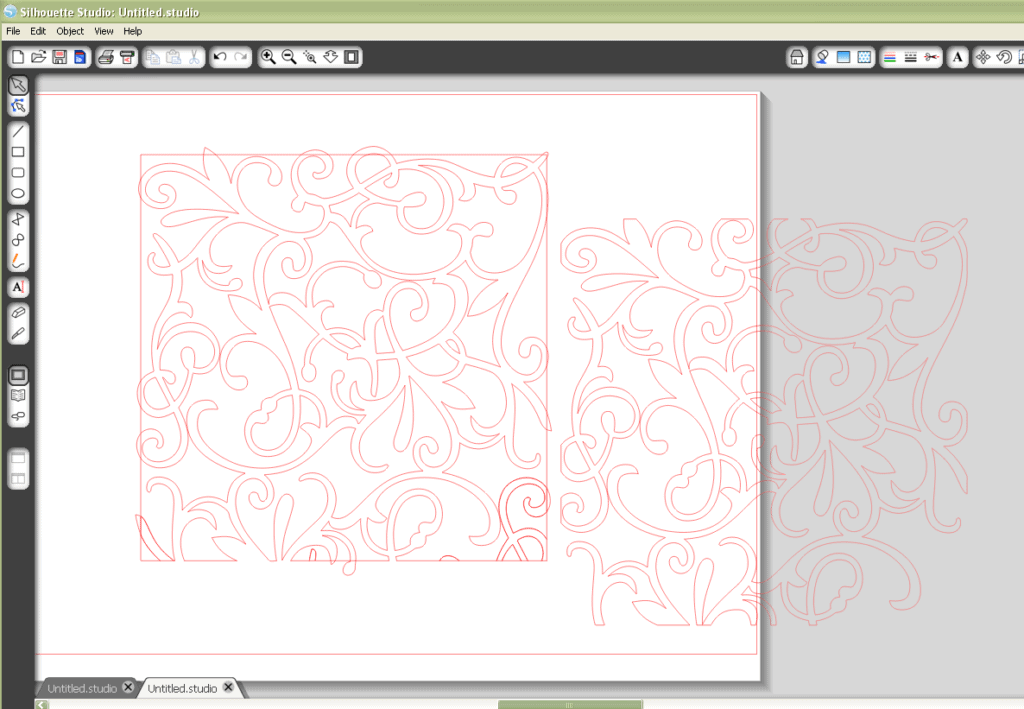
- Step 1- Create your own pattern block by taking an appropriate design, duplicating it enough to fill an 8×8″ area, arrange enough for the shapes to slightly overlap, and “weld.” (You could spend quite a bit of time doing this.) Remember, not all shapes will work for this–you may lose your holes in the design.) Save before moving on.
- Step 2- Select all of the pattern and choose “make compound path.” I’ve found that this makes the computer “think” less for the next steps.
- Step 3- Draw a symmetrical 8×8″ square so it overlaps around the edges of your pattern. You may need to resize your pattern so it fits nicely.
- Step 4- Save your work so far. Select it all and choose “divide.” (My computer needs to “think” for a minute when I use the complex modify tools, so be patient if yours does too!) Once that function is complete, you should see darker lines inside the square. That’s because there’s now a duplicate shape stacked on top of your design within the square’s boundaries.
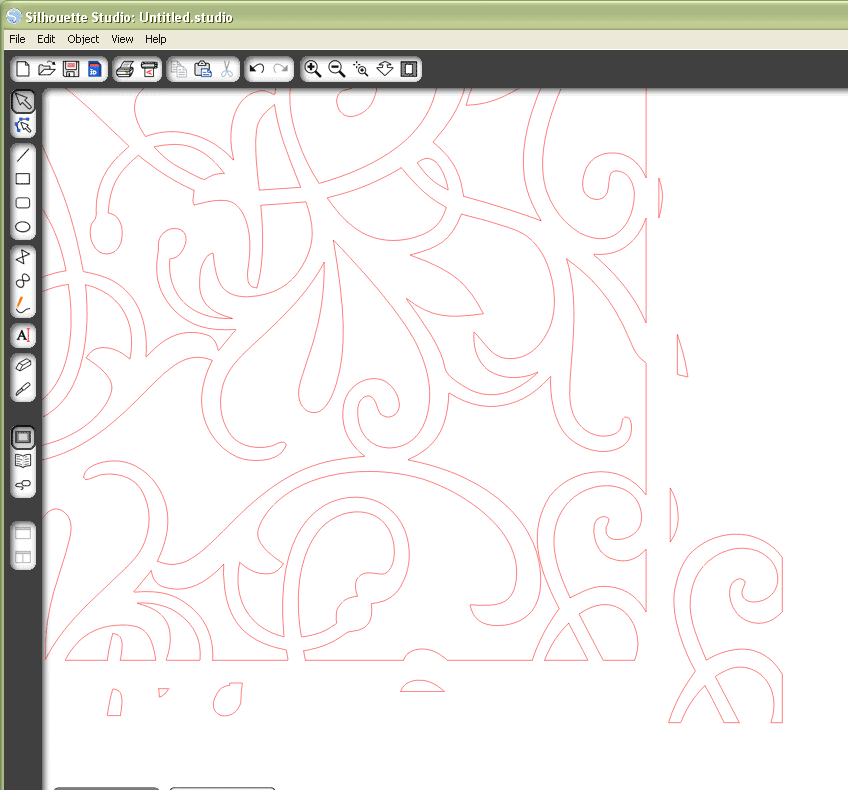
- Step 5- Pull away and delete all the pieces on the outside of the square. There is also one large shape (and maybe small ones) on top inside the square to pull away and delete. To find these, click on and pull away any dark red lines inside the square. Go along all the edges of the square and pull away any tiny shapes extending beyond the square that make the square’s edges. You want your square to have “chunks” out of its sides.
- Step 6- Save your work. Select all and “make compound path.”
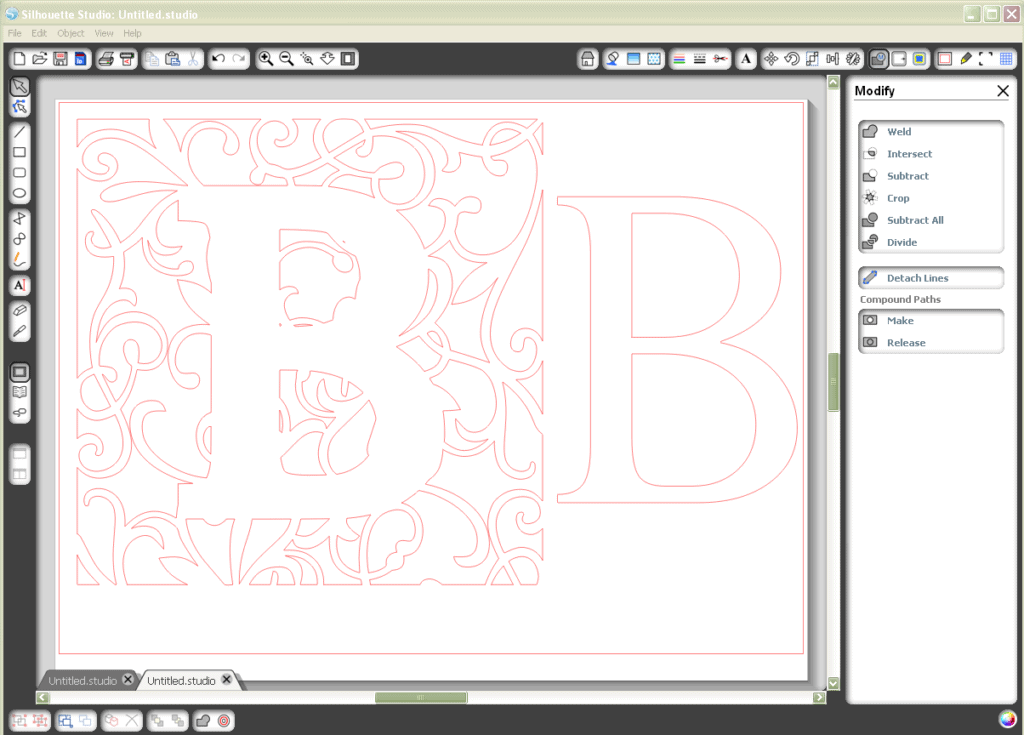
- Step 7- Away from the square, create your monogram letter with a font you like. I used Perpetua. Stretch it to fill a good portion of the square; don’t go all the way to the edges because you will be applying an offset. Apply an offset with the corner option, approximately .20″.
- Step 8- Move the offset only over the pattern block. (Don’t group.) Select the offset and the pattern. In your modify options, select “subtract.” It should look something like this:
- Step 9- Select the whole pattern with its “hole”. Make compound path.
- Step 10- Move the letter into its place in the pattern block. Make a symmetrical square around the pattern block, leaving about the same border width as the letter’s offset. Select the square outline and the pattern block (not the letter itself). Go to the Align window and select “centralize.”
- Step 11- Adjust the letter as necessary to leave an even border. Select all and group together.
For this 8×8″ shower block, I resized my completed shape to 6.8×6.8″ and it fit perfectly within the molded borders. (My local Home Depot didn’t stock the glass blocks, but my Lowe’s had them for only $4.98 each!)
Now we’re ready to cut. Cut an 8″ strip of fuzzy vinyl, and I always use my cutting mat because my machine seems to cut deeper than average. Select fuzzy vinyl as your medium. I have to adjust my thickness, but still use the recommended pink blade cap. Once it has cut and you unload it from the machine, don’t panic because it looks like it didn’t cut. That’s just the fuzzy vinyl. As you look from behind and manipulate and bend the backing, you’ll see where to pull and weed the excess pieces.
Once all you have left is your shape to be applied to the glass, DO NOT get out a fresh piece of transfer tape. You’ll never get it off your fuzzy vinyl. Either use a well-used and very low-tack piece of transfer paper, or several long strips of Scotch tape. I put long strips of Scotch tape diagonally and across all the vinyl and it was quite easy to get it off the backing and applied straight to my glass block.
Edited to add: Clear Contact paper works as transfer tape on fuzzy vinyl, but you still need to de-tack it by dabbing it on your clothes before putting it on the fuzzy vinyl.
There you have it. It’s definitely easier to buy a background pattern from Silhouette, but if they don’t have what you want or your project needs to be unique, then I hope these instructions help you. I apologize if it doesn’t work for your particular project. Leave me a comment if you still have troubles (or I’d love to hear if you try it and it works).
One more point I want to stress: Save often, especially before clicking any Modify buttons. My computer froze up so many times as I’d try something and undo multiple times. Eventually it would stop working and I’d have to shut down the program, only to lose all my work. But doing the same steps over and over sure helped get the process right!
I’ve already almost finished my next design. I’ve embedded butterflies into a different pattern to put up in my girls’ room. Here’s the framed butterfly vinyl.
Update: I’ve now got a video tutorial for a similar project using this flourish shape and the Modify tools in Studio. Check it out HERE.

Hi! I found your blog through Silhouette's Flickr and the photo that you had posted! Your directions are easy to follow along and I hope to try this out soon! Thank you!
You're welcome, Heather! Let me know how it turns out. 🙂
This is BEAUTIFUL!! I love the flourishes you used and thank you for the detailed directions – I'm gonna be giving this a try too 🙂
Just found your blog, you have some really great ideas. This block is beautiful. I hope to use some of your tips soon. As my Silhouette is packed away right now since I am in the middle of a move. The picture at the top of your blog is neat is that kinda how you have your room organized. I am going to finally have an area to scrap in that isn't also another room like the dinning room table. 🙂 was wondering if you have some tips in putting together a scrap room or organizing it. Thanks can't wait to read more. Loving all of your blog.
Breanne,
That is a good idea for a future post. I have my own room for scrapbooking but it's coming together very slowly. My husband does woodworking for a hobby so he's building my furniture, but it gets done a piece at a time, months or years apart at this point. 🙂 That's my messy "creative genius" work table on my blog header.
This is wonderful Kelly! I am hoping to try this once I become a bit more familiar with my SIL ——- I am still a bit intimidated by it, but one day I will definitely be trying this. Thanks so much for sharing your tutorial.
You really should try it! It's the best way to learn and get over your intimidation.
If anyone has tried this project I'd love to hear about it!
This is amazing! What a great idea!! Thanks for sharing!
Your tutorial is excellent! I just made a monogram and you couldn't have made it easier, thank you so much!
Jennifer, I'm so glad to hear it! I'm thrilled you tried this and it worked for you. 🙂
I'm very new to the Silhouette and I'm trying to make this, Would I do it using this method or some other way. Any help would be great. Thanks for all the great advice.
http://www.scribblinsisters.com/zecrinpetu.html
Anna, sorry it took me a while to get to your comment. The new tutorial is here to make the zebra-print cross you're asking about.
I just found your blog and am trying this fuzzy monogram but when I click to divide, my software says it is not responding….and that's that. I know you said yours took a bit, but did it say not responding? I am leaving it up all night and see if it will work through it…I really hope so because I LOVE this block!!!!
Sharon, I often get the "not responding" message in Studio when using the divide function. Sometimes if given enough time it comes through for me, sometimes it shuts down Studio completely.
Make sure you save often and follow the steps exactly. If you're trying to divide a shape that's not a compound path, that's when it has the most trouble.
I just found you and I LOVE your blog!!!! I followed your tutorial and I did it! YAY me (and you, lol) I am going to try this with zebra stripes and see if I can work it so i can do the glass etching process on glass and put it in a frame? I am excited. Thank you for inspiration. 🙂
Shannon, I'm so glad it worked for you! I just made a similar tutorial with the same flourish shape, but for a card front. I think I've simplified the steps, too, although this tutorial still works. My new tutorial is HERE.
Just found your site – Beautiful Block. Thanks so much for the tutorial on it. I can see Christmas Presents with this. Did you put anything in the block? Thanks Sandy
Sandy, I've left this block empty but if you like the filled blocks I'm sure it would look pretty as well. (Just take a look around Etsy for all kinds of inspiration!)
I just wanted to let you know that I found your glass block idea on Pintrest. I pinned it, and made my own. I am a design team member on the Pins to Creation blog and I am featuring your idea there on November 9th. Feel free to come on over and check it out! http://pinstocreations.blogspot.com
Hugs,
Jamie
http://scrapqueen141.blogspot.com
Thanks, Jamie! I'll come visit!
I must be missing something. how is the desing transfered to the fuzzy paper and how is the design cut out? is there a special machine you are using??
Thanks Maggie
This is cut with the Silhouette machine, and designed in the software Silhouette Studio. I used Silhouette brand fuzzy vinyl that is self adhesive.
Okay I finally got it. It was not filling properly and then I realized that I had not deleted the inner square edge and had not made a compound path at the end and then it was magic! Thank you. I will definitely be making a few as gifts and of course one for my own family.
So glad you got it to work in the end. You can see that every little step is important, and so worth it to get it right! 🙂
Thanks for your tutorial on this Kelly! I've been wanting to make this for a long time. I had the original Sil and my kids gave me the Cameo for Christmas, so I decided this was going to be my 1st big project! I used the Design Block Flourish for my background.
Thanks again!
Brenda.
Hooray! And congrats on getting a Cameo. You'll love it!
Hello! Beautiful! Can I ask what font the W is? Thanks
I'm pretty sure it's Perpetua.
thank you it worked great
So glad to hear it! 🙂
I absolutely love this. Would you be willing to send me this as an attachment? I will pay for it. It is going to be as a gift and would love to have this one. please please
Just to clarify, Candas, do you want a completed flourished letter Silhouette Studio file like this so you can cut it out? If so, which letter do you need?
Yes I believe that how you would say it. And W is the letter. Just like the project
Would u be able to do that?
Candas, I just emailed this W monogram file to you. Sorry it took me a bit to get back to you. 🙂
Would I be able to get the Letter W file? I can’t seem to figure this out for the life of me 🙁
Sherry, I’d be happy to send you the W file to cut in Silhouette Studio. Please send me a request via email to kelly@findingtimetocreate.com and then I’ll have your email so I can send it. 🙂
This is beautiful. Do you think it can be cut in Cricut Design Studio? Would you be able to send me the file as an SVG, please? I will gladly pay you. Thanks so much.
Hi Dawn! Yes, I can convert it to an SVG and send it to you. It should work fine in Cricut Design Studio. No charge. 🙂
Dawn, I sent it to you via email. Enjoy!