Tracing Paper Dolls for the Silhouette to Print and Cut
Update 1/26/2014: The instructions below still work, but I’ve made simplified video tutorials on my new blog post Disney Princess Paper Dolls. Please go there first for updated and easy instructions. Thanks!
Original post:
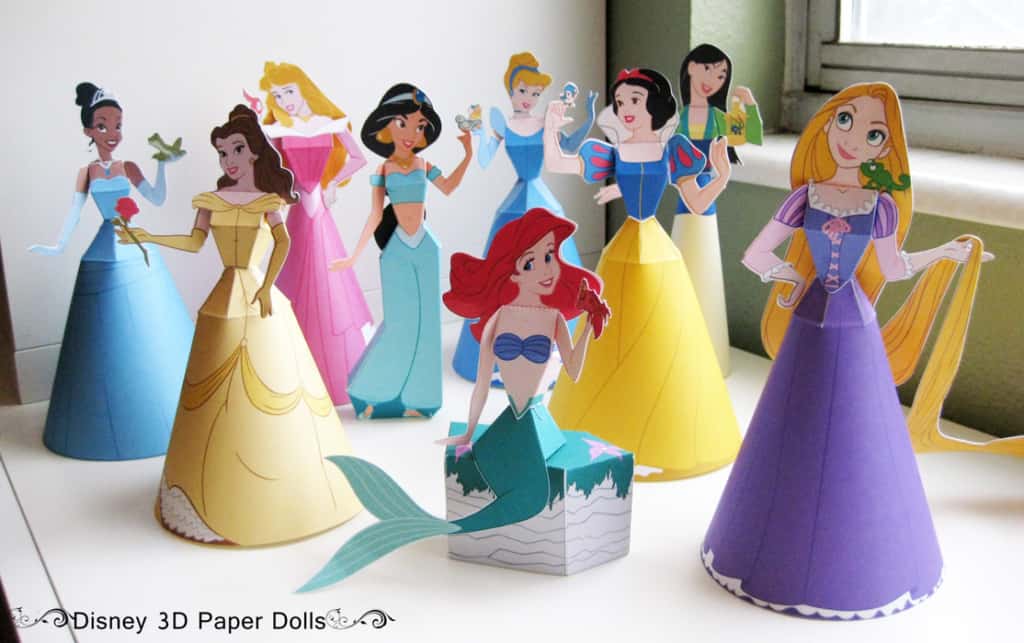
I found these Disney paper dolls from a photo on Silhouette’s flickr site, the CREATIVE place, and they have been keeping me busy and working my Silhouette skills! This tutorial will mostly address the Trace feature and Print and Cut in Silhouette Studio, with some prep work in Photoshop Elements.
I use Photoshop Elements a lot because I love it almost as much as the Silhouette. Hard to believe, I know, but it does make this project simpler. ( I don’t actually know how to convert a PDF file to a JPG or PNG to import into Silhouette for the print and cut other than in Photoshop, so if you know of a way, please let me know in the comments!)
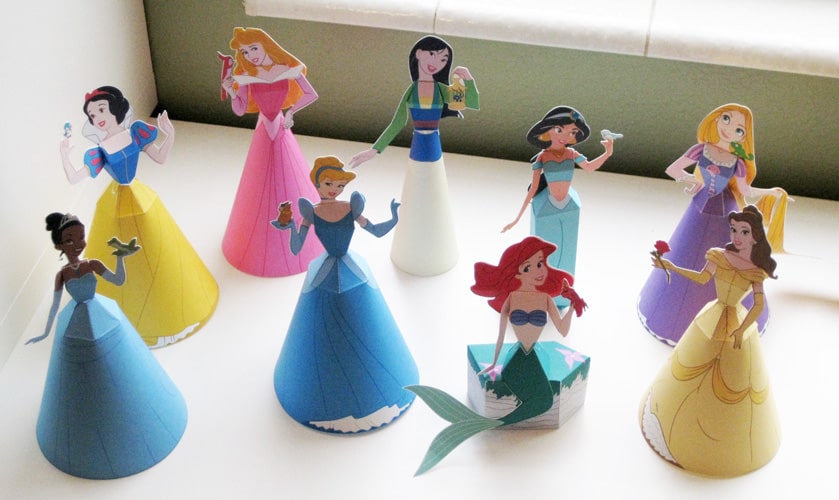
First, download the princesses from Disney’s site HERE. You might need to use their search engine to find all the right ones. They are Snow White, Cinderella, Ariel, Aurora, Belle, Jasmine, Tiana, Mulan, and Rapunzel (9 in all). The files are PDFs with instructions. If you don’t do the Silhouette, they can always be cut by hand…but who wants to do that? Update: They’ve added Pocahontas to the link above, and you can get Merida from Brave here. (Note: If you don’t have a Silhouette machine, just cut out the PDFs from Disney with scissors and skip the rest of the tutorial.)
Second, (here is where I go to Photoshop Elements) open the first page of the princess PDF in Elements. (Snow White and Rapunzel are spread across two PDF pages.) I found Elements to be especially helpful to prepare these princesses for cutting with the Silhouette because it let me separate the pieces (arms, torso, skirt, etc.) and rearrange them to fit on a single page where they would be away from the registration marks. The file even puts them on a transparent background (Photoshoppers know what I’m talking about) so this is really easy to do. Also, it makes prepping the design for Studio’s trace feature much simpler.
As I said, open the princess PDF in Photoshop. Use the lasso tool to select a body part. When you have completed the outline and have the “marching ants” then right click and select “layer via cut.” Select your bottom layer again, then repeat selecting with the lasso tool and cutting the layers apart until each piece is on its own layer. You can clean things up now with the eraser tool so they’re not getting traced later, if you wish. Rearrange the parts to fit closely, then crop the extra background away (keep in mind you’ll need three corners available for registration marks later).
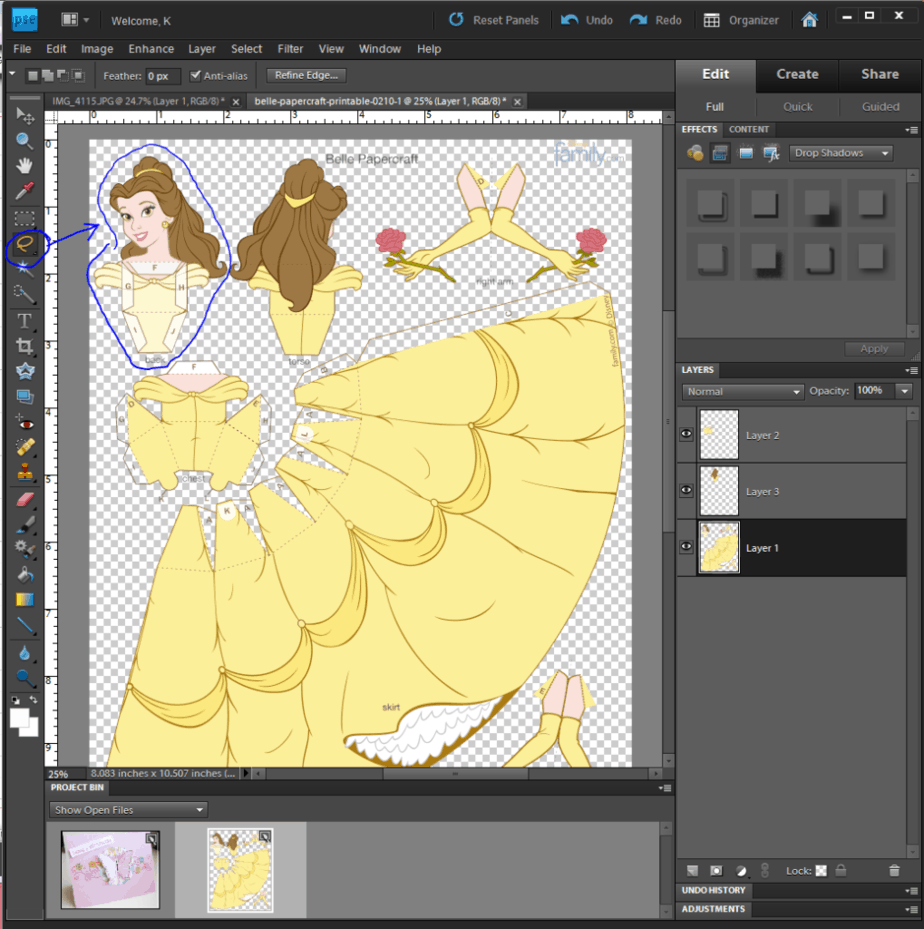
Save your edited file as a PSE document. Then save it again as a JPG document.
Edit: Try saving this and the black-filled JPGs at a resolution of 9 to avoid them opening huge in Silhouette Studio.
Next, in your PSE document, fill each layer with black (Edit>Fill Layer. Options: black, preserve transparency). Use your paintbucket tool to fill voids on the tabs with black, as well.
Now save this one again as a JPG “black filled” name and don’t save your changes to the PSE version. You’ll now have four files for each princess: the original PDF, the edited/separated PSE, the JPG colored version, and the JPG black-filled version. Sounds like a lot, but this makes it easy as we continue.
Now open Silhouette Studio. Open your colored JPG and your black-filled JPG for the princess (you will need to choose the option for “all files” each time because the default is Studio files). This opened really big for me, but we’ll resize them later. I like to use the double-arrow zoom tool here to quickly zoom out and see the entire princess document. Click on the double arrow and position your mouse at the bottom of the document. Click and drag upwards to the top and it will zoom out quickly.
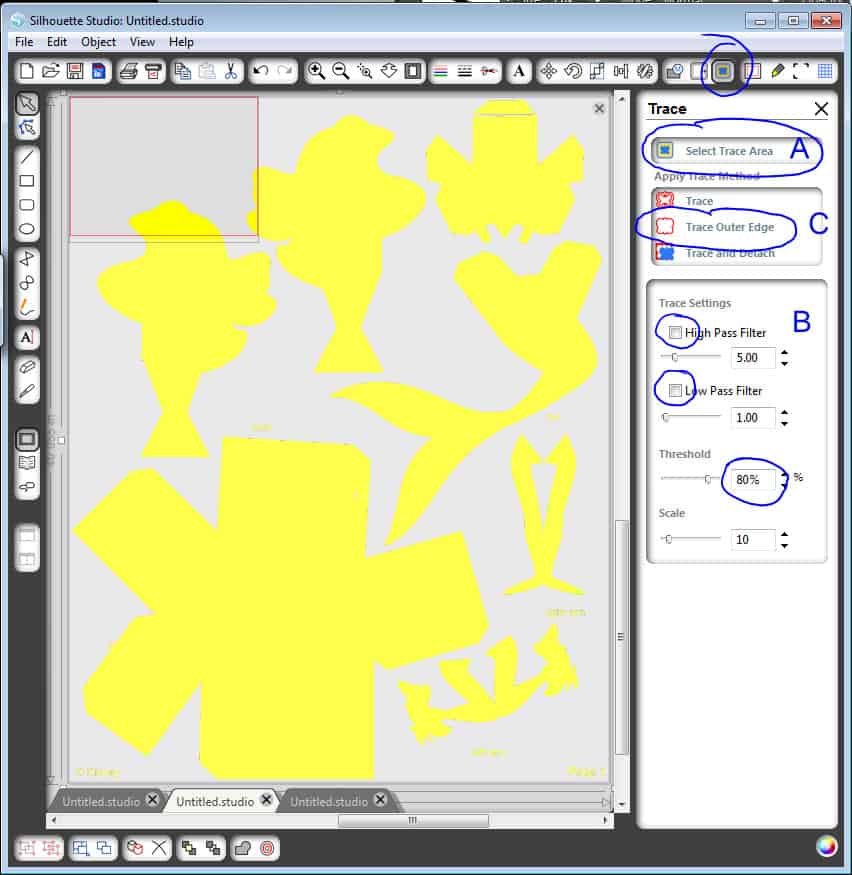
On your black-filled document, open the “trace” window (the button has a blue blob in the middle).
A- Click on “Select Trace Area,” then position your crosshairs in the upper left corner and click and drag across the entire page so all the black pieces will be selected. The yellow that shows up here is what will get traced.
B- Deselect both High Pass Filter and Low Pass Filter and bump your Threshold up (usually 80-90%) so all the black pieces are now filled with yellow. When you do this with a colored document it’s messier to clean up, so this is why I had you make a black-filled version. You will still need to do some point editing to clean it up, so if you can’t get it all to fill with yellow don’t worry about it here.
C- Click on “Trace Outer Edge.”
Next, select your black/white background (I click on a black area then click and drag it away from the red outlines a little so I know I’ve got it selected) and delete it so only the red cut lines you just created remain.
Use your eraser tool to eliminate extra words, etc. that you don’t want to have cut. The closer you zoom in while using the eraser tool, the more precise it will be. The eraser tool does not stay selected so you’ll need to reselect it for each pass you make.
Now we’re ready to combine the cut lines with the colored document. Select All (ctrl-A), Copy (ctrl-C), switch to your colored document, and Paste in Front (ctrl-F).
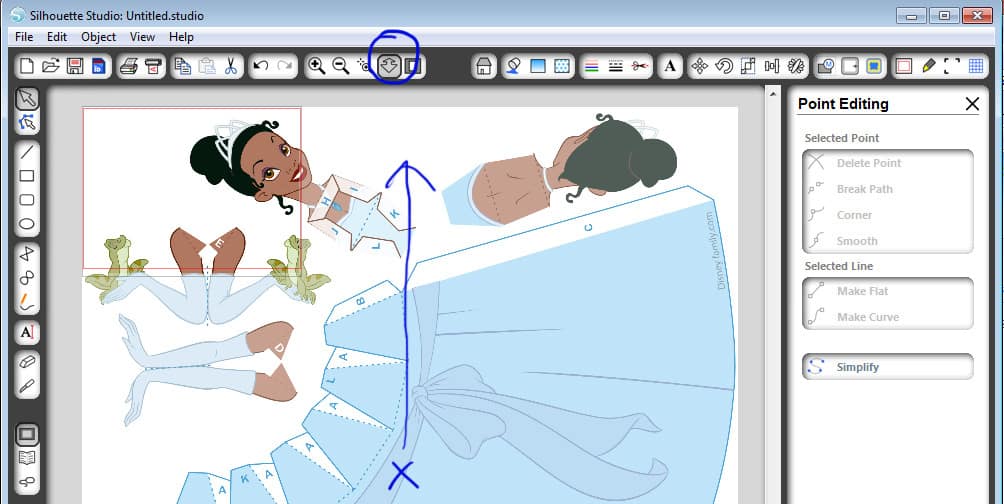
Here is where we’ll clean up the cut lines with individual point editing. You can do this before or after resizing. Click on your “Edit Points” button (left side of the screen, arrow pointing to blue dot-to-dot line). Click on a red cut line and it will show a lot of grey dots. Each one of these points can be moved, deleted, straightened, curved, etc. When you hover your mouse over a point it will show a tiny little arrow. Click and it will turn that point white. Use your options on the right of the screen to edit these points and get them more appropriately positioned around the princess parts you want to cut. Play around a little and you’ll see what you can do. You can even insert extra points. Just make sure you use your “delete point” option on the screen and not your actual delete key on the keyboard!
I’m using the original Silhouette and I’m not sure if it’s better with the SD, but don’t agonize too much over every single point. My machine still gets off a millimeter or two here and there as it cuts, so absolute perfection is too much to ask here. It may seem like a lot if it cuts a little into the princess’ hair and leaves a little extra white on the other side, but once these are assembled and you’re handing them over to a child to play with, you’ll realize it doesn’t matter in this application.
Remember to look at the “Cut Style” Window (scissors button) so you can see in bold red lines where the machine will actually cut. When importing files to print and cut I usually get a rectangle around the outer perimeter that needs to be changed to “no cut.” You should also be able to see any little extra unwanted shapes you may have missed and you can delete them or change to “no cut.”
Now to shrink it all to actually fit on your page. Select All, Group, grab a corner handle, and resize it to fit on the document, registration marks selected. Go slowly because sometimes the cut lines shift away from the picture a little. If that happens, stretch it back and forth a little until the shapes are centered again.
The registration marks have a cross-hatch area where there should be no image touching it. You can switch between portrait mode, landscape mode, invert the marks, and shrink your shapes more to make it fit. Then you need to take your Eraser tool and run it along each registration mark so they will print and not think they are covered by white from your imported pictures.

Ready to print? Load white cardstock into your printer and click your print button. Take the printout with its registration marks and mount it on your cutting mat so the registration marks are perfectly even at the top. If you’re using the cutting mats with a grid this is easy to do by holding it up to a light.
Load your mat into the Silhouette and go to the Cut Settings screen (looks like a yellow-capped blade holder). Use your favorite settings for the weight of cardstock you’re using, and if you’re using the original Silhouette you’ll need to decrease your speed to 2-3 to avoid long pauses in cutting. Any time I edit points or do a print and cut I turn my speed way down on my original machine.
Click on Send to Silhouette. Skip printing since you’ve already done that. Choose detect registration marks (this is the fun part…when it works). When it’s ready and waiting to cut with no error message, click on Cut Page. Now watch it cut while you don’t have to get out your scissors (never mind that it may have been faster by this point to cut it out with scissors. That’s not the point!)
Don’t forget to save this as a Studio document so you can cut it over and over for all the little girls in your life. Open up your original downloaded PDF file for the instructions on folding and gluing. You will need to cut a few tabs on the skirts with scissors unless you create cut lines for them during your point editing. I used Aleene’s Original Tacky Glue (gold bottle–you can find it anywhere) and it worked really well. It stayed wet long enough to position pieces where I wanted them, but dried surprisingly fast.
If you want to make every princess, it will take some time, but I thought this project was well worth it in the end. My girls are glad they finally get to play with the dolls! They change their minds every few minutes as to which is their favorite princess.
This tutorial should help you in taking any PNG or JPG image and turning it into a print and cut. Love this feature of the Silhouette! Let me know if you have questions.

Gosh Kelly!! What a sacrifice for the sake of teaching us. That was a labor intensive tutorial, but so appreciated!! Thank you!
You did an amazing job on them all, thank you for the information and tutorial, oh, the fun!
Thanks, ladies! Creating a tutorial with this project made it a bigger task than I originally intended, but I really hope it helps! I'm glad it's done and the girls can play with their paper dolls to their hearts' content. 🙂
I bet your girls LOVE those.
P.S. I like your butterfly background.
Thanks, Kristin. I made that myself. 🙂
Hi. Would mind sharing the cut file with me? My daughter is having a Belle theme birthday and this would be perfect for me to give to the girls to play. gutierrezyuly81@gmail.com
Thanks
This exercise kind of makes me wish I had a little girl. Although, maybe I will get a granddaughter one day. Thanks for the tutorial, now I wish I had Adobe Photoshop. LOL!!! Job well done!!!
Dona
Dona, I believe the Disney site linked above will also get you to some other shapes, not all for little girls. I think "Up!" characters were on there as well.
Sorry I can't help with needing Adobe Photoshop…it's a program I can't live without! There's always the free trial if you're considering it. https://www.adobe.com/cfusion/tdrc/index.cfm?product=photoshop_elements&loc=en_us
Thanks for a fabulous tutorial! Those paper dolls look so cute – my daughter would love them!
Wow you are so talented with these! Great tutorial. They are adorable! They would be so cute for a themed birthday party! I'm now following your blog. Off to take a peek at more of your Silhouette ideas. (I've recently bought one of these amazing little machines! :0))
Thank you! My daughters are enjoying playing with them. I definitely think they'd be fun for a themed birthday party. (Just start early so you have enough time!)
Hello Kelly!
I went to Disney website, but Little Mermais Ariel's template isn't avaliable anymore.
Can you send the pdf file to me by mail?
Thanks a lot! duda.marcal@gmail.com
Sophie, I sent the PDF to you. Please let me know if it doesn't get to you. 🙂
wow this is incredible. LOVE it. now I just need a silhouette. lol
kathryn
http://www.thedragonsfairytail.blogspot.com
You do need a Silhouette, Kathryn (*wink*), but in the meantime you can still download and print these dolls and cut them with scissors.
Is there any way you'd be willing to share the files you used so that I don't have to go back and recreate them? My daughter's birthday is in a week and it's a princess theme – these would be awesome decorations! I don't have the time (or Photoshop software) to do them by myself before then.
**batting my eyelashes and trying to look pifitul**
PS. I found your pics on the flickr group – they totally caught my eye!
YES PLEEEEASE!!
Tricia, are you asking for the cut files as well? My email address can be found under the "About Me" tab at the top of my blog, if you want to let me know your email address.
I also have a princess birthday party coming up in 5 days. Would you mind sharing the cut files with me? These are so cute and I don't have the software.
Thanks
Nicki
Nicki, please send me an email so I have a place to send them. 🙂
Me too! My daughter's 4th birthday is in a week and I would love to have these for her party! lindzmarie@hotmail.com
Thanks in advance!!
Lindzmarie, I sent you an email.
Love this! I learned some new things on using Photoshop and am new to the Silhouette! Thanks!
Glad to hear it! I think Photoshop is a great asset when using the Silhouette.
I would like to suggest trying inkscape, you can import pdf straight into an svg, break paths apart and ungroup then create a contour pretty easily for cutting on your silhouette, this way you can bypass photoshop. Inkscape also has a trace bitmap function for contour cutting!
Thank you. That's another option; I tend to stick with the programs I'm already familiar with so I don't have to learn another. That will be especially helpful to people who don't already have Photoshop.
My daugther want this… Its so cute
Can you sent me pdf by eamail..thanks
The link to all the PDFs you can download is in the third paragraph above. If you can't get the PDF files from that, please send me an email (see my "About Me" tab above) so I can get your email to send it to you. 🙂
Hi ! i'm French and i my twin girls wanted them for their 4th birthday party but i can't print them on " disneyfamily.com"
could you send me the pdf version ?
many thanks
best regards
I'd love to help you out. Please email me so I have your email address to send the files to. (See my "About Me" tab above for my contact information.)
go to http://www.familygo.com they have them there in adobe acrobate form
Hello Dear Kelly, I also like to have these PDF files birthday party for my daughter.
Please send to my email: aidcalder@hotmail.com
Thank you !!
Or someone who can send them to me ..
Hola estimada Kelly, me gustaría también tener estos archivos PDF para la fiesta de cumpleaños de mi hija.
Por favor enviar a mi correo electrónico: aidcalder@hotmail.com
Mil gracias !!
O alguien que pueda enviarmelas…
Thanks Andy capp. Unfortunately, all I got was index page after index page when typing in that web address and trying to click on any buttons.
Es una genia, me enseñó muchisimo el uso de las funciones de mi Silhouette, yo que recien me inicio en esto. Gracias. Nina Manson
"It's a genius, taught me a lot of features using my Silhouette, I that I first started in this. Thank you. Nina Manson" (according to Google Translate)
You're welcome! I'm happy to help! Usted es bienvenido! Estoy feliz de ayudar! (I hope that translation is correct.)
Wow, this is time consuming for sure – but the results are awesome. Would make the most awesome party decor.
This was a game-changer for me – I can't thank you enough for taking the time to post this! My daughter loves all the disney printables, but I never finish some of them because the cutting is so tedious. I just printed and cut a Sofia the First amulet and tiara to surprise her with tomorrow morning. THANK YOU!!!!!!!!!
Thank you for sharing that with me, Kristin! I'm so happy to hear I've made it easier for you. Nothing like a princess surprise for a little girl. 🙂
Hi Kelly! I just e-mailed you. Can you please send me the pdf file to print out the Princess paper dolls. I do not have any of the software to make them and do not have a silhouette. I came across these online and absolutely loved them! 🙂 I am having a princess theme birthday party and I think these would be perfect decorations for my daughters 3rd Birthday.
Thank you 🙂
Shari
Hi Kelly! please send me files in email. as i already sent an email to you.
is it possible to do with my baby's photo??? i mean to say My baby face on toy????
Thanks
Zulu
Beautiful! Can you please sent me the cut file! I don't have photoshop or money to buy a gift for my niece 4th birthday! Love to surprise her with this lovely printable! Her birthday is today! Hope I'm not too late!
Thank you for your time and for sharing!
ecardona919@gmail.com
They are so beautiful!!!!!! I got to make 3! thanks to your fast reply! My niece love them:) Thank you so much!
Best Wishes!
Yay! I'm glad it worked out so well.
Hi there,
I don't want to bug you about this but I just saw your amazing post and would love to have the pdf files for my daughter's 4th birthday party this weekend. Would you kindly send them? I don't have the software to do this on my own. Thank you SO MUCH in advance!!!!
son1170@yahoo.com
Thank you! You are an angel 🙂
Hi Kelly –
I love your princess cut outs. I'm planning a princess birthday party for my daughter and i would love to have these displayed on the tables. Are you still sharing your PDFs? I would love it!
ttsoohoo@gmail.com
Thank you, Tina
Tina, the PDFs can all be found on the Disney site if you don't need Silhouette print & cut files. The link is in the post above (3rd paragraph down). If the site gives you trouble downloading, please let me know.
wow, i've never heard of silhouette before but have googled it and it looks pretty impressive. Would love to make some traditional paper dolls for my 4 year old. how on earth does it do it?
Oh, the Silhouette is impressive! 🙂
To answer your question, basically you use the Silhouette Studio software to trace a paper doll image (or buy one for $0.99 on the Silhouette online store). You print it out on your home printer, and it will print "registration marks" in the corners.
You then load the printout into the Silhouette machine and it will read those registration marks with its optical eye so it knows exactly where to cut, and then cuts perfectly around those images. It's a lot of fun to watch, actually.
If you want to see more of what the Silhouette can do, check out my Silhouette blog posts and also check out the Silhouette YouTube channel.
The Ariel you show in the picture is different than the one on the Disney site now. Could you send me the Ariel you show? Hinpurch@gmail.com. I have made a print and cut of all the princesses, but used Inkscape to convert to png or svg and then did a trace and detach in studio, then cleaned up the points. That way I could move all the pieces around as I needed. Worked really well and may be helpful for those that don't have photoshop or how to use it. You are awesome for sharing your talents.
That's interesting they changed Ariel slightly. I'll email the version I have to you. Thanks for letting me know.
There are several ways to get a PDF into Silhouette Studio for a print & cut, especially if you know other programs like Inkscape or use a PDF printer (I have another tutorial using Bullzip PDF Printer). PDF files vary, so it's nice to know a few methods. I just happen to love Photoshop Elements, so that's what I shared in this post. 🙂
Hi I don't know if it will be usefull but I use the Inkscape to transform SVG files into PDF. Very easy to use… and free!! Love your work!!!
Waouh ! That is so wonderful! TY for offering this turorial and i am to receive my cameo but it will be difficult to wait until xmas !
Is sdy has a santa doll ? Where can i order accessoiries for my silhouette ? seems to be less expensive in States than in Europe !
Thanks for helping girls?
Hi Kelly, thank you so much for your svg's awhile back…FYI they have the new Frozen princesses Elsa and Anna, trying to get them done myself…what a hard time. http://spoonful.com/printables/anna-papercraft
I was just wondering last night if they had added the Frozen girls yet. Thanks for letting me know! I've got a revised tutorial coming out soon… hopefully this week. It will be very simplified over this one.
I have an updated, simplified video tutorial for converting and tracing these Disney paper dolls (including for non-PSE users) on my blog here.
GRATEFUL! So so grateful for these =)
The page is gone. ;-( Is there another way?
Disney has changed a bunch of their links. If you go to my updated tutorial you can still go directly to some of the princesses, and some just take you to the general area where you can navigate around and still find some. Here is my tutorial with direct links: Updated Princess Tutorial with Links
FIND THE DOWNLOADS HERE :
http://home.disney.com.my/activities/crafts/index.html
Hi Kelly. Saw that a lot of your readers can't find the files. I happen to found them in the link above. However, I still miss a few characters, if you still have the files, could you kindly share them with me? My email : craftysupermom@gmail.com
Files needed if available : Pocahontas, Mulan, Jasmine, Belle, Aurora, Tiana
Thanks a bunch! Love your tutorial!
Thanks for the link, Jolene. 🙂 I'll send you those files.
this doesn't woRk
I'm sorry. Without more specifics, I can't help. Have you tried my newer tutorial? (The link is at the beginning of the post in red.)
Hi Kelly –
I love your princess cut outs. I'm planning a princess birthday party for my daughter and i would love to have these displayed on the tables. Are you still sharing your PDFs? I would love it!
i tried the disney site, but it aint working for me…
also plz email me sofia the first if u have as i especially want that…
thanks a bunch!
email: subhanaweed86@gmail.com
Sent. 🙂
hello,
I also would like to have these PDF's fo my daughter's birthday party.
my email: sandra_anuzyte@yahoo.com
Thank you so much!!
Done! 🙂
I’d love the PDFs as well for my daughter’s birthday party, If you’re willing to share. laurymcd@gmail.com
Would you be so kind and also share the PDF for my daughters princess party bboyas@att.net Thanks
Could you please help me to acess the PDF please for my niece B
day, and I did not understand how to do it. thank you. ademota1@gmail.com
The link to Disney’s website is in the blog post above. I sent you an email.
Hi,
could you please share the PDF on huma@doodlecollection.com
Thanks in advance
No Google você acha sites que converte a imagem e PNG, eu uso um que e muito bom, só não me lembro o nome agora, mais tem vários muitos bons, ou você pode jogar a imagem no Paint e na hora de salvar selecionar salvar em PNG
Thank you for the tip!