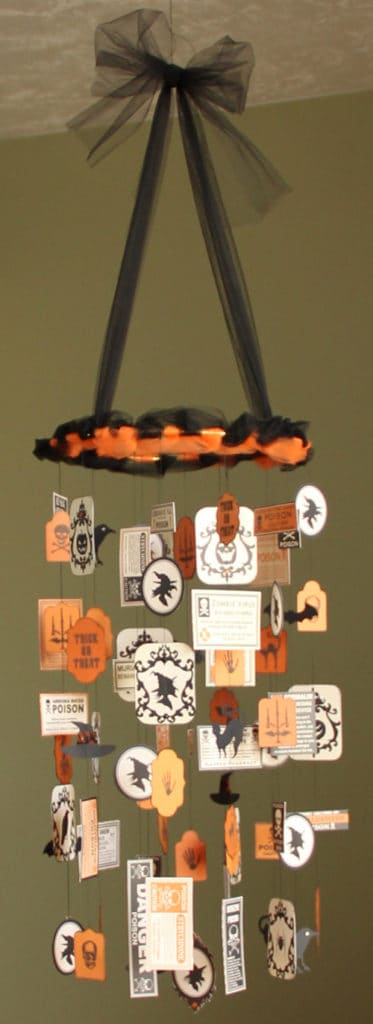
Halloween Mobile Tutorial
Use any kind of ephemera to create a mobile. Here’s a tutorial I’m sharing with you to create a Halloween mobile with ribbon, thread, and scrapbook paper.
Materials:
10” metal ring (or you could use an embroidery hoop, painted black if desired).
4-5 yards black tulle
2 yards orange tulle
Heavy black thread or fishing line
Sturdy wire (optional)
Teresa Collins “Haunted Hallows” pattern paper—
1 page “Frames”
2 pages “Poison”
2 pages “Witch”
Teresa Collins “Haunted Hallows” clear stamps
Teresa Collins Rhinestones (orange, black, clear)
Slice machine with “Toil & Trouble” design card, or other die cutter like a Silhouette Portrait or CAMEO
4 pages orange 8 ½ x 11” cardstock (2 each of 2 shades)
2 pages black 8 ½ x 11” cardstock
Black ink pad
Adhesive
12” Paper trimmer
Scissors
Instructions:
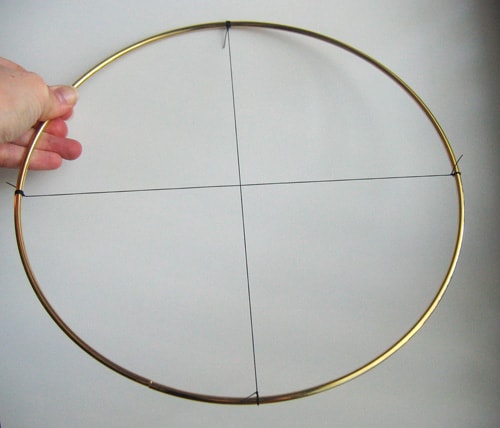
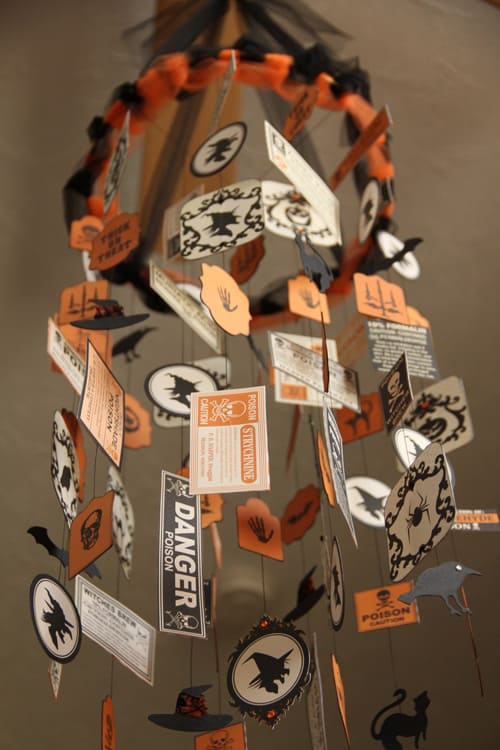
Step 1—Use heavy-duty black thread or sturdy wire to place two pieces across the center of your metal ring so they cross in the middle of the circle. Wrap or tie the ends securely where they meet the ring. This will create a cross in the circle for more surface to tie shapes to. (Note: this is a 10-inch “dreamcatcher” ring I bought at a local craft store. You can also find them online.)
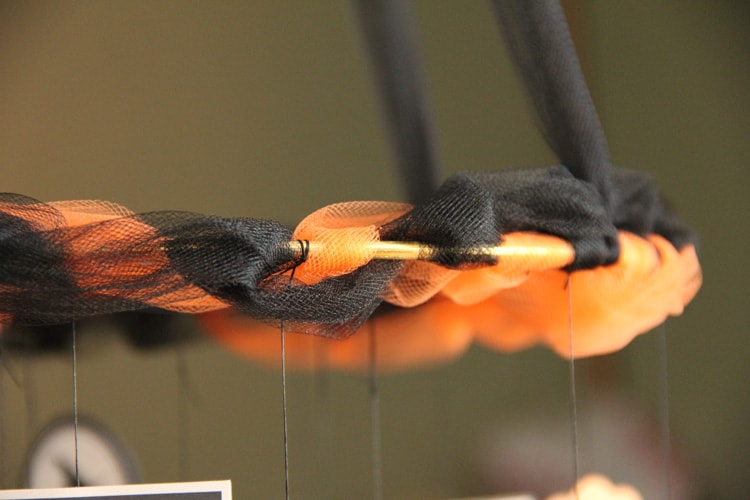
Step 2—Weave the orange tulle along the ring, making a twist every 2-3 inches. Follow with 2 yards of the black tulle, alternating orange and black twists along the ring. Tuck or stitch the ends together so they don’t come apart.
(If you want a different, fuller look—tie coordinating ribbon strips in knots around the circle base. This will take up to 15-20 yards of ribbon, depending on how full you want it to be.)
Step 3—Cut your paper designs.
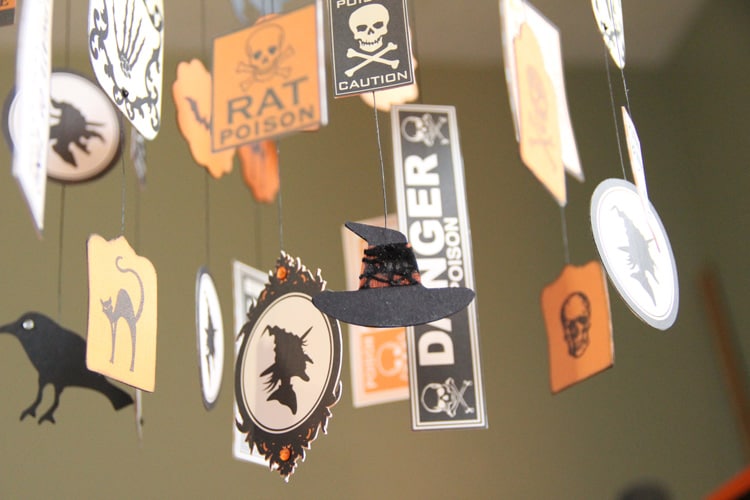
Frames paper: Use a trimmer to cut out all the pictures into rectangles. Slice the paper exactly between the black decorative frame designs, being careful not to slice off any part of the frame. Match up your shapes back to back, use a corner rounder punch on the corners, then ink the edges with a black ink pad. This will yield 10 finished “dangles” from the 20 designs on the page.
Poison paper: Cut out along the edges of all the rectangles with scissors. When both pages are cut out, match the identical tags back to back. This will yield 28 “dangles.”
Witch paper: Cut out two witches along their decorative edges for the center “dangle.” Cut out the rest of the witches along the outer black oval edge (you’ll be cutting through the decorative edge on these). Ink the backs with a black inkpad to hide uneven edges when matched up. Match the witches back to back. These pages will yield 12 total “dangles.”
Cut out at least 24 sets of matching background shapes (48 pieces) from 2 shades of orange cardstock. Make them approximately 2” tall (1 ½”-3” range) for stamping. I used the Making Memories Slice “Toil & Trouble” design card, but you could easily use a Silhouette machine or other digital cutter, rectangles with a corner rounder, 1 ½-2” circle punch, etc. If you make more than 24 sets you’ll have extras in the end, but can make sure you have enough to distribute the different styles throughout the mobile.
Use the Teresa Collins clear stamps with a black stamp pad (pigment ink gives a crisper image) to stamp images onto the orange shapes. Stamp the same image on two matching shapes so they can be placed back to back for a single “dangle.” If desired, ink the edges of each piece, front and back, so if your lines don’t match exactly you can’t tell.
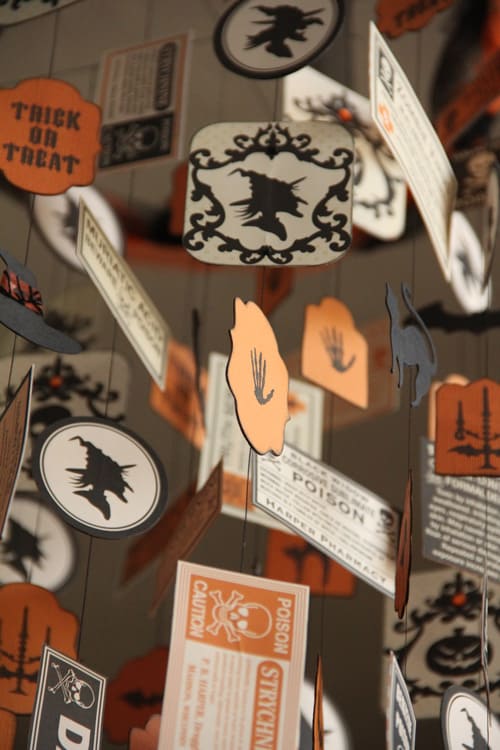
Cut out various Halloween shapes from black cardstock. I used the “Toil & Trouble” design card to make 3 sets each of witch hats, bats, cats, and ravens. If you have textured cardstock, make sure you mirror the image on half of them so they can be placed back to back. Yield: 12 total “dangles.”
Step 4—A large workspace is helpful for this next step. Cut 17 pieces of black thread or fishing line to approximately 22” each. Arrange your “dangles” in 17 rows of 5 “dangles” per row, making sure to evenly distribute the designs. Remember to use the witch with the decorative border as the bottom of your center thread.
Now glue your shapes back to back, with the thread sandwiched in between, spacing your shapes evenly along the thread (approx. 1 ½ – 3” between each shape). Leave enough thread at the top to tie each strand to the ring or crosshairs at the top. If you want, make the center strand (with the decorative witch at the bottom) longest, make the inner four strands that tie to the crosshairs slightly shorter, and the 12 on the outer ring the shortest.
Embellish your “dangles” as desired with rhinestones or ribbon, etc.
When all of your “dangles” are embellished and glued along the thread strands, tie the threads to your base and crosshairs. Space 12 threads along the ring’s outside (each quarter of the outside circle will have 3 lines tied to it; one at each point of the cross and two between each point). Then one thread will hang from the crosshairs at the center of the ring, and four from the center of each wire/thread spoke inside the ring.
Step 5—Use approximately 1 yard of black tulle to tie to the four cross points along the metal ring for hanging the mobile from the ceiling. Add a bow at the top with more black tulle, if desired.

Amazing,absolutely AMAZING!
You are so talented!
Can't wait to see it in person.
Judy 🙂
Kelly this is fabulous, I love Halloween and never made a mobile for anything, this should be fun. Thank you for the tutorial on it.
Hugs, Lori m
Really, really darling! Awesome job.
Liz
I love this. Great job.
Thank you!
LOVE THIS!
Made one! Love it! Thanks for tutorial.
Oh, I'm so happy to hear you made one, mk!
I love this project. was looking for a contact email to ask about featuring this at tipjunkie.com.
lowri.mcnabb @ gmail.com
Love your project. I just finished mine up last week.
Awesome, Christy!
WOW! This is awesome. I have to give this a try. Banners and mobile are few things I have not done before! Yours is so inspiring. TFS
This is absolutely adorable!!! Thanks for hopping with all of us at the Bugbytes and for submitting this wonderful project in the challenge!!!
How cute is this?!?! Love it!!! Thanks for linking up with us at the Bug Bytes!!!
O my goodness….I absolutely love this….I have so many little vintage postcards and journaling tags – this would be perfect!!!! Thanks for sharing!
Go for it! Vintage postcards and journaling tags sounds like a great idea for a mobile like this.
Thanks so much for this post. This is awesome post I ever seen on internet.
Love your project, This is absolutely adorable.