Halloween Party Invitation
This Halloween Party Invitation is an idea I saw from a Flickr photo, and apparently the original idea came from Martha Stewart, but of course I changed it a little to use things I had accessible to me. I can’t compare to Martha Stewart, but this idea just cracked me up and I had to make it! I laugh every time I open the box.

This “disembodied finger” will be on display in the Heartland store, and here are the instructions:
Materials:
Pattern paper: Haunted Hallows “Spiderweb” by Teresa Collins
Font: Blackadder ITC
Black cardstock box, cut by the Silhouette machine
Wilton pretzel mold and melting wafers
Black netting, approx. 18”
Black narrow ribbon
Instructions:
1. Using a Wilton witch finger pretzel mold for Halloween fingers, follow instructions for melting the candy wafers. Use mostly white with a little orange for flesh color, and chocolate for the fingernail if desired. Cut your pretzel short enough so the entire length of finished pretzel will be under 4”. (Put the cut end into the candy side so the nice end is showing.) Let set.
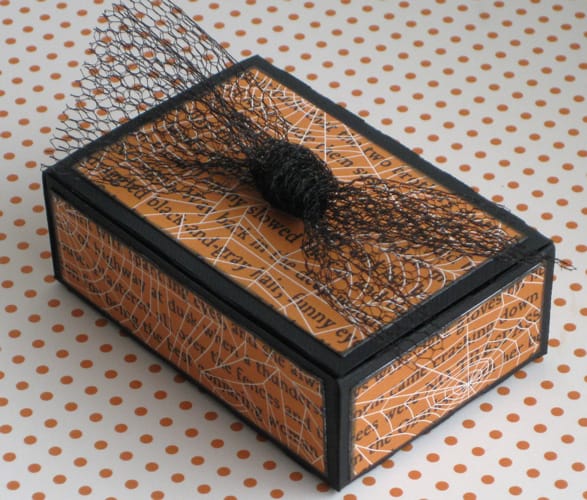
2. Cut a basic shallow box from black cardstock with Silhouette, or use another shallow box with a diagonal opening of about 4”.
3. Cut “Spiderweb” paper to fit outside edges, top, and inside flap (6 total pieces), leaving approx. 1/8” border for box to show. Ink edges with black inkpad. Glue to box sides, top, and inside flap.
4. Print sentiment on white paper, sized to let pattern paper border show. Ink edges with black and glue to inside flap.
5. Fill box with about 12” of black netting or other filler material. Tie ribbon to candy finger and place inside of box on top of netting.
6. Use remaining 6” of netting to tie in knot and glue to outside of top lid.

Simply awesome!!!
Allie/Duckienz
Kelly, your cards are great and this is just too funny.
Thanks! My kids enjoyed eating the extra candy fingers I made for their after-school snack this week. We all think this invitation is pretty funny. 😉
I love this!!
Super cute. Love the papers too.
So funny! (makes me wish I was hosting a party!)
What a fantastic project. I'd love the Silhouette but doubt it's in my future.
I don't understand your comment "put the cut end into the candy side so the nice end is showing". I don't have the mold so I'm wondering if you could please explain further??? Thanks so much.
MC, you have to cut your pretzel short enough so it will fit in a box. When you've poured your melted chocolate or melting-wafer candy into the mold, you have to then stick the pretzel into the candy so it has a base to hold onto. I want the "baked" end of the pretzel to show sticking out the end, not the broken/cut end.
I guess you could even leave out the pretzel altogether and just use the molded candy alone, but I think it's less creepy to know the finger is actually a decorated pretzel.
I hope that answers your question. 🙂
Christine, who needs a party to make these funny fingers? Give them to your kids or friends; my kids loved eating the extras!
Or if you're really ambitious, pass these out as Halloween favors to trick-or-treaters! With or without the box.
Kelly,
Thanks so much for the extra adice. I thoroughly understand what you mean. Can't wait to try them.
You're welcome. I'm glad you asked.
omgosh, what a fun idea! brilliant Kelly!!
enjoy your wknd!
Loved this. I'm going to look for the mold so I can make these next year.