Scrapbook Steals Blog Hop: Adhesive Washi Sheets

I can’t tell you how excited I am to be a part of the Scrapbook Steals blog hop! I jumped at the chance to be a guest designer for some mystery product from the website that brings me a new amazing deal every day (twice)!
We were given 12″x12″ We R Memory Keepers Adhesive Washi Sheets. I haven’t used much Washi tape before, but I looove this stuff! If you’re a regular reader on my blog you know I adore my Silhouette Cameo machine, and you can cut anything you want on these large Washi sheets with a Silhouette (and probably any cutter that works well with vinyl). This is self-adhesive, just like the rolls of Washi tape, but it’s a full 12″ square sheet that comes on a backing.
The first thing I did was cut some words, just to see how well the Washi sheets would cut. I used my standard vinyl settings of Speed 8, Thickness 9, Blade 1 (blue cap for older style) and it was perfect. (These letters are just under 1″ tall.)

Because I received the red and green sheets, I automatically thought of Christmas cards and gifts. I also wanted to showcase the transparency of the Washi sheets, so that’s what guided my projects. Here’s a quick preview of the five projects I made using the Washi sheets.
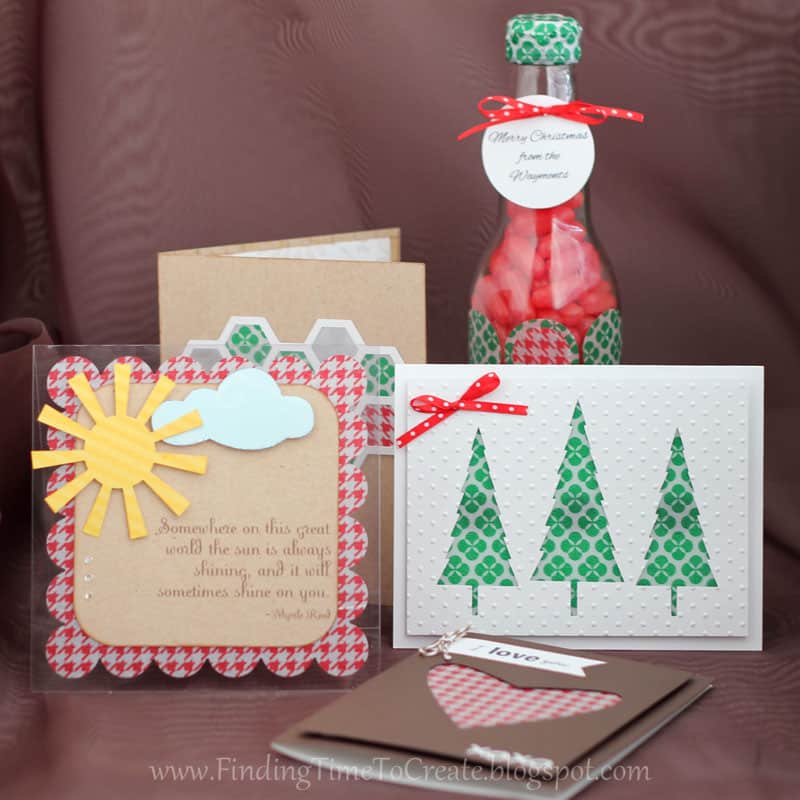
Are you ready for lots of pictures and tips? Here we go!
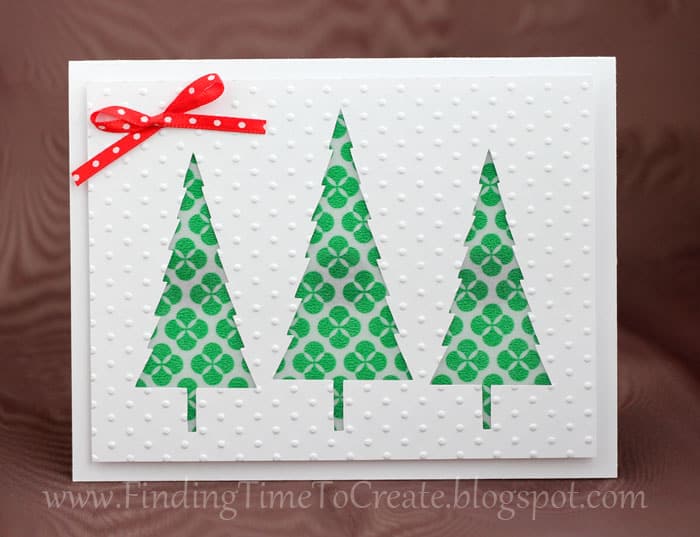
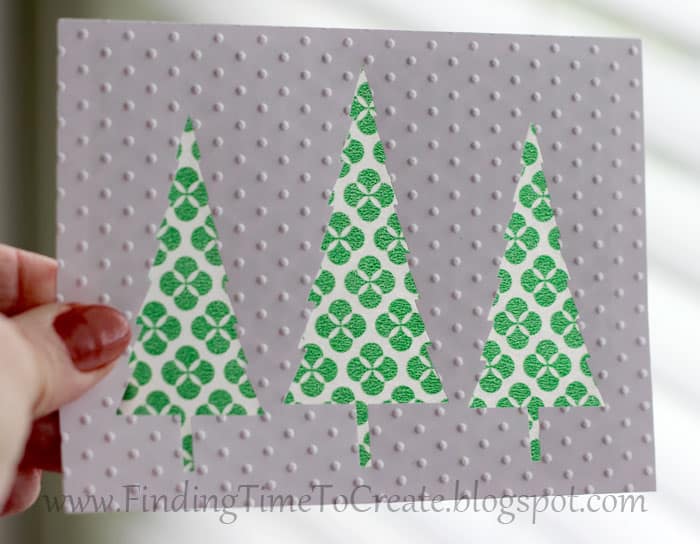
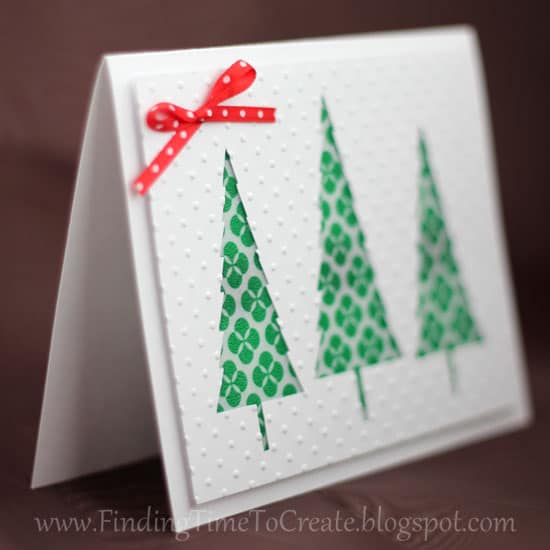
I decided to make a window card to keep the Washi from looking just like any other pattern paper. This was easy to do with the clear plastic sheets I have on hand. I had my Silhouette cut out these pretty trees (#23174) from the card front and embossed it with a Cuttlebug folder.
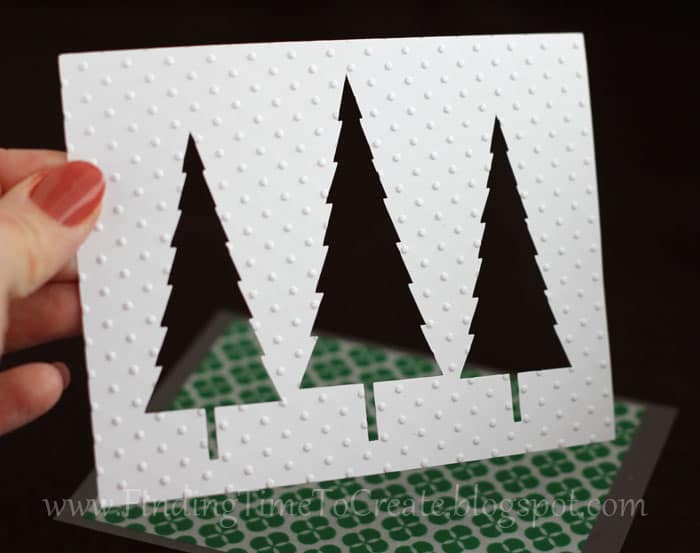
Then I cut a piece of green Washi large enough to fill in the blank space and stuck it to a piece of clear plastic, cut just smaller than the embossed face piece.
I attached the acetate to the embossed card front. (See how pretty the transparent Washi is through the cutouts?)
Finally, I attached the embossed window piece to my white card front with 3D foam squares and added a little red bow.
For another Christmas card option, I bought this Hexagon Card (#31280) from the Silhouette Store. I wanted windows for all of the hexagons, so I altered the file just slightly to do so.

I had my Cameo cut out the clear plastic in the correct shape, then some red and green hexagons from the Washi sheets, then applied them where I wanted for the windows.
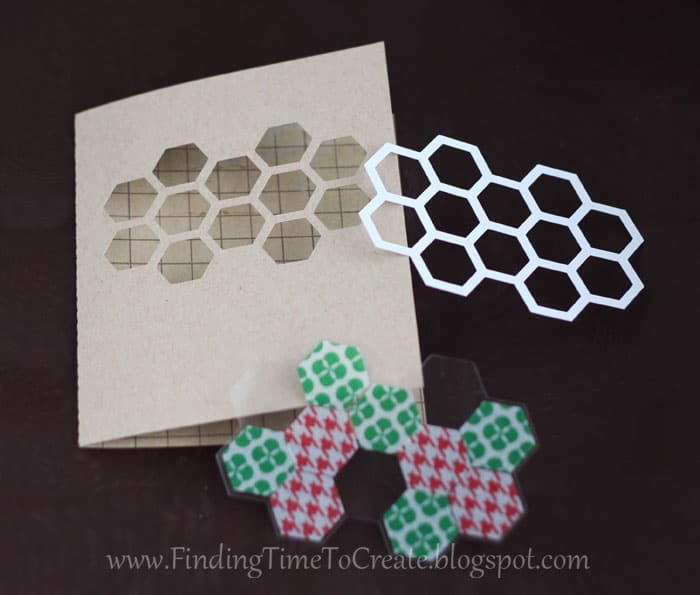
I then ran the thin white frame piece through a 2.5″ Xyron, placed it on top of the acetate with washi hexagons, then added some Micro 1/8″ Glue Dots to the window cutouts on the kraft card base, sandwiching the plastic between the white frame and the kraft card base.
Here’s a view of the inside. (By the way, the sentiment on the card front is white fuzzy/flocked vinyl.)

And here’s one more Christmas project that would make a nice, simple gift.
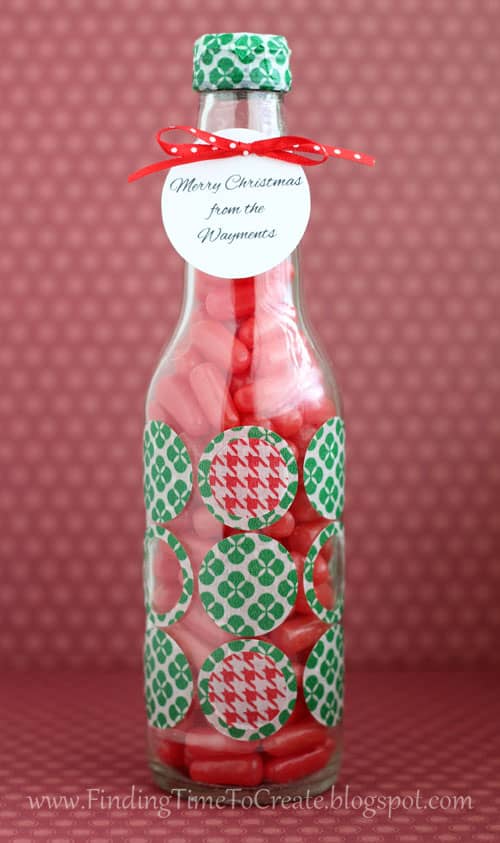
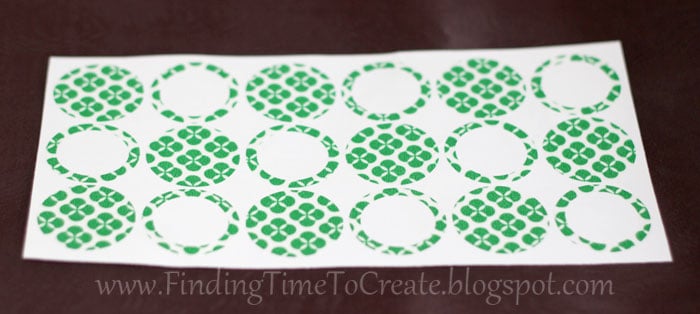
I created these spots in Silhouette Studio to fit perfectly around my empty “Jones Soda” bottle, then cut them out using vinyl settings.
Using the same technique I do with vinyl, I placed a clear piece of transfer tape on the cutouts to lift it off the backing. (Because the Washi has kind of a slick/waxy coating and resists the transfer tape a bit, I used a fresh piece of sticky transfer tape and flipped it over to peel the paper backing away from the Washi and transfer tape.)
I placed it on the bottle, and the Washi stuck nicely to the glass and released from the transfer tape easily.
I added a few inside circles with the red Washi…
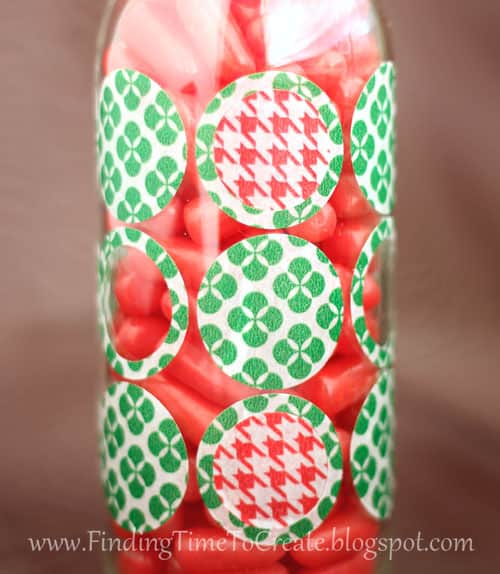
And added some scraps of the green Washi to decorate the bottle’s lid.

That was enough Christmas stuff for now, so I made another window card with the red Washi. I used mostly the same process as the first window card above.
(Wouldn’t something like this be great as a Christmas ornament?)
Here are the mechanics on the back. This all gets hidden when you stick it to the card base.
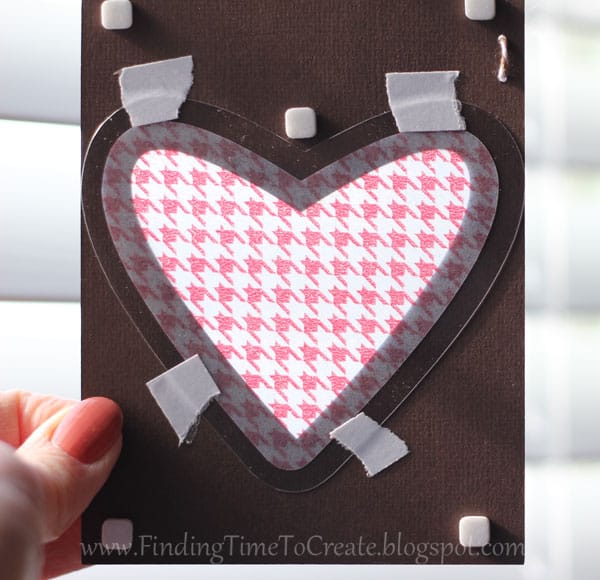
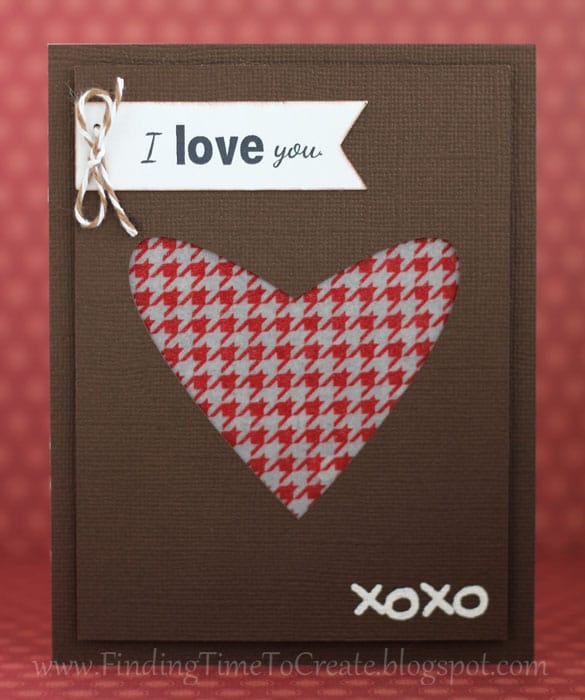
And last, but not least, I’ve always wanted to make a clear card.
I made this scalloped square in Silhouette Studio and cut it (and the acetate card base) with my Cameo, then placed the Washi on the card front. I added more pieces cut with my Cameo, and placed a piece of white inside–the same size as the kraft print & cut front piece. You can see the hounds-tooth pattern right through the card!
I had so much fun working with these full Washi sheets with my Cameo and otherwise. It cut beautifully and was easy to work with. It’s great on clear accents, and my mind is still full of more things I can do with it.
Thank you, Scrapbook Steals, for letting me be a part of this blog hop! Now the rest of you, go Steal some of these We R Memory Keepers Adhesive Washi sheets and continue along the blog hop here with Cyndee…
And here’s the blog list in case you get lost. (Don’t forget to comment on all of these blog-hop posts to be eligible for a $20 gift card prize to Scrapbook Steals.)
1. Scrapbook Steals
2. Andrea at Scraperie
3. Madeleine at Senorita Scrapper
4. Shirley at Shirley Shirley Bo Birley
5. Me! (YOU ARE HERE)
6. Cyndee at Scrappy Daylily
7. Ashley at Things That Shine

Oh my goodness! you did a fanatasic job with these washi sheets!!
these are great projects, I like the clear card
I love what you have created with the Washi sheets.
Your use of the Washi and the Acetate together is very innovative.
Your clear card is wonderful
Mandy
i love all of your projects!!!
Adorable projects! I love them all! I especially love the clear card – will definitely be giving this one a try! Thanks for the inspiration 🙂
Kelly great projects and wonderful use of acetate, thanks for all the tips, hugs
Love the window technique with the washi!
Holy crap woman!!!!!!!!! You make me so happy I stole today. I can't wait to get it.
We should get together one of these days. I need your creative to rub off on me.
AMAZING!!!!
omg! i LOVE everything you did!! seriously considering stealing today just because of your creations!! amazing!
love the cards! especially the clear one! thanks for sharing!
Amazing projects! I love how you showed off the transparency!
Great projects! Thanks for all the detailed instructions/photos too! My favorite is that hexagon card, but I love the idea of decorating the bottle too. Very cool!
Your graphic pieces are so fun. I love the Christmas trees! Putting washi on acetate…gotta try.
Wow–lots of great ways you used this product!
Oh, you fun and clever girl. You do such incredible work! I'd love to be your neighbor!
Great great great inspirational ideas! You used the washi sheets perfect!
Great projects Kelly!
Wow!!!!! I love how you used the transparencies! So cool!
Kelly,
Can't believe how many ideas and how much cuteness you have packed into this one post. Fantastic job!
Very clever use of the transparencies. I'm so pinning some of these!!
Great cards!
Wow! You had some wonderful ideas! Thank you for sharing. I plan to become a follower too. You are very creative!
Fantabulous!!! I'm loving the clear card and the "washi windows"!
O love your use of acetate with the washi paper. I'm a sucker for hexagons, but my favorite one is the three green trees card.
All your projects are fantastic! I especially love the clear card, I'm going to have to give that a try!
Love them all, I can't pick just one. Thanks for the great ideas!!
i love this technique! Great job!
These are all such great ideas! I'm pinning this post for future reference. Thanks for sharing!
Amazing projects. I especially love that clear card!! Great inspiration!!!
Kelly, these are all wonderful! I knew they would be. Thank you for inviting us to the blog hop and inspiring us too. xxx – Debbie
Love your techniques! The bottle and the hexagon card are my favorites!
Oh my! You really outdid yourself! Your projects and instructions are great!
fantastic ideas! love all the 'window' ideas.
I think I had to pick up my jaw…I love how you used transparencies with the washi and your die cut machine! And to top the bottle… genius! Beautiful inspiration, thank you!
Simple and elegant your design inspires me a lot…can you guide me how can i design Plastic cards like that….
That's a good idea for a tutorial. I'll write up a post to show how easy it is to make a clear card like I did in this post.
Great way to make labels. Loved everything.
So creative….great ideas for a new crafter like me. Thanks for sharing!
Fabulous card ideas!
I love your cards… I never thought of using plastic sheets… very creative!
Wow! Great cards! Love all the different window card ideas and all your uses with the clear acetate!
I do love the way you used the washi on the clear acetate. Gorgeous effect, and your projects look so cool. TFS!
so many great ideas. thanks
I love the soda bottle idea!! I'm stealing that. 🙂
wow you have gone above and beyond here with all of these projects! I simply adore the use of the negative cut trees with the washi behind it! Amazing, thank you!
Lisa
Cute…cute….cute!
Absolutely great ideas
Your projects are ALL GREAT! Love the tree card.
Such amazing projects! I love the idea to use it on a bottle for gifts!
WOW!!! So many great ideas using the washi sheets! Thanks for all the fab inspiration! My fave is the tree card! 🙂
The cards are amazing. Love the trees and heart.
Your cards are amazing, especially the white embossed card with the green trees. Thanks for the tutorial of how you created each one.
Simply gorgeous cards. Thank you for your tutorials.
Great projects! I love the Christmas trees!
I like the use of clear sheets – I should give that a try on some cards!
Hay Kelly,
all your projects are great – in fact, the cards you made with the christmas trees, I'd made ones almost identical which I was going to feature on my blog, which I still will at some point but with glitter in behind? LOL – I've not played with washi tape to date, so exciting to see what you've done.
I hope you're having a good week!
Wishing you JOY!
~ Barb
Some very cool ideas…. I want to do more with Acetate!
–Robin
Use sticky adhesive
with Washi sheets and bingo…an awesome creation is there.
I was really searching for such a nice post and got here…Thanks for sharing such a nice information, its beneficial for me…Keep sharing more.
scrapbooking stores
I was really searching for such a nice post and got here…Thanks for sharing such a nice information, its beneficial for me…Keep sharing more.
scrapbooking stores