SPRING 3D Letters
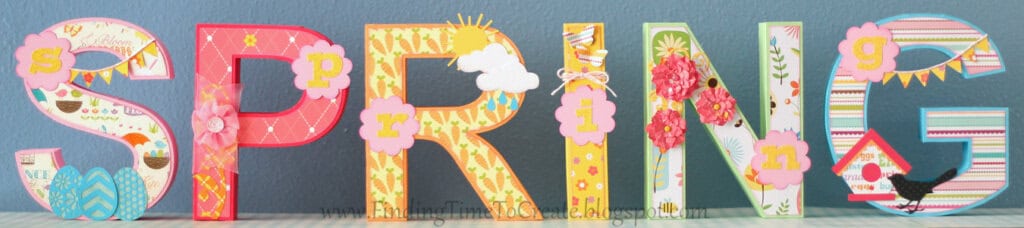
I am ready for SPRING! Are you?
I created this decorated 3D word for Heartland Paper’s design team, but if you can’t go see it in person, I’ve included lots of pictures. Surprise, surprise. 😉 Each letter is about 6 3/4″ tall. These Spring 3D letters are one of my favorite pieces of spring decor.
You can purchase all the letters (digital SVG cut files) from SVG Cuts here if you have Studio Designer Edition, or there are comparable 3D letters on the Silhouette Design Store for Basic Studio users. Assembly instructions for the SVG Cuts letters are here. Be sure to watch the 4-minute video, but here are some key points that I definitely follow:
1- Glue the strips to the back of the front face first, because it will look better.
2- Take your time.
3- When gluing the strips down, start with a small tab and work from there.
4- Scotch Quick Dry Adhesive (liquid glue) is good for this, and I also use 1/4″ Scor-Tape or Scrappy Tape in some places.
5- Dry beans or something similar for weight is important, especially for the rounded letters like the S and the G.
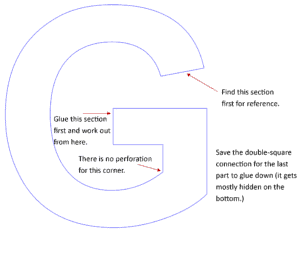
6- If you’re doing exactly these “SPRING” letters, don’t do the G first. The curved letters are a little more tricky, so I suggest making the I and the N first to get
the hang of it. Here are some more tips for the letter G that I think
you’ll find helpful.
There are a few tips to remember when using Studio DE to open SVG files (SVG files can open differently based on how they are designed and saved):
1- Set your Preferences to “Import Options>When Importing SVG>Centered” so they always open to the center of your page at the size they were created.
2- Ungroup multiple times until you can no longer Ungroup (the icon on the lower left of your screen changes grey).
3- Change line thickness to 0.00 in your Line Style Window.
4- Turn on Cut Lines in your Cut Style Window.
5- Release Compound Path and regroup so you can reposition items on the page. (This is often optional, but will usually help save paper.)
You will probably want to save your letters into a folder in Studio format once you have converted them so you don’t have to go through all these steps again next time you want to use the same letter.
Now I’ll share a few details on the decorations. I chose my pattern papers and coordinating cardstock first, then laid out on my Silhouette Studio screen an idea of the files I wanted to use. This is after a page of my “brainstorm” process where I just add everything to a page I might possibly want to use. The elements on this page are the keepers, plus I can size them perfectly for cutting. (When actually cutting, I copy and paste the individual elements onto a third page so I can cut and delete as I go.)
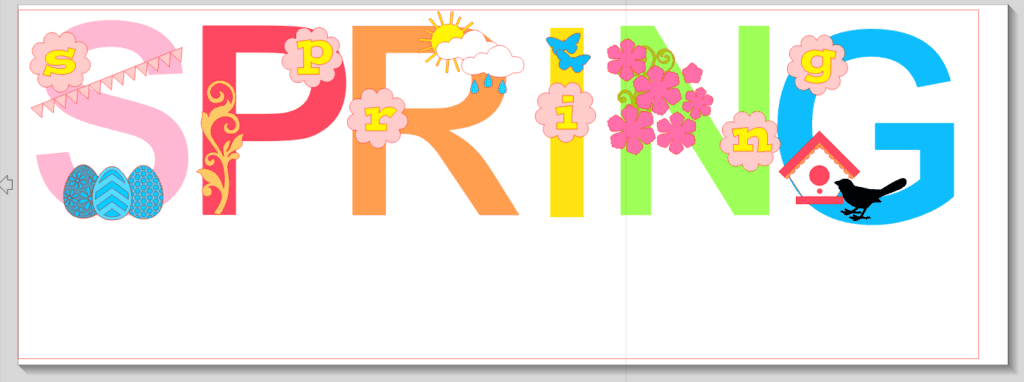
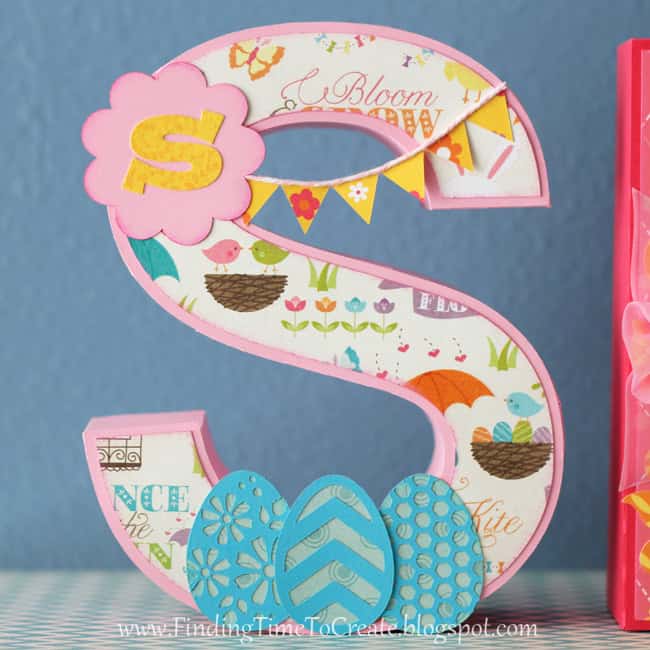
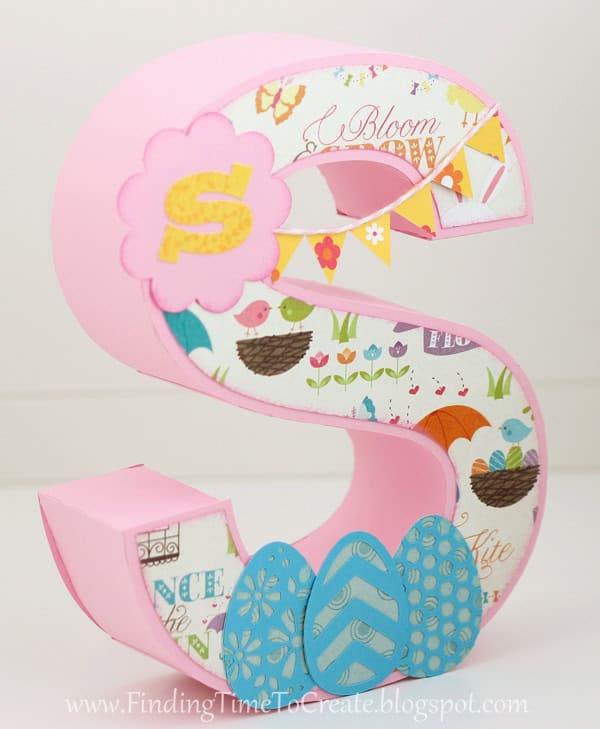
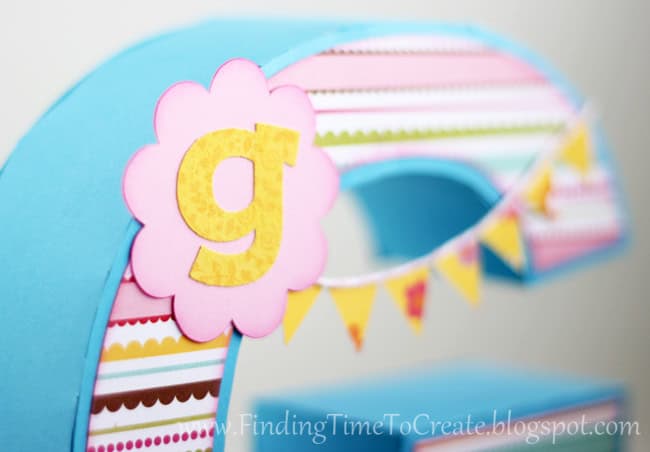
The “S” is decorated with some easter eggs (#17422) cut from cardstock and layered over pattern paper. I made a small yellow letter accent for each large letter using the font Postino Std. The banner is a group of triangles I made that slightly overlap so it cuts as one piece but curves easily, then I glued some baker’s twine to the top edge. Each of these letters from SVGCuts.com has a face piece that I cut from pattern paper and inked the edges.
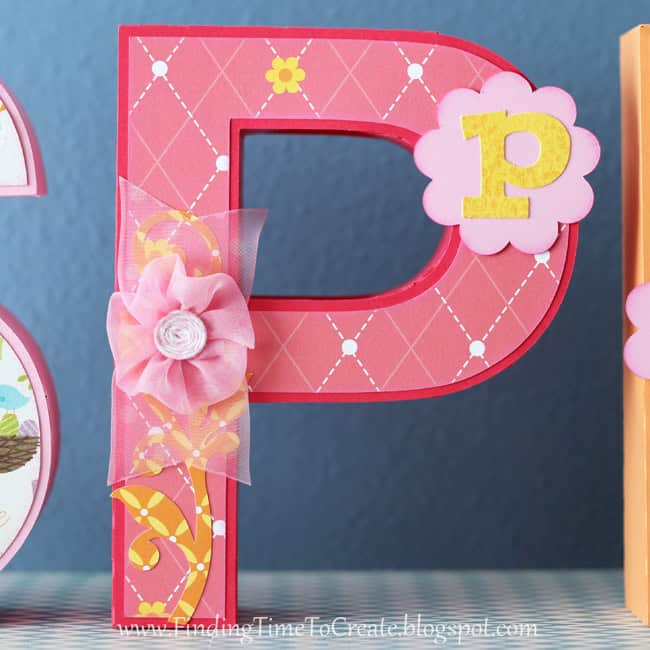
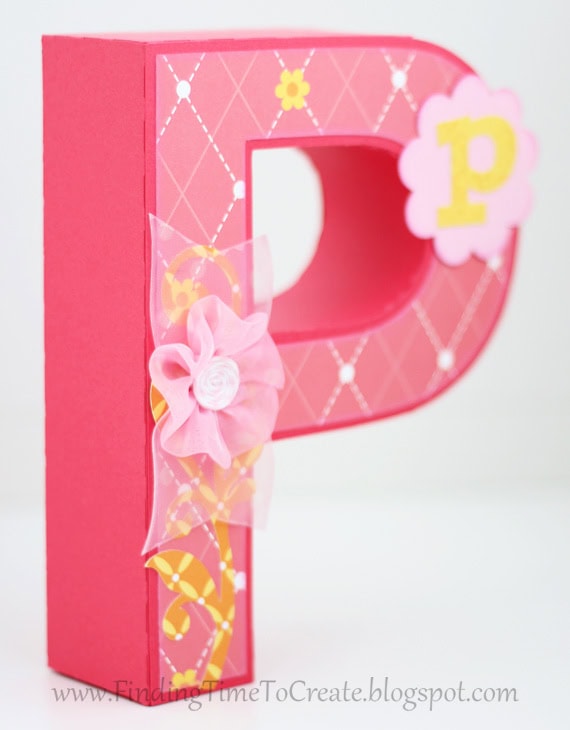
I added a flourish (#26479) to the letter “P”, then made a flower out of 1 1/4″ sheer ribbon. I folded it in half lengthwise, stitched by hand along the open edge, gathered it, then stitched it closed. The center is baker’s twine glued in a spiral onto a small paper circle, then hot glued to the flower’s center. The ribbon behind is a separate piece of ribbon.
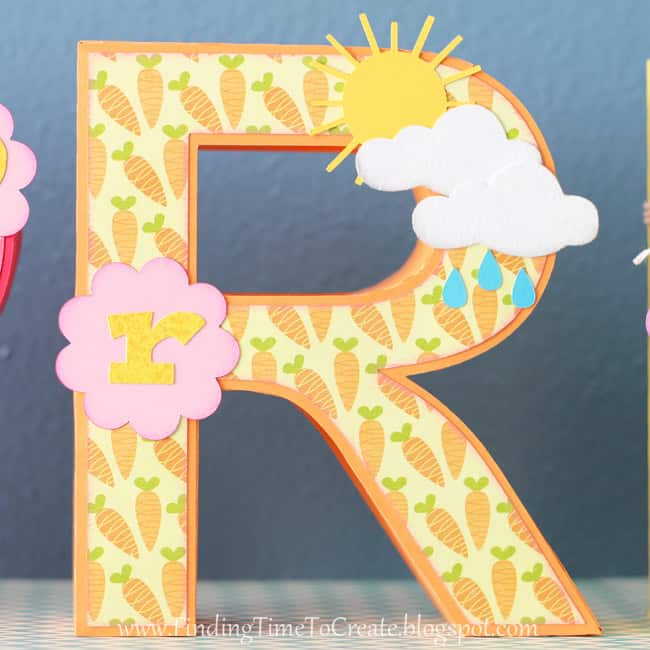
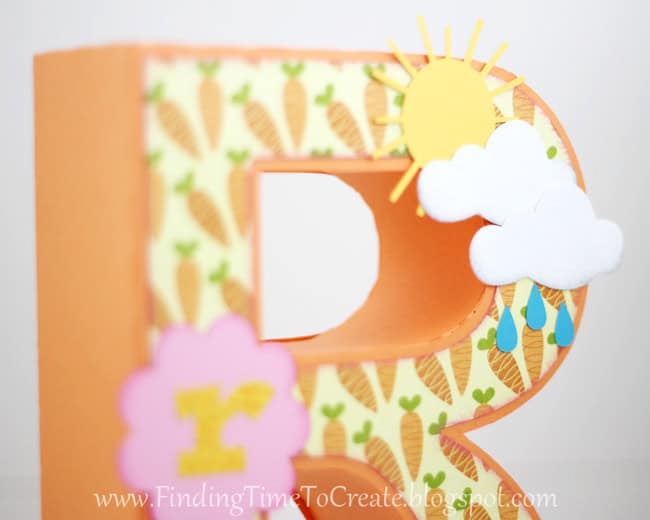
The “R” has another old Silhouette free shape, the sun and rain cloud (#17283). I simply cut the pieces from plain heavy cardstock, but I added white flocking to the clouds after lightly inking the bottom edges. (More details on how I did that below.)
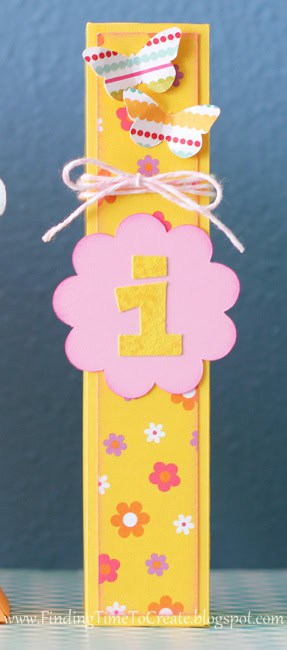
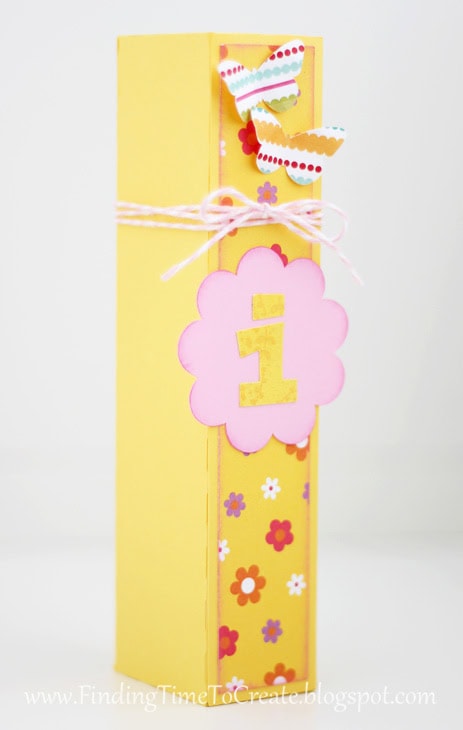
The letter “I” has some simple butterflies that I modified from an existing butterfly cutting file, then manipulated and curved them with my fingers to give them some definition. Some more baker’s twine is wrapped around the letter and tied in a bow.
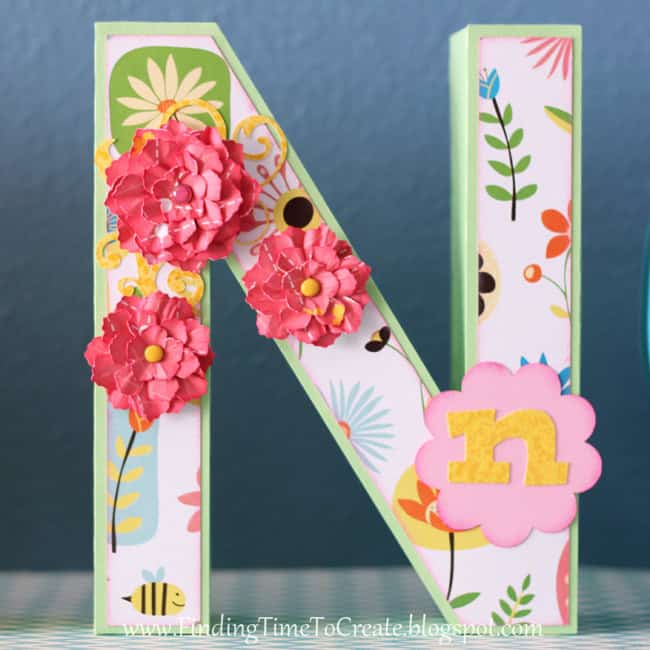
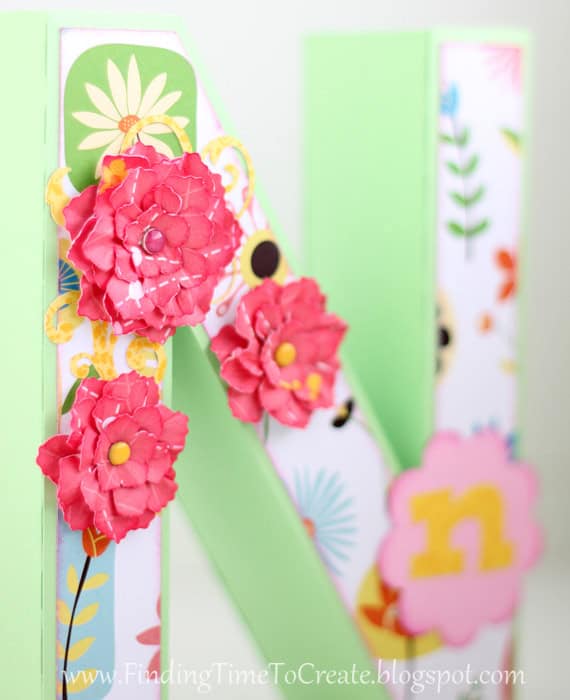
I used yet another favorite past Silhouette freebie, the 3D Ruffle Flower (#11887), to decorate the “N”. I made them pretty small and left out the larger layers for two of the flowers to give them some variety in size. After cutting them out with my Cameo, I inked the edges in dark pink, then misted them with water and crumpled them. After they were dry, I unfurled them and pierced the centers so I could hold them together with a brad. These flowers are glued to the letter with hot glue.
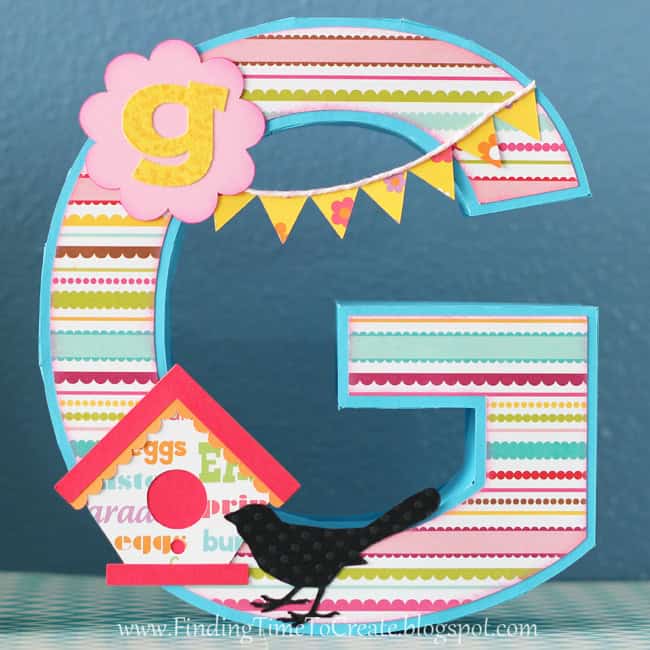
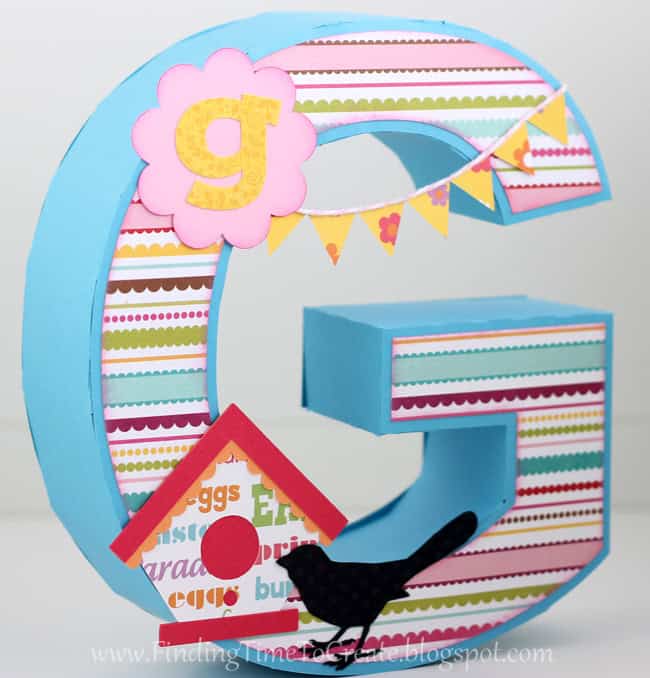
The “G” has the rest of the banner from the “S” and a cute bird and birdhouse. The bird is traced from a Carina Gardner image, and the birdhouse (#18144) was yet another past Silhouette freebie. (I collect the weekly free shapes every Tuesday, because you never know when you’ll need shapes like these.)
I have one last detail to share. I cut the little yellow letters out of pattern paper, but they needed a little something extra to make them worthy of these 3D letters. The extra I came up with was to add flocking to the small yellow letters. From recent experiments I knew that the flocking powder goes on a little sheer, so I was hoping the little details of the pattern paper would show through, and they did! I cut the letters on my Silhouette (also the clouds for letter R above), flipped them over and ran them through my Xryon sticker maker upside down, so the adhesive would go on an even layer on the front of my elements. Then I just poured and rubbed on a little flocking powder, tapped off the extra, and I had some soft and lovely elements with the extra bit of texture I was looking for. Too bad you can’t feel it!
Supplies:
Cardstock: Bazzill Smoothies 2 of ea. (Carribean Blue, Apple Crush, Raspberry Splash, Grapefruit Bliss, Marmalade Blast, Guava Sensation)
Pattern Paper: 1 of ea. TCP Studio (Easter Bunny Love, Easter Flowers), American Crafts (Gardenia-Flora Nursery), Imaginisce (003747), Bella Blvd (Sunny Sunday)
Pink baker’s twine
Sheer pink polka-dot ribbon
Doodlebug flocking powder (yellow, white)
3 Brads
Adhesive: Scotch Quick-Dry liquid adhesive, Scor-Tape (1/4″), Hot glue
Silhouette Cameo digital cutter
3D Letter shapes available from SVGCuts.com
(Other Silhouette Studio files listed above with each letter)

Gorgeous, gorgeous, gorgeous! I love every single letter! It's all so bright and cheerful!(I'm wanting that carrot paper on the R, too!) This is just perfection, Kelly!
Thank you! The carrot paper is on the back side of the paper I used for the S. It's by Imaginisce.
You did it again. I now know how I'm going to decorate my mantle to bring in Spring. Thanks so much for your instructions and supply list.
Your letters are beautiful! Thanks for the inspiration.
Hi Kelly, what a spectacular project! This looks like something one would see in a schmancy crafting mag. So lovely, how do you make the time. Are you up for another blog hop one of these days?
♥ Barb
Kelly, your "Spring" letters look amazing.You embellished s beautifully. It was so nice to look at your lovely project. It reminds us all, Spring is on the way.xxx- Debbie
Hi Kelly! Just saw a link to these beautiful letters on SVG Cuts FB page! GORGEOUS! Had to come see for myself! Am your latest follower BTW 🙂
Yay! I'm so happy SVG Cuts spotlighted these on their facebook page. I didn't really even think about submitting it, so it's nice to be noticed. 🙂
Very pretty and nicely done
DIANA L.
http://dianamlarson.blogspot.com
Hi Kelly – just saw this on SVG Cuts FB page. Great job on these letters! They are beautiful!
so pretty!!!!!!!!!!
Very Pretty, nice holiday spring display, hugs, Lori m
Glad to see someone else enjoying the 3d letters, too. I have been making 3d letter ensembles that are fun to embellish since October last year, using the Snapdragon Snippets 3d letter box files from Silhouette. I noticed that your link to those on Silhouette's online store only shows a few of the Snapdragon styles. They are easier to make than the others, because you make a base and a lid and then fit them together, no need to try to fit the backside on alone. You can see my other designs on the Silhouette Flickr group blog, or at needlesnknowledge.blogspot.com.
Thanks for the information on Snapdragon Snippets' 3d letters, Jodi! I haven't tried them because I already have this SVG Cuts set, but that's good to know it's a box and lid for simplicity. The link I provided is what "3d letter" brings up in the search. "3d letter box" would probably be a better search term to find those from Snapdragon Snippets first.
I'll have to come see your letters, Jodi!