Homemade Stamps!
Thank you, Silhouette, for coming out with something so fun to play with! O.K. maybe the idea of cutting your own stamps with a digital cutter is not new, but it’s new to me. I used to stamp quite a bit years ago, but that part of my crafting fell by the wayside when I discovered the Silhouette machine and the joys of pattern paper.
But now…the new stamping material by Silhouette is so fun (and easy)! I’m going to love adding this to my Silhouette crafting capabilities.
Let me show you what I made today:
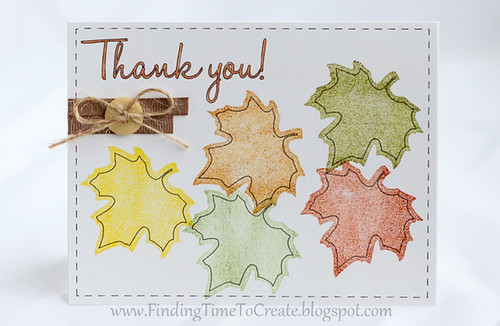
In the above fall thank-you card, I used sketch pens
in combination with the stamps. While you can see in the bottom leaf
card that the stamps alone are quite pretty, with the sketch pens you
can add details that the stamp alone can’t do. In this case it was a
simple inner offset, but I’ve got lots of ideas on using sketch pens to
add variety to stamped images. By sketching the lines first, it also
let me design my card on-screen and just stamp directly on top of the
sketch lines for perfect stamp placement. The sketched sentiment is
filled in with a copper-colored Sakura Stardust gel pen (by hand). It shimmers!
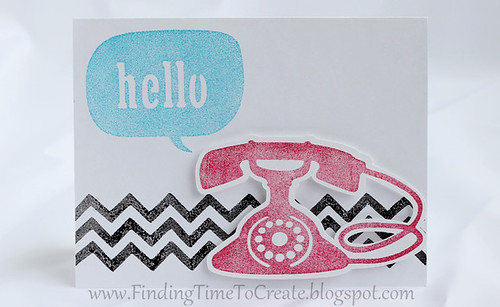
As you can see from all of these examples, the stamps are great for
non-intricate shapes. Placing the telephone cord just right to fit the
offset shape I had cut was the trickiest part about any of this stamping
stuff. Does this “hello” card look familiar? I used the same shapes
with chipboard on my recent post Hello Card
and thought they would look great as stamps. I modified the “hello” in
the word bubble so I wouldn’t lose the centers of the “e” or the “o”,
and I added a bit to the telephone rotary dial so that would stay
attached as well. You don’t want to cut shapes with a lot of separate
pieces that you’ll have to place every time. If it’s all connected as
one piece, that’s much better. I also thickened the telephone cord just
to give it enough structure.
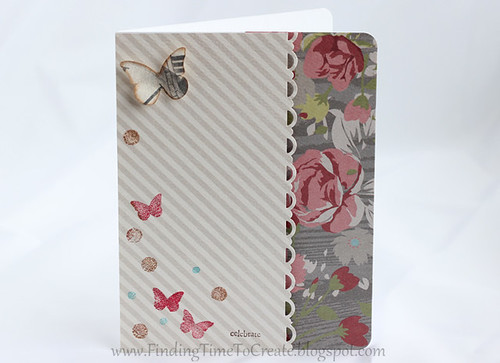
FYI, the tiny “celebrate” stamp on this butterfly card is not from the Silhouette stamping material. But the butterflies and dots are!

I used Classic Stampin’ Up! ink pads for most of the stamp colors. Those are dye-based pads, and I found that the ink pads on the dry side worked much better than the juicy pads. Dye pads won’t usually get you bold, solid images, but I knew that and purposely overlapped the leaves on the top fall card to show off that somewhat transparent effect. The slick stamp material makes the ink pool up just a bit with wet ink pads; I’ve heard that you can sand it down a little to help prevent that, but I had plenty of dry-ish ink pads to work with. 🙂 Silhouette’s video suggests that the stamps will become “seasoned” with use. My black chevrons on the telephone card used the black ink pad that came in the stamping kit, and it’s a very wet pad.
Cutting the material itself is very easy. Just like the video shows, the special mat has holes in it so you don’t get bubbles when laying the stamp material down on the mat (be sure to remove the white mat liner and replace it when finished). It has connected points because of those holes, so you have to pull the pieces apart after cutting. I found the default settings of blade 9, speed 1, thickness 18 to be just perfect.
Finally, the material itself is quite thin for a stamp but it worked surprisingly well. It was not too “squishy” to get soft edges, so the images I got were crisp and clean. And I had no trouble with extra ink on the block edges transferring onto the project. The larger the stamp, the harder it is to work with to get a smooth image, but that’s the case with stamps in general. It is clingy on both sides so, if you don’t have text included, you can use either side to stamp with. (I don’t have any other reversible stamps, do you?)
I can’t wait to make more custom stamps in combination with other features of the Silhouette machine. If you have any more questions about this stamp material, please ask me and I’ll do my best to answer based on my experience with it.

Excellent review. Thanks for doing this!
WOW! WOW! DOUBLE WOW!!! Thank you so much!!! I am lovin' this right about now. Just seen that I will be expecting delivery of my stamp kit on Friday. YAY!!! I love how you used your pens and then colored with the stamps. Oh my, I am excited. Thank you Kelly! hugs, rose
Hi ! Love the results you got, interesting about the qualities of the stamping material.
Fab cards, Kelly.
Tine 🙂
Thanks for all the helpful hints on using this new product. Looking forward to further days of creativity–yours and mine.
Hi Kelly,
oh my GOSH!! I am so excited about this. Thank you for featuring these, for I really really WANT and I may pick your brain if I get stuck. You are incredible. I think this really WOULD be something worth staying up for!
🙂 Barb
I enjoyed my visit with you!! I ♥ your posts.
I just had to "follow" you so not to miss anything! It would make me so happy if you would follow me too. 🙂
Have a beautiful week!
Lots of BIG Hugs,
Deborah
Wow…these are all beautiful Kelly! I'm glad you were able to make some really nice projects with the kit…there are a couple of bloggers out there who didn't seem to give the kit a chance and I hope they didn't talk anyone out of trying it! It's my favorite new Silhouette product…so many possibilities. I even bought a few more types of ink to try out at some point…but really I'm just hoping Silhouette starts making more of their own in lots of different colors because their black ink is pretty nice. Thanks for the link!