Sketched Cards with Silhouette Free Design
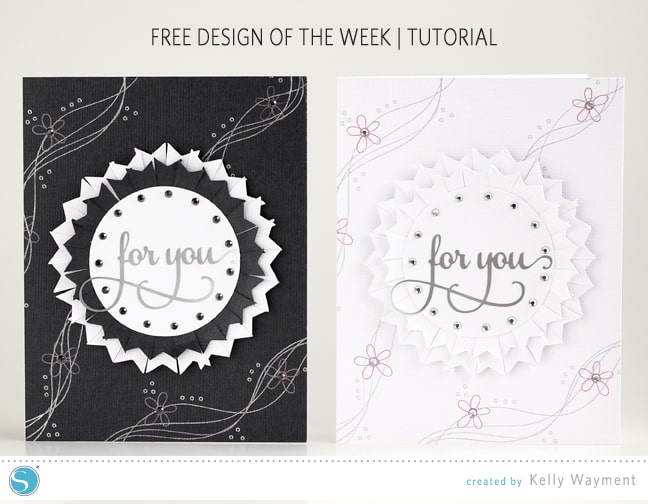
Hello, Silhouette friends! Let me share with you how I used this week’s free design on a couple of cards, in combination with metallic sketch pens and rhinestones for extra shimmer.
This ribbon design has a lot of pieces to be placed, so I chose to cut it with adhesive cardstock to take out the step of gluing each piece. Note also that I cut an extra circle from adhesive cardstock and flipped it over for an extra sticky place to add the flags.
1- To make these cards, I resized the design so the widest point (the larger set of flags) was about the width of my vertical card—just under 4.25”. Be sure to resize both sets of flags and the circle together so they stay proportionate.
2- To make these two cards I cut the following from adhesive cardstock:
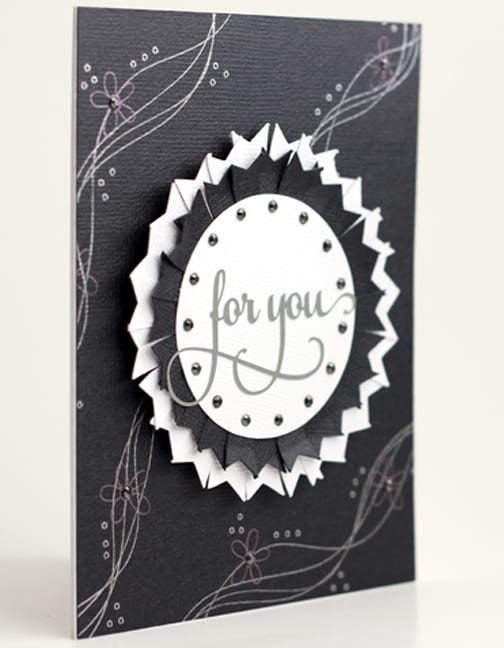
- From black—a smaller set of flags and a card front* (4.25” w x 5.5” h).
- From white—a smaller set of flags, two larger sets of flags, a card front*, and four circles.
* I sketched multiples of this flower border on the card front with silver and metallic purple sketch pens (from the sketch pen starter kit) before cutting with the blade the rest of the base and the other pieces listed above. For a quick tutorial on sketching and cutting, see Step 7 of my tutorial here. Just add an extra pause after a second sketch color, before the final blade cut in the Cut Order.
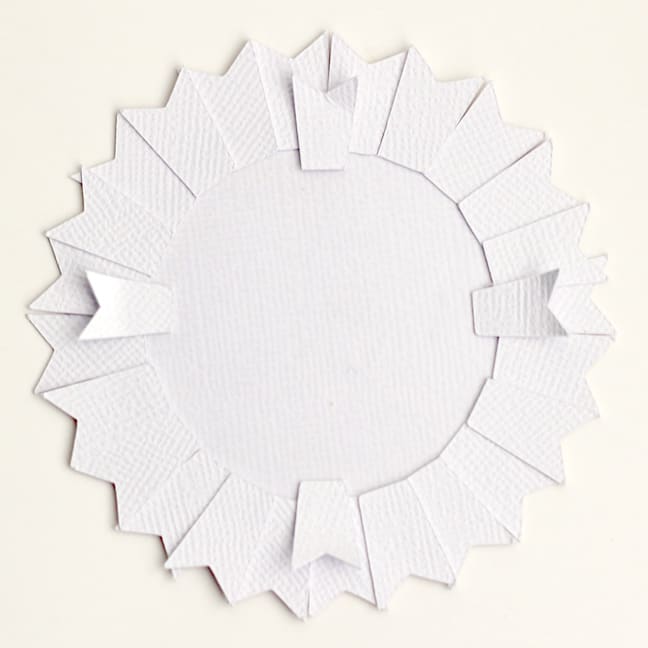
3- Assemble the flags onto a circle before adding to your project. As I mentioned above, I cut an extra circle out of adhesive cardstock and flipped it around to place the flags on the sticky side. (If you don’t use adhesive cardstock, just add glue that won’t dry before you place all the flags along the edge.) There are 24 larger flags and 24 smaller flags. This is the easiest way I found to place them to keep the spacing even (read steps 4 and 5).
4- Place a flag from the larger set at each point below–labeled 1,2,3 and 4. (If you were looking at a clock, they would be at 12:00, 6:00, 9:00 and 3:00.) Then place four more flags, one between each existing flag—labeled 5,6,7 and 8 below. Finally, place two flags between each of the existing flags, which should use the remainder of the flags. That takes care of all the larger set of flags.

5- Then start over with the smaller set of flags, placing them lower (more into the circle) than the first row. You can see the first four flags of the smaller set that I’ve started below. Start them so they cover the break between flags of the upper row, then continue in the same order as the larger set.
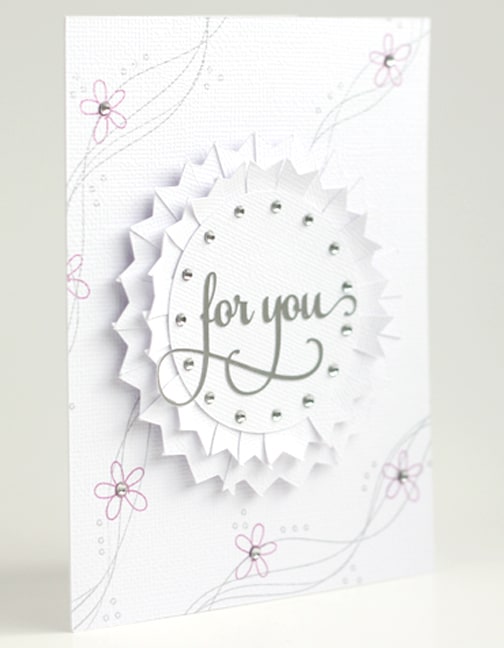
6- After all your smaller row of flags are placed, put another circle on top, centered within the design. Add any sentiment or embellishment you wish. I added “for you” from the perfect flourish words – gift tag set in the design store, cut from silver printable foil (which cuts beautifully and is self adhesive).
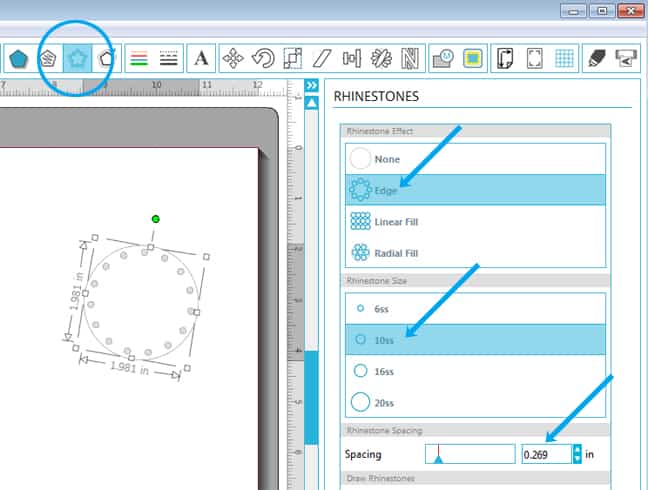
7- To finish my medallion, I added a circular border of rhinestones. In the Designer Edition of Studio, I created an inner offset of the circle, used the Edge effect in the Rhinestones Window, and set the spacing to 0.269” for 10ss rhinestones.
I cut a template of these rhinestone holes, filled it with rhinestones, pressed rhinestone transfer tape on it and lifted the circle of rhinestones off the template, placed it on the top circle of my assembled ribbon, and ironed them to activate the glue. Perfect circle! (You could also place the rhinestones by hand if you don’t have the Designer Edition and heat them individually with the rhinestone setter tool.)
8- Place the sketched card front onto a folded card base. Adhere the assembled ribbon piece to the center of the card front (foam adhesive squares give it extra dimension). I also added rhinestones with the rhinestone setter tool to the centers of my sketched flowers.
What will you make with this week’s free design?
Designs Used:
- Free ribbon design (#69031)
- Flower border (#46376)
- Perfect flourish words – gift tag set (#50172)
Originally published on the Silhouette blog 11/11/2014 as a design-team project.

Great idea!!! hugs, Patty
Thank you, Patty! 🙂
Love your two cards! I was wondering how to use the free shape this week … thanks for the inspiration!
Thank you and you're welcome! 🙂
Hi Kelly,
You always have brilliant ideas and tutorials. So informative, I am just going to have to do this one! Hilary
Thanks, Hilary! Let me know how yours turns out. 🙂