Getting Started with Silhouette Curio™
Do I have any intimidated or overwhelmed Silhouette Curio™ users out there? I’ve written this Getting Started with Silhouette Curio tutorial for beginners so you know all the basics about the base, platforms, how to load and unload, etc.
This post first appeared on the Silhouette America blog in November 2016 and has been updated here for Silhouette Studio® v4.

Who feels like they need some basic information about Curio before they dive into all its specialty features? Welcome to Curio 101! I’m Kelly, and I’ll be your instructor for today. 😉
This post will mostly cover the parts of the Curio machine, including:
- Understanding Curio’s Base
- Using Curio’s Platforms
- Understanding Side Buttons And Lights
- Getting Silhouette Studio® To Recognize Curio
- Performing Test Cuts With Curio
- Tools And Gadgets Included With Curio
Understanding Curio’s Base
Curio is different from any other Silhouette machine. The special base is what allows you to use a wide range of thickness in materials, from paper-thin up to 5 mm in thickness.
There are two different sized Curio bases:
- The smaller base that comes with Curio (holds media up to 8.5 in. x 6 in.)
- The larger base (holds media up to 8.5 in. x 12 in., purchased separately). (Affiliate link.)
NOTE: Curio cannot cut media without a mat, like vinyl or other adhesive-backed materials. (The CAMEO and Portrait machines can.) However, you can cut those materials with Curio if they are on a mat.
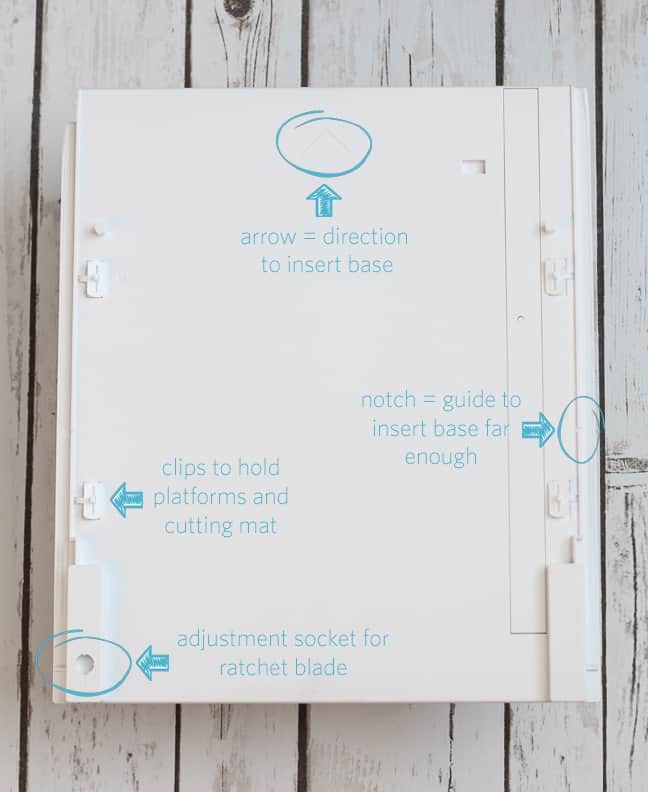
4 Things To Know About Curio’s Base:
- The base must be loaded with the arrow inserted into the front of the machine first.
- The notch on the right side is the other important indicator you must pay attention to when loading.
- You have a convenient adjustment hole for the ratchet blade.
- Clips on the edges of the base hold the platforms in place. They are flexible to accommodate the various heights.
Using Curio’s Platforms

Here’s what you need to know about Curio’s platforms:
- The platforms plus the media thickness should total 6 mm to be at the correct cutting height.
- Thin materials, such as paper, vinyl, and cardstock, have a minimal thickness and therefore require the platforms to total 6.
- e.g. Paper on the cutting mat (1) + 2 + 2 + 1 = 6
- Thick materials, such as a 5 mm piece of wood, require less platforms to total 6. The only platform you would use for a 5 mm-thick material would be the cutting mat. (1 + 5 = 6)
The platforms each have a number 1 or 2 marked on the side, which represents 1 mm or 2 mm in thickness.
Use the platforms in combination to get to the stated platform number. For example, if the platform level says 5, then use 2 + 2 + 1. Remember, the top platform is always 1 mm and is either the cutting mat or the embossing mat.
There are two ways to decide how many platforms you need to use:
1. If you choose existing media in the Cut Settings Window of Silhouette Studio®, the software will tell you which platforms to use.
Go to the Send Panel, choose your material, then click on the 3 little dots to enter Advanced options.

Now choose the correct tab for your material (i.e. Cut, Emboss, etc.) and you can see the platforms to use with an existing material.

2. If you choose your own media not in the presets, you must decide on the correct number of platforms. The thicker the media, the fewer platforms you will need. (See those math equations above!)
Understanding Side Buttons And Lights

On the right end of Curio you can see three buttons (left to right):
- Pause (with light)
- Load/Unload
- Power (with light)
Load/Unload
To load or unload the base, the indicator light by the power button must be off or flashing. A solid green light means the base is locked in place and you must not force the base in any direction at that time.
To load Curio:
- Push the base (arrow-end first) into the front of the machine so the guide notch is farther in than the front edge of Curio.
- Press the load/unload button (if on) or the power button (if off). Curio will move the base into the correct position.
To unload Curio:
- Press the load/unload button so the indicator light flashes green.
- While the light is flashing, pull the base out of the machine.
Pause
The pause button pauses the cut job. And because the base loads in exactly the same place each time, you can unload the base while paused, inspect your job, then reload and resume.
To pause Curio:
- Press the pause button
- Press pause again to resume cutting
- Or press and hold the pause button to cancel
Getting Silhouette Studio® To Recognize Curio
The first time you plug in your Curio, there may be a delay with the software. Be patient, and it will recognize Curio and load the accompanying free designs into your Silhouette Library.
NOTE: If your software says “Syncing,” load the base to move to “Ready” status.
Once Curio is recognized, the Emboss and Stipple panels will be available. Even if you turn off Curio at this point, those functions will remain available until you plug in a different Silhouette machine. If you cannot access the Emboss and Stipple functions, make sure your Curio is plugged in and turned on.
Performing Test Cuts With Curio

What to know about the Test Cut and Curio:
- Use the arrows near the onscreen test cut button to position the blade unit over a clear area of your material.
- You can test cut for either tool, so be sure to position the blade/tool you want to test over the area of your material you wish to test cut.
- The tool you select (red or blue) for a test cut will cut under that tool. This will give you an idea as to how well your chosen blade settings will cut.
- Note: as of December 2017, this still has a bug in v4, so the blade position is not necessarily where it will test cut. The issue has been reported and hopefully will be corrected with an update soon. You may choose to perform your own trial cuts with small shapes you position on your screen in lieu of the software’s built-in test cut option.
Tools And Gadgets Included With Curio

Besides the basic base, platforms, and two types of cutting mats, Curio comes with some other special items you may not use often but you should keep.
Fine And Wide Embossing Tools
- These two embossing tools can be placed in the machine’s inside storage holders while not in use.
Clear Material Fasteners
- These clear fasteners are used for embossing and debossing jobs with the embossing mat. They are placed along the edge of material to keep the edges from curling up. New clear fasteners come with each replacement embossing mat you purchase.
Registration Markers
- These black plastic squares are used for the very specific function of Print & Emboss. (See this Print & Emboss post.)
Spare Platform Clips
- These clips hold the platforms in place on the base. You’ve got some spares in case any are lost or broken.
Get going with Curio!
For more information on using the various specialty functions of Curio, you may find the following posts helpful (note some of these use Silhouette Studio v3–watch this video to find the differences from v3 to v4). And check out THIS POST for updated videos on the Curio functions in v4.
- Deboss
- Ink stipple
- Metal stipple
- Metal etch
- Emboss
- Print & Emboss
- Dual carriage
- Deep cut blade tutorial (cut craft foam)
What else would you like to know about using Curio?
You can purchase a Silhouette Curio™ here (affiliate link).

Thank you Kelly. Your instructions are great and you always cover just what I need to know. I appreciate you taking the time to teach us. I look forward to learning from you in the future.
So glad I can be a resource! Thanks, Jerri!
Am a 81+ alert lady who normally quilts but I bought a Silhouette Cameo two years ago for a church project but it didn’t handle it so last year I purchased the Curio (was told it would cut craft foam.. but never got either going properly due to no lessons and being 1 1/2 hours from a town of any size where I might be able to attend a class.) Now its time to move on with my own fun projects but need a lot of teaching from someone! When I tried to use the Curio on the craft foam, the machine cut the platform grip base and I had to buy a new one…I had also bought the larger base which is still in the box unused. I truly NEED TO LEARN HOW TO USE THESE two machines. Thanks for any help you can give me.
Hi Patricia! Here’s a tutorial on cutting craft foam. I’ve got lots of Curio tutorials on my blog (search “Curio”) and am making a series of online classes for the Curio, so stay tuned. If you need CAMEO classes, check out this post with links to all my online classes.
Just got a Curio for Christmas 2018 (all ready own Cameo 3) and was dismayed by the lack of information/tutorials Silhouette offers on the Curio. Thankfully, you have this covered, and I’ll be making use of all your tutorials. A huge THANK YOU!
One question, has the ‘cutting bug’ in v4 been corrected as of this date, January 15, 2019?
The Curio works fine with Silhouette Studio v 4.1.479 (the current release as of this date).
Thank you for your tutorials. Where and how do I use the Clear Material Fasteners with my Curio? I have not found any instructions.
You use them to hold down materials against your soft white embossing mat. Place your paper or metal stippling sheets against the mat (leave a border as indicated by the tiny arrows on the mat), then lay the clear material fasteners on top so the solid edge lays on the sticky mat and the “fingers” lay on the media. It helps hold the edges down while the Curio is pressing in the center.
Thanks Kelly. I have had my curio for a long long time. I bought it right when the cameo three came out. I thought it was a better choice to upgrade to from the ceamo one. I hated it and sold the one and bought a three and was going to sell it. then I watch a video or two and got the hang of it. I have used it here and there for specific things, but rarely use it. Found two link to your videos and am very happy. I will be trying more things in the next few weeks. I however, do not remember ever getting any black print and emboss square. I have purchased new mats and the larger base. Hmm….
I’m glad you found me, Pauline! Don’t worry if you’re missing those black squares for print & emboss. You can just use squares of black cardstock that are about 1 1/8″ x 1 1/8″ wide, but the measurement does not need to be precise. All they do is go under the registration-mark hole once it’s been cut (very specific to Curio print & emboss) so black shows through. It should make sense when you get to that point, but let me know if you have further questions about it. Good luck!
Hi Kelly, I’m so glad I’ve found you!! You’re a great help and explain things so well.
I would really like to know how to set up and cut the construction board 1000 microns. Would you be able to help please?
ElaineK
Hi, Elaine. That sounds similar to chipboard. Is 1000 microns equal to 1 mm? If so, you’ll probably need to use a deep-cut blade set to about 10 or 11, set a very slow speed (1-2), and make multiple passes. That would use the gridded cutting mat with the full value of platforms (value of 6). I hope that gets you started. If it’s too dense, your Curio will not cut it.
I don’t know how to load the paper into the curio to get started. Please help me. I am clueless
Hi Bobbie. As described in the post above, you have a base and multiple platforms. To cut paper, you need to clip all the platforms to the base (a value of 6, or 2+2+1+cutting mat). The top platform must be the cutting mat (it has a sticky grid area with a blue protective cover). Place your paper on the sticky cutting mat (trim to fit). Then push the whole base with attached platforms and paper arrow-first into the Curio. Go ahead and push the base all the way forward until it stops. Then turn on your Curio or press the double-arrow button on the side (the load/unload button) and the machine will position the base into place. I hope that helps with the loading!
Sorry in my poor English if it’s not understandable because I use an online translator
Very good tutorial.
I have the following problem.
I can’t find a platform option on the program.
where are those three dots that you listed I can’t find them at all.?
Hello Miroslav. The software has changed again and I apologize for not updating the post. You are looking for a “MORE” button instead of the three dots now. This will open advanced settings and allow you to see the platform number.
Thank you so much for this! I could not get the program to sync with the curio when following Silhouette’s instructions. Loading the base: genius! Thank you!!!!
Glad I could help, Kim!
Hi, my curio seems stuck. The carriage that holds the blades wont move into position when i load the base. Please can you give me some advise? Thanks
Are you pressing the load/unload button on the side after manually sliding the base in? If the carriage sounds like it’s trying to move into position but is not, you may need to turn off the machine and slide the housing unit back and forth a few times before turning it back on.