Silhouette Studio Tutorial: Make Your Own Scalloped Circles
I was asked how to design your own scalloped circles using Silhouette Studio, so I’ve written a short tutorial. This can be done in either version (basic or designer).
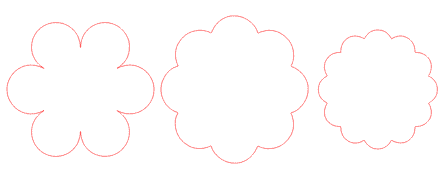
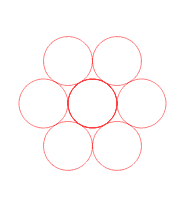
Here are the scalloped circles I’ll show how to make, using basically the same steps each time.
1. Draw a perfect circle using your “elipse” drawing tool. You can make it a perfect circle by holding the shift key while you drag out the shape. Make it 0.825″.
2. Go to your Replicate window (looks a bit like a flower). With your circle selected, choose “Row of Three”.
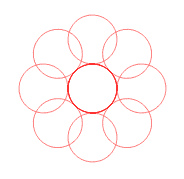
3. Select all of those circles, then choose “Rotate Three Copies” while still in the Replicate window. It should look like this:
4. Now select all of those circles and choose “Group” (bottom left icon).
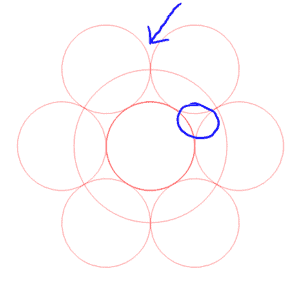
5. Draw another circle that will fit inside the outer ring of circles. This is what you’ll use to fill in the holes in the center when welding. This circle is 1.74″.
6. Go to your Align window (next to the Replicate window), select all the circles again, and choose “Center”. If you don’t like the size of your inner circle you can adjust it here by holding your Alt key (Option on a Mac) while dragging a corner handle and it will stay centered while you resize it.
7. Select all the circles again and choose “Weld”. (Bottom icon, looks like a grey rectangle and circle overlapping.)
Now for the variations:
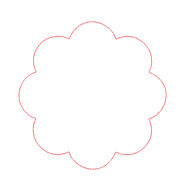
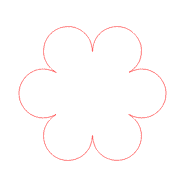
To make the scallop circle from the top image that looks like a flower:
Steps 1 & 2 are the same.
Step 3: Choose “Rotate Two Copies” (instead of three)
Step 4 is the same.
Steps 5 & 6: Your inner circle will need to be more precise. Make sure it’s big enough to cover the holes in the center, but not so large that it overlaps the very outer edge to interfere with the scallops. (This circle is 1.420″)
Step 7 is the same.
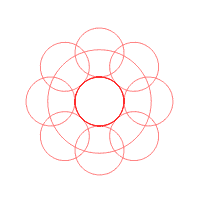
For smaller, closer scallops, you can make this variation:
Step 1: The circle is 0.50″
Step 2: Make it a “Row of Four” instead.
Step 3: “Rotate Five Copies” so it will fill in the gaps due to a smaller circle.
Steps 4-7: You know the drill.

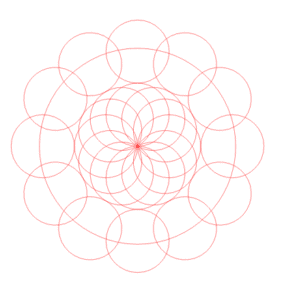
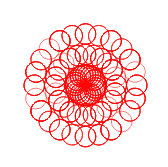
As you can see, these might be fun sketch designs for flowers before welding, too. Just for fun, I made a very small circle (0.345″), but had to choose my “rotate copies” in several combinations quite a few times until the edges were filled in. Because you’re welding, it doesn’t matter that there are some circles with many many layers in the same place.

Once you’ve created the scallop combination you like, these can be resized to fit your project. Have fun experimenting!

Very cool! Thank you for the tutorial! I sounds pretty easy the way you explain it 🙂 Not that I've tried it yet, but I'm sure I'll be able to do this on my own with your tutorial in hand 🙂
Thank you, so much! This tutorial will be so helpful for me as I'm just learning about the Silhouette.
This is great and helpful. I just unpacked my Silhouette and have been messing around trying to do something just like this!
I pinned this!
Thank you Kelly, great tutorial, fabulous idea to get a custom scallop that works for each project.
Hugs, Lori m
Thank you Kelly!!!!! For one who is missing the design gene, these tutorials are so very helpful.
Outstanding tute, Kelly! Thank you!
really helpful – ty!
Brilliant! This will be a fun one to try! thank you!
How clever, as a new Silhouette Cameo user I need all the help I can get. Many thanks.
Your tutorial is awesome! Thank you so much!
Hey! I just found your blog and you are rocking my little silhouette world! Thank you for such great tutorials and expanding on all the tools! I will definitely be following you 🙂
Thank you, my friends! I love helping you expand your Silhouette skills.
Thank you so much!!! I needed a scalloped circle to cut for a card I am making and this tutorial came up. Simple and easy to follow.
I've read through this & it helps me to understand how the software works in creating shapes. Thank-you so much for putting this together.
You're welcome! I think experimenting with Studio is pretty fun, and sharing what I learn is very rewarding. I appreciate all the nice comments so I know this is actually helping someone.
This was such an easy tutorial to follow! I'm still learning all the buttons, so this was an interesting one to get to know. Thanks!!
OMG! A THOUSAND thank yous!! This was so helpful! All of your tutorials are GREAT! I'm really struggling with making a scalloped oval. When I apply the methods for a scalloped circle on an oval, the end result after the weld is a circle… Do you have any advice?
Thanks Again!!
Mary
Mary, these steps using the Replicate and Align options work best for a circle. If you're manually placing circles along an oval shape, just make sure all of the circles and the oval shape are selected before choosing to Weld.
I have another tutorial for making a scalloped oval using "text-to-path" and I will add it ASAP.
I've added a video tutorial here for Making a Scalloped Oval.
That seems pretty straightforward – even though I haven't tried, just read the instructions. I will certainly be trying this as I wondered how to do it.
Some of the designs remind me of what my Spirograph used to draw.
Found your blog via a Facebook group and am now following you.
Thanks for the tutorials.
Many of the designs created with the replicate tool definitely remind me of Spirograph drawings! 🙂
Thanks so much for this tutorial. I've tried making my own scalloped circle in the past and never got it right. Just tried this now and it is such an easy way to do it. I won't be able to stop playing now!
I love to hear that, jordiegirl!
thank you i've copied and pasted into word,I'll add this to my camie folder – you make it look so easy. x
What a great project – so versatile and easy. thanks for the instructions.
I found your tutorial on pinterest. Thanks for sharing. Great tutorial.
This is the best site! Thank you so much for sharing!
Great tutorial! Thanks so much. It's so easy now 😀
Thank you so much for the tutorial. It was very easy to understand, even without the pictures loading for me!
Sorry the pictures wouldn't load, but I'm glad it was helpful anyway!
Fabulous tutorial. Thanks for the help!
Making these scalloped circles are only possible with the Designer Edition inlcuded?
I do not have that yet and seemed to have trouble following the steps outlined here.
Appreciate your reply.
Thank you.
Hi Sherece. You can do this with the basic version of Studio and do not need the Designer Edition. At which step are you having trouble? Usually it’s one little step that’s missed that may seem insignificant.