Silhouette Studio Tutorial: Flourish Frame for Cards
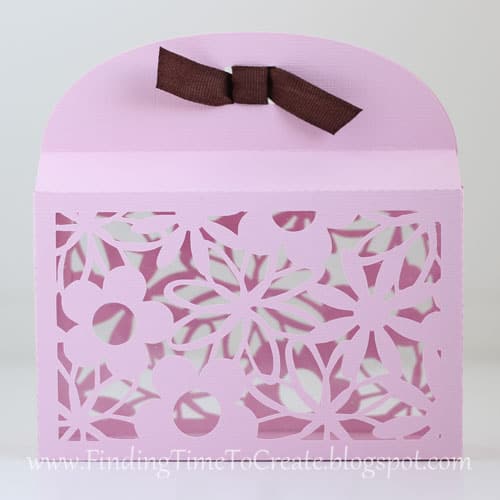
I recently taught a class on using the Modify tools in Silhouette Studio to combine background designs with other shapes. We made this project:
And in preparation for the class I made another fun frame, which I used in this project:
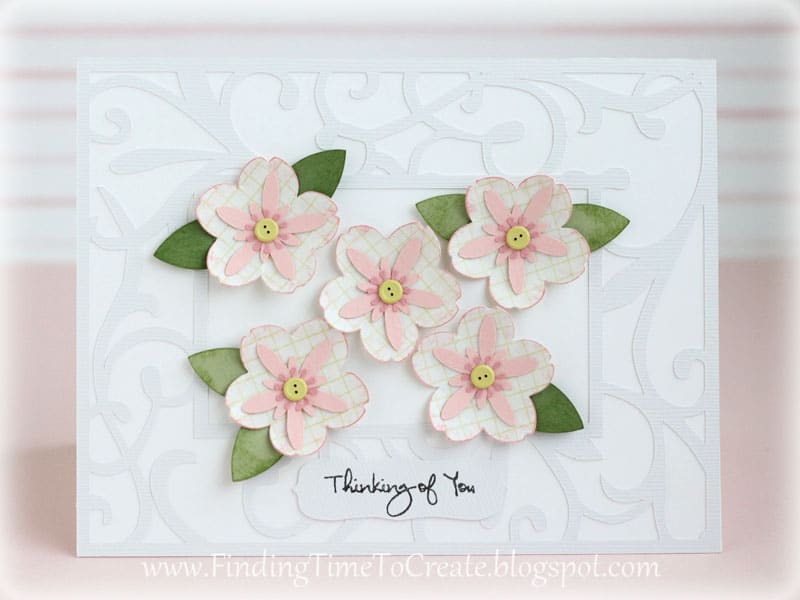
I was asked again about how to make this frame for the card front, so I’ve made a tutorial for you. You’ll need to purchase the shape design block flourish from the Silhouette store if you want to make exactly the same project, or you can try it with any background shape you already have.
The video details may be a little small, so I’ve got all the steps written out here to make this frame. Just a side note: a design like this will work best when cut with medium to heavy cardstock, as opposed to a lightweight paper.

1. Open “design block flourish” shape from your purchased shapes in Silhouette Studio.
2. Resize it to W=5.755”, H= 4.555” in your Scale window.
3. Select it, right click, choose Make Compound Path.
4. Draw a rectangle the size of your card front, W=5.5” H=4.25”.
5. In your Offset window, select Internal Offset, Corner option, 0.120”, Apply.
6. Save your work.
7. Move a copy of your inner rectangle (hold down Alt/Opt while dragging) over the top of the flourish.
8. In the Align window, choose Center.
9. Save your work.
10. Select both the rectangle and the flourish, go to the Modify window, choose Crop.
11. While still selected, right click and choose Make Compound Path.
12. Select your two rectangles (the original and its offset), right click and choose Make Compound Path.
13. Move this rectangle frame over the cropped flourish, select both, and Center (in the Align window).
14. Zoom in, and enlarge the flourish just slightly so its edges fall between the two lines of the frame. (Hold Alt/Opt while dragging a corner handle and it will stay centered.)
15. Save your work.
16. Select the frame and the flourish, Weld (right click or button on bottom of screen).
17. Draw a new rectangle and size it to W=3.235”, H=2.005”.
18. Make an Offset of 0.120” (Offset window, Corner option).
19. Drag a copy of the inner rectangle to the top of the welded flourish frame, Center (in Align window).
20. In your Modify window, (select the flourish and rectangle) choose Subtract.
21. Select the flourish frame with its rectangular hole and Make Compound Path.
22. Select the smaller rectangle with its offset, Make Compound Path.
23. Drag this rectangle frame to the center of the flourish frame, Center it, Weld it.
24. Done!
Keep in mind that I only included the exact steps to make this particular frame. If you’re feeling adventurous you can (in theory) use any background design and any shape if you remember a few basic principles when working with the Modify tools in Studio.
- Save your work often, because the program has to “think” hard for some of these tasks and may close unexpectedly.
- When designing, use copies when modifying so you don’t lose the pieces you’ve already made and sized correctly.
- Make everything a compound path before using any Modify functions, including Welding. The program doesn’t have to “think” as hard, and you won’t lose the holes in your designs.
If you want a list of these steps to print and have on hand, you can download a PDF of this tutorial for Using Modify Tools in Studio to Make a Flourish Frame.
This post may contain affiliate links. Your price is the same, but I may receive a small commission when you use my links. Thanks for your support!

Thanks for these easy to follow directions and the download copy of them. Also the make everything compound path before welding explains why I lost holes when trying to design a few things because I forgot to do that.
Fabulous Kelly! Thank you so much for doing this and an especially big thank you for including the written directions. I love having them on hand when I try a tutorial and then keep instructions in my "Cameo" binder for future reference.
(I was thinking of you when I included the printable instructions, Shawna!) A reference binder is a great idea.
thank you for this great tutorial Kelly!! I learned a lot watching this video:-) I appreciate you taking the time to make the video and share this information with us!
Kelly, I think you make some of the best video and written tutorials. Thank you so much. I always learn so much.
I'm glad you all like this tutorial. I've got a list of more I plan on doing, so I appreciate hearing that these are actually helpful. I always spend more time on tutorials than I intend, but when I get positive responses like this the effort seems worth it.
Nice tutorial, Kelly.
Tine (Addie24)
This was great, thanks.
Thank you for this tutorial! It helped me very much!
Best wishes from Germany!
Steffie
This was a great tutorial, thank you for sharing!