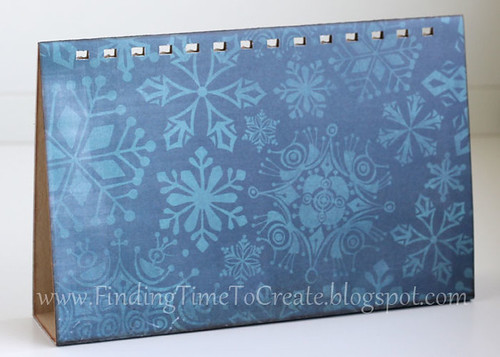
Perpetual Flip Calendar
This is a project I’ve wanted to make for years. I saved an image of someone’s flip calendar on my computer in an “inspiration” folder ages ago and am so happy to have finally made it! I used my Silhouette Cameo to cut the titles and numbers, but the rest can be done with basic tools like a paper trimmer, plus some way to bind it. Here’s how I made this perpetual flip calendar.
Supplies:
- Pattern Paper: Bo Bunny Blitzen collection (3-4 different double-sided pages)
- Cardstock to coordinate with pattern paper (4 colors)
- Silhouette Adhesive Cardstock (black, from Essentials set)
- Chipboard, medium to heavy weight. Final size will be 8”x12”
- Distress Ink: ColorBox Chalk dark brown
- Bind-it-All, Cinch, or other binding system
- Fonts used: LD Little Fishie (months), Lobster Two (days), Impact (numbers)
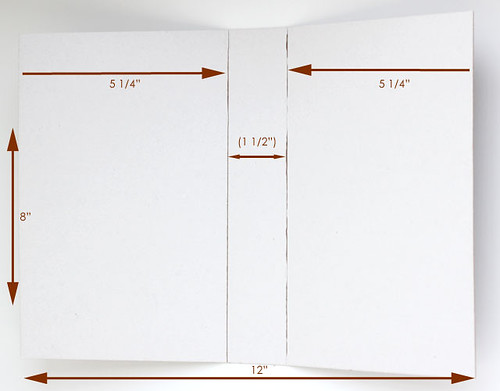
1. Cut the chipboard down to 8”x12” for your calendar base. I think a heavier weight will be better than lighter; you’re just making straight cuts with a paper trimmer so it’s not difficult to cut.
2. Score the chipboard at 5 ¼” from either end. I used a craft knife to make a controlled, light cut just in the outer surface.
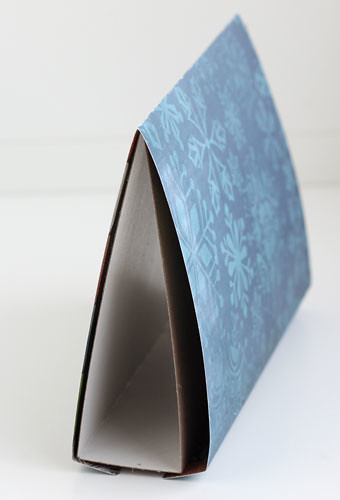
3. Fold the chipboard sides up so the cut is on the inside of the fold.
4. Select pattern papers that are neutral enough to mix and match throughout the year. You can make enough pieces with three double-sided pages, but four will give more variety.
5. Select about four cardstock sheets to coordinate with the pattern paper (letter-size should be big enough).
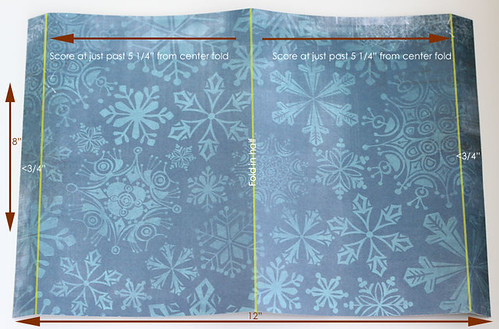
6. Cover the chipboard with pattern paper: Cut one piece of pattern paper to 8”x12”. Fold it in half (to 6”x8”). Score at just more than 5 ¼” from the center on each side (this will leave a little less than ¾” to fold under the chipboard base). Ink the edges of that pattern paper.
7. Optional: Cover the inside of the chipboard with plain or pattern paper. (Make the same score lines as the chipboard piece and trim any overhang.)
8. Wrap the scored pattern paper from Step #6 around the chipboard base so the opening of the chipboard piece sits in the center fold line of the pattern paper. Adhere it in place, wrapping the smallest edges under the base.
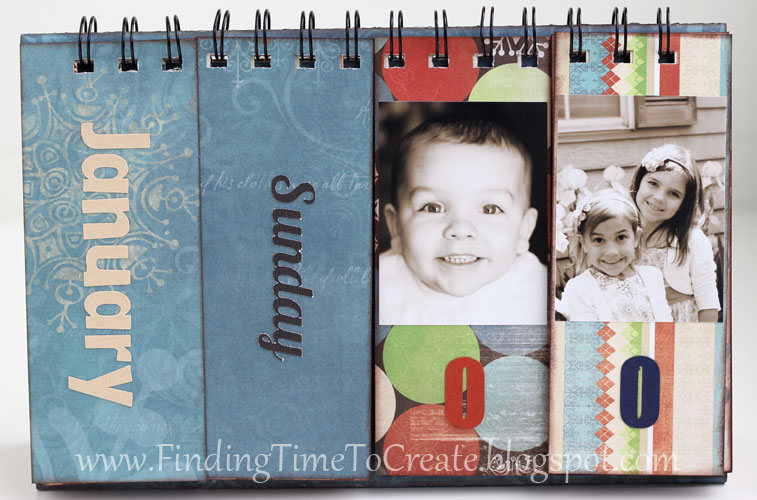
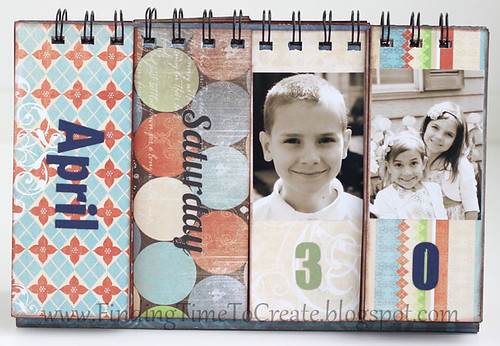
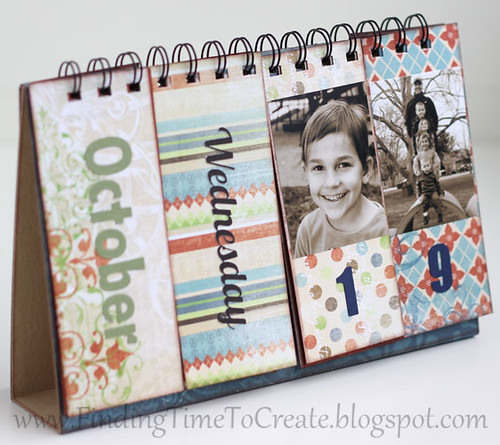
9. Trim the pattern paper from multiple coordinating pages into 33 strips, each 2” wide by 5” tall (12 months + 7 days + 14 numbers).
10. Ink all the edges of the paper strips, front and back.
11. Cut from coordinating cardstock: 12 months, 7 days, numbers 0-3 and 0-9. I used Silhouette Adhesive Cardstock in black for all the days.
12. Adhere the months, days, and numbers to the flip cards so the front of each card gets one month or day or number.
13. Add photographs (14 total) to the numbered flaps, if desired. My photos are cropped to 1.875” wide by 2.5” tall.
14. Punch holes and bind so the cards will flip independently of one another.
I cropped 14 photographs for all the numbered flaps, and as much as I’d love to show you every combination of the months, days, and pictures, I’ll spare you and just show a sample of how some of these will look throughout the year.

I’ll be turning this one in to Heartland Paper for the design team, but I’ve already printed photos to make another for myself. This would make a great Christmas gift for family members. And once you make it, it can be used year after year.
P.S. My blog’s 2nd anniversary is coming up on October 7th and I’m really close to 500 followers right now. I’d love to reach the 500-mark by then, so I’d be very happy if you would join my followers if you haven’t already!

Such a great idea! And how fun to see those adorable faces smiling everyday, I adore this project. Great choice of papers too!
That is soo cute. would make a great gift for anytime of year.
What a neat idea. I'm bookmarking this as it will make some wonderful gifts for Christmas.
This is so beautiful. Thank you for the tutorial.
/Charlotta
What a lovely idea. Filled my head with lots of ideas and who to make this gift for!
I have saved this for when I can get back to crafting! It's a marvelous project for home and gifts, and I am thinking it could be possible to cut several at once. Am I right?
Absolutely, Barbara! This is a great one to produce in multiples. 🙂
So sweet ♥