3D Rosette
I’ll be sharing a tutorial in the next few days for a patriotic ribbon that uses a 3D rosette, but I think it will be simpler to show how to make the necessary rosette separately. 3D rosettes are fun to add to all sorts of projects.
You can use my free 3D rosette download for use with Silhouette Studio HERE (requires a 12″ Cameo), or you can create your own with a paper trimmer and bone folder or Scor-Pal, etc.
Be ready with some tape, a hot glue gun, and two circle scraps (approximately 1″).
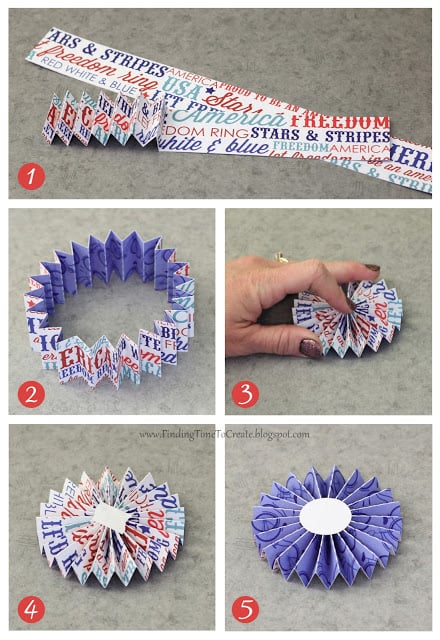
1. Cut and fold my free rosette file on the perforated lines; or to make your own without a Silhouette Cameo, simply cut two strips of 12″x12″ pattern paper to 1 3/8″ wide. Then crease and fold every 1/2″.
2. Once both strips are folded, glue the ends of both strips together to form a loop.
3. Gather the circle together and press down in the center to flatten it.
4. Compress it as tightly as you can without deforming the paper, and place a piece of tape on the center of the rosette to temporarily hold it in place. Also place tape on the other side.
5. Once you have tape on both sides of the rosette, add some hot glue to a paper circle and press it down on the center while still holding the shape as compressed as you can.
After you have hot glued the rosette on either side, you no longer have to worry about it springing open again (the tape itself won’t hold it very long). At this point you can decorate the rosette however you want, including gluing a larger circle or label on top.
Come back soon to see the fun patriotic ribbon I made using this rosette!


Thank you for sharing this usefull tutorial!
Thanks for sharing the cute cut file.
Blessing's Jocelan
Thanks Kelly for the file and the tutorial. Making all those score lines is time consuming, so I will enjoy making rosettes much much more, thanks to you! I love yours done in the patriotic paper.
It really is sooo much nicer to have a Cameo do the work! 🙂
Thanks for the rosette. I had been wondering if your hand had gotten well. I am happy to see you back to making fun stuff again and sharing. It is never any fun when you are injured or sick and it keeps one from being creative. Just thrilled you are back!!!
rose
Thank you, Rose! It's been a rough couple of weeks but I think I'm back in business now!
A fab embellishment to make, Kelly & thanks for sharing your file with everyone too.
Can't thank you enough, will be making Christmas banners with these rosettes.
Many thanks for a very useful tutorial and cut file. Can't wait to try it
Carole