PixScan for School Work! {Tutorial}
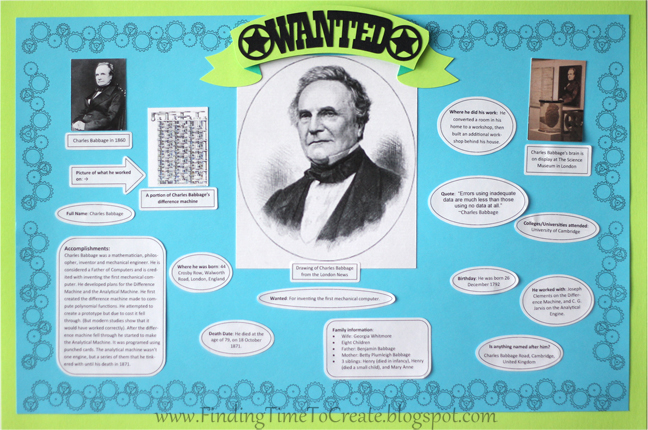
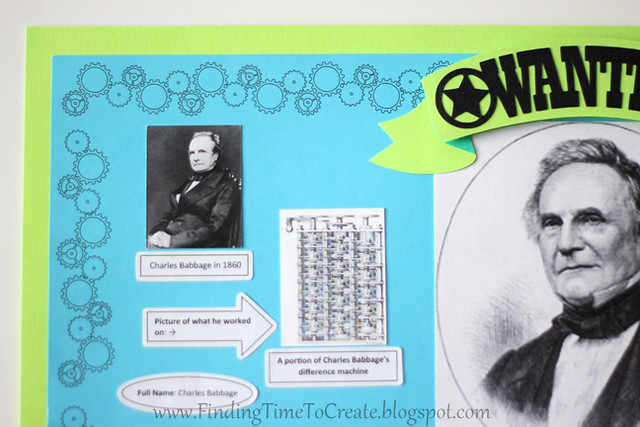
My son in junior high school had to make a 12″ x 18″ poster about a famous person for his term science project. He chose the one who has his brain on display in a museum…yeah, you heard me right. British mathematician/engineer Charles Babbage, whose brain is in the The Science Museum in London.
The students were able to do all their research and type up a document at school, but to make it all crisp and clean we wanted to use my Silhouette CAMEO. And yes, he asked me to use my machine to help.
So we had all these text boxes and general text he had already typed up with important facts. And while I love, love, LOVE Silhouette Studio for designing, it is not meant to do a lot of itty bitty text. And even if I wanted to do it, it would take a long time. Way too tedious, now that we have a PixScan™ mat.
I could have used his Microsoft Word document and moved the lines of text into text boxes, but I just copied and pasted into my other favorite designing program, Microsoft Publisher. A few minutes of creating text boxes, copying and pasting text from Word to Publisher, and then drawing basic borders around those text boxes, and we were ready to print!
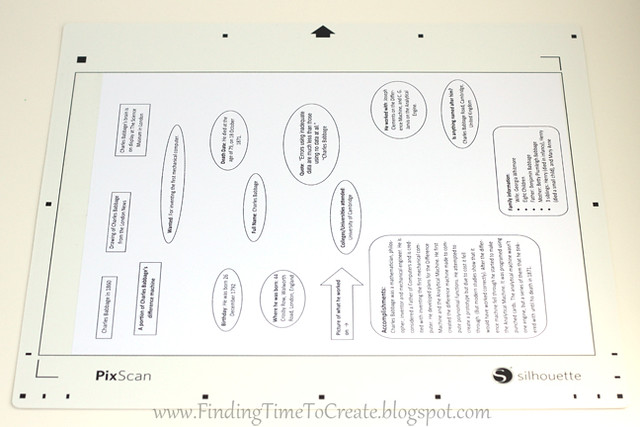
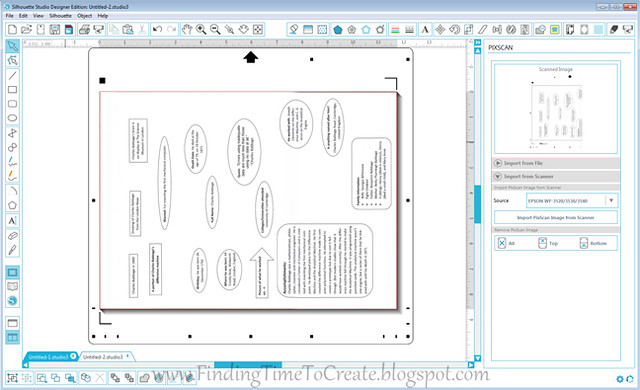
I printed the page from Publisher, then placed it on my CAMEO PixScanTM mat within the black border. I placed the mat with the printout on my flatbed scanner (just a standard size for A4 or letter pages) and followed the instructions posted by Silhouette America on their FAQ page.
- Place your paper on the PixScan™ mat and place it down on the scanner with the left or right edge against the long scanner bed edge. (It will hang over the side of the scanner.)

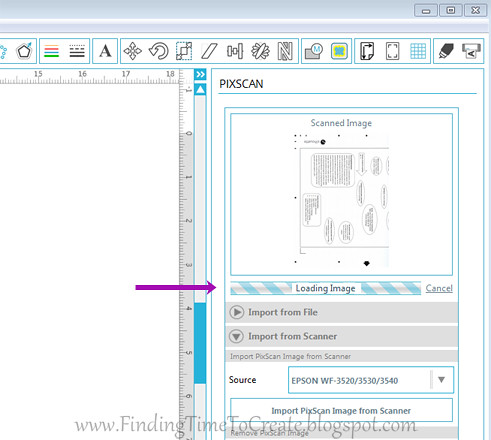
- Click on the PixScan icon in Studio (between the Open and the Save icons).
- Choose Import from Scanner.
- Choose the correct scanner in the little dropdown box.
- Click Import PixScan Image from Scanner.
- For me, this brings up a scanner popup from Epson. I choose A4 size instead of letter paper to make sure the maximum image is captured.
- Click Scan (or the equivalent) on your scanner’s dialog box.
- If nothing happens (warming up for more than a minute or two or otherwise not responding), try minimizing Studio. Sometimes I have to minimize and maximize Studio a few times or cancel completely and try again. (This is obviously a glitch that will hopefully be resolved soon. Not sure if Macs have the same problem.) Eventually it should scan your mat.
- Once it has scanned, you’ll see a loading dialog box. Just be patient and wait for the progress bar to disappear.
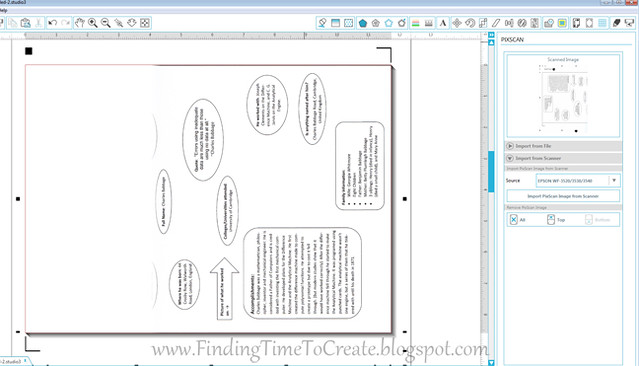
- Your page should now show on your Studio screen, half loaded. At this point you’re ready to scan the other half.
- I lift my scanner lid and rotate the PixScan™ mat 180 degrees, placing it in exactly the same spot on my scanner as the first pass.
- Click Import PixScan Image from Scanner again.
- Verify the settings are on A4, and choose Scan again.
- Wait for the loading progress bar, and then your full image will appear on your Studio workpage within an image of the PixScan™ mat. Perfectly merged.
- Now is the point where you use your Tracing skills. I’m not going to go into details for that here; there are plenty of tutorials out there on Tracing in Studio. (Basically, in the Trace Window: Select Trace Area: Adjust Threshold: Trace or Trace Outer Edge.)
- Note: As an alternative to tracing, I could have used the Studio drawing tools to draw ovals, rectangles, and rounded rectangles around the text.
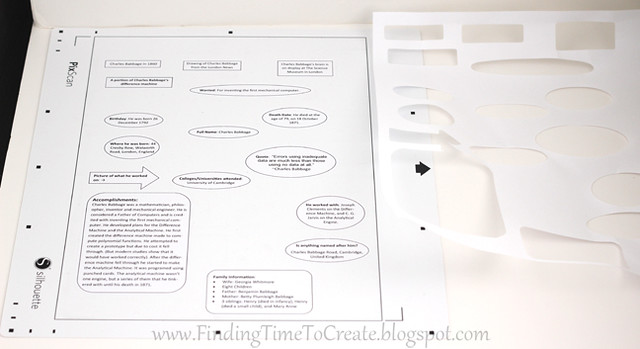
- Because I already put boundaries on my text boxes, I just traced the whole page, which created cut lines along all my text-box borders. I wanted to cut slightly outside the borders of the text boxes, so I selected everything and created an offset in my Offset Window.
- Then I deleted all the cut lines except the offsets.
- Now the paper is still on the mat and the software knows where to cut. I went to the Silhouette Cut Settings Window, chose Copy Paper as the media type, and adjusted my blade.
- Load the PixScan™ mat into the Silhouette machine and choose Send to Silhouette, as normal. The optical eye reads the marks on the mat, just like it reads registration marks on paper for a print and cut, and then cuts exactly where you see the cut lines on your screen.
Brilliant.
I would have had a hard time fitting all of this into the boundaries of a print & cut, so the PixScan™ mat is perfect for cutting out images that take up the whole letter-size page. And it was the perfect workaround for getting all that nice-looking text cut out that was designed in a completely different program.
And of course to finish off the poster, we used a Silhouette cutting file for the “wanted” banner (a project requirement), and we sketched gears all the way around the border of an 11″ x 17″ paper with a sketch pen. The border was another requirement, and my son chose the gears border design. He was thrilled with the final result. Oh, and he made sure we used foam adhesive squares to make the banner pop off the page so it would be more impressive.
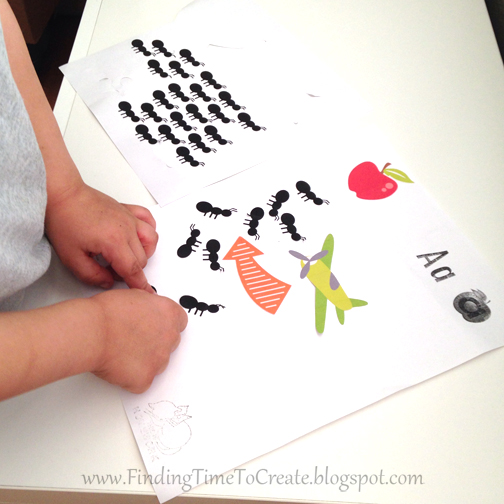
For my kindergartener, we’ve been using the PixScan™ mat, too. Every day he brings home a new letter page to fill up with things that start with that certain letter. We don’t keep magazines around our house, so we just find designs in Silhouette Studio (for a standard print & cut) or choose a bunch of clipart in Microsoft Publisher to use with the PixScan™ mat.
He chooses the clipart pictures, we print it straight from Publisher on paper (sticker paper is awesome), then we put the printout on the PixScan™ mat, scan it, Trace the outer edge of the pictures in Studio, load the mat into the CAMEO, and cut it! Then he’s got a bunch of stickers to place on his homework page. Love it.
I used my PixScan™ mat for another project involving scrapbook pattern paper, but I’ll save that for another post. 😉
And in case you’re wondering, Silhouette Studio’s current version 3.1.417 is working great for me. The few bugs it has are just a minor nuisance if you’re doing a lot of designing and manipulating shapes. The more basic your use of the software is, the less you’ll encounter the little bugs. I’m using it a lot, and am not frustrated with it.
One final note about PixScan™. I’ve seen some confusion in blog posts regarding the use of the PixScan™ mat. I hope to have time to share more ideas, tips, and tutorials, but one thing I’ve noticed is people are using the PixScan™ mat to scan an image into their computer, trace it, then cut it out with a different material. That is simply a scan and trace, which we’ve always been able to do.
The biggest benefit of the mat is that you can take something that’s already drawn/stamped/printed, stick it on the mat, and cut it straight from the mat. Designs created in Studio, like stamps for the stamp material, sketch designs, and imported digital images not yet printed already have the capability of being cut straight from the program without adding the step of using PixScan™.
As always, please ask me if you have questions about any Silhouette machine or Studio feature!

What a great tutorial. I have ordered my pix scan mat and your clear instructions will be invaluable. Love your projects. Hilary
I'm glad to hear it. 🙂 Thanks, Hilary!
Thanks for this, Kelly! I'll definitely save this information for when I get a PixScan mat.
You're welcome, Gilda. 🙂
This is an amazing tutorial – I have to admit that I didn't really know how I'd use the mat at first – but there are a few things I think having PixScan mat with will be awesome.
Thanks, Kim! I hope to post more tips and tricks about PixScan soon!
I love how you used the pixscan mat Kelly! I just read the suggestion thread on the SIL Plus group and I like seeing that you are helping us understand more of this, what seems to be, fabulous tool.
Thank you!
Thank you, Ceci! I really do think PixScan is an excellent tool that expands our options as Silhouette users, so I'll try to post more tips as I have time.
Maybe this is a really basic question, but what cut setting should be used for sticker paper? I can see some school projects really enhanced by that. Does the Silhouette cut all the way through the paper, or just to the backing? I'm thinking of the full sheet Avery type sticker paper. Feeling the "need" for a PixScan mat now….
I've used the same settings on Silhouette sticker paper and full-sheet Avery sticker paper. To cut through just the sticker layer and not the backing, I set my blade on 1, speed 8, and thickness 22. Sometimes I actually want to cut through the backing for individual stickers to be passed around, and then I set my blade on 2, speed 8, and thickness 15+. (It will usually depend on your blade; these settings work for a sharp blade that works with most of the default cut settings.)
Thanks Kelly. This actually worked for me. I gave up on the camera calibration because I shake too much…and previous attempts did not seem to work. Your very clear directions have made me decide to keep & use my PixScan mat.
So glad to hear it, Jean!
When I read, 'Load the PixScan™ mat into the Silhouette machine': I thought you were putting it in the Cameo cutter. You were putting the scanned file/picture into the drawing area of the silhouette software. Correct?
rmissbrooks59, WA, PC, Windows 7 Pro, Silhouette Cameo 12", Sure Cuts A Lot Pro V 3.052, Quilter
You place the paper to be scanned onto the sticky area of the PixScan mat. Then you scan the whole mat with the paper stuck to it. That scanning process places the picture into the drawing area in Studio so it looks exactly like your mat. Then you really do load the PixScan mat with its paper still stuck to it into the Cameo just like the normal cutting mat. I hope that clarifies!
My Craft area didn't have enough light and I searched and found that you can shine a flash light on the silhouette if it doesn't pick up the registration marks works great