Silhouette Design Team Blog Hop {and Giveaway}
Welcome to my little stop along the blog hop with all the talented ladies of the Silhouette America design team. I’m so glad you’re here! I’m first in line, although officially it starts at the Silhouette America blog. We don’t want you to miss a thing!
We were asked to share our favorite Silhouette product, and one lucky winner will receive the product I’m spotlighting! Yay! I really love Silhouette’s adhesive cardstock, and if I were only able to choose one color, I’d go with white.
I love all adhesive-backed cardstock because I can cut intricate (or large) shapes and never worry about adding glue to the back. It is such a time saver! In addition, white adhesive cardstock can be printed on for beautiful print & cuts, and you can color it with markers for custom colors! And there’s another fun trick you can do with adhesive cardstock, which I’ll show in just a minute.
Let me share with you how I used white adhesive cardstock on these Christmas house ornaments.
Although I have several of the available adhesive-cardstock colors, I used only white adhesive cardstock for the window trimmings and doors in this particular ornament collection, just so I can show you how versatile it is. This would have been a super-fast project if I had simply gone with white trim for everything, but a little more time and creative thinking resulted in a lot more variety.
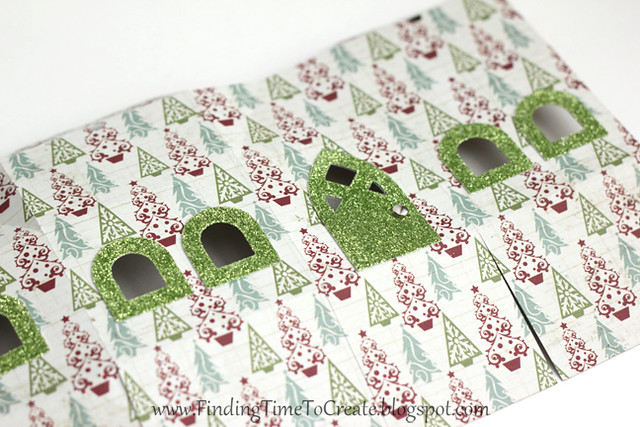
Here’s the fun trick I mentioned above. I cut some of my shapes from white adhesive cardstock, then simply flipped them over for an evenly-coated, sticky layer just begging for some glitter!
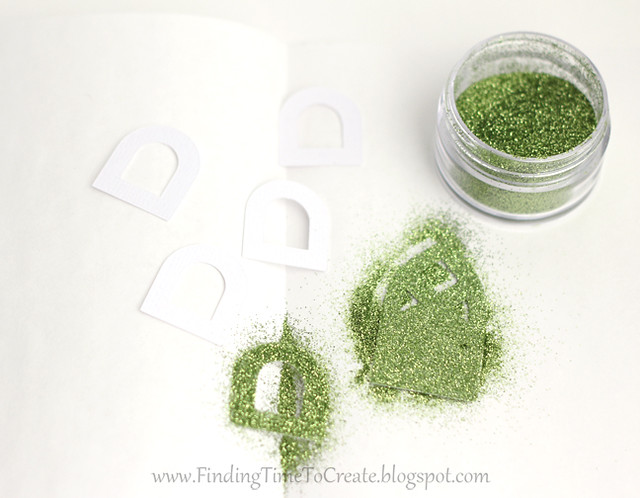
If you’re adding glitter to the back of adhesive cardstock, just remember to flip the shape horizontally if it matters (like my door with a doorknob hole, or any words) before cutting. {Right click – flip horizontally.}
The other thing to pay attention to if adding glitter is to make sure you’re getting clean cuts so you don’t get any tearing on the back that will create voids of adhesive. Tip: I’ve found that depending on the age and condition of my blade, I may need to increase the settings quite a bit to get perfect cuts on adhesive cardstock–but I can get clean cuts even with a dull blade. If my blade is dull, I may need to go up to a 5 or 6 on the blade with the maximum thickness setting (this is a gradual process as my blade gets more and more dull by putting off replacing it). But a new blade does wonders with adhesive cardstock! New blade settings for me are usually blade 4, speed 3, thickness 29.
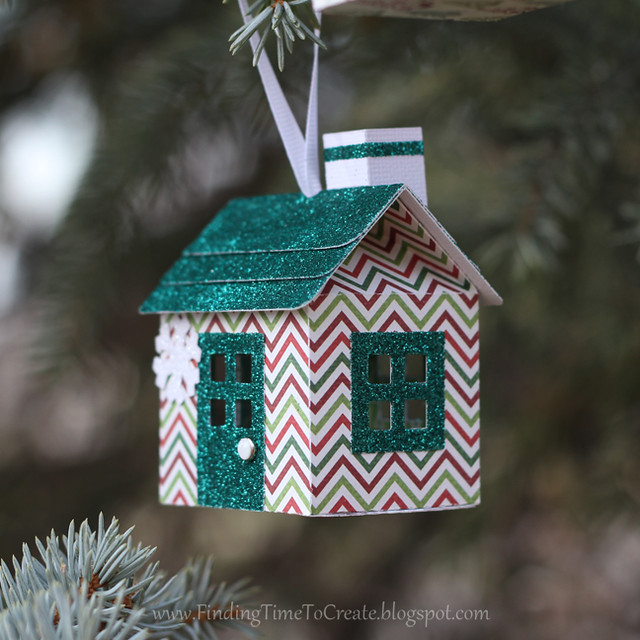
I added glitter to doors and windows, snowflakes, and even a couple of rooftops, just by using the reverse side of the adhesive cardstock. I did have to actually glue the glittered windows and doors to the house base since I used the sticky side for glitter, but it was worth it!
Even this roof is white adhesive cardstock, flipped over and layered together before sprinkling on the glitter. (I hot-glued on the chimney of regular white textured cardstock before adding glitter.)
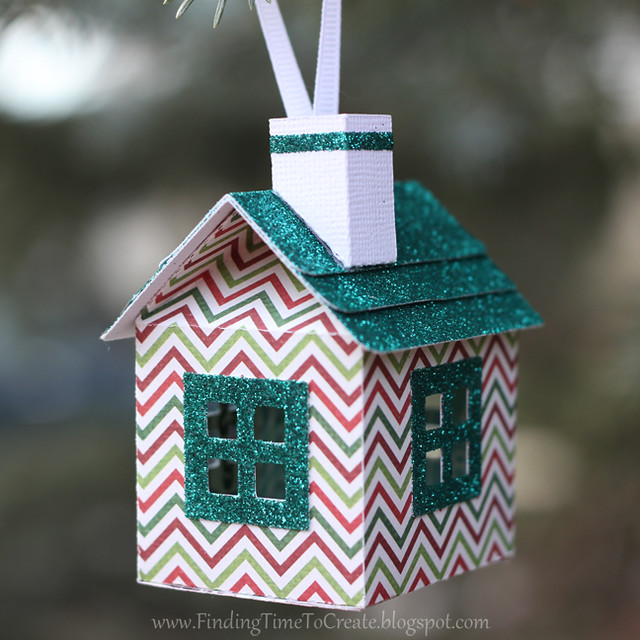
House assembly tip: Add the windows, doors, and decorative doorknob (brad or other small embellishment) to the house before gluing up the sides and base. It’s much easier to press the pieces on while it’s flat.
Another thing you can do with white adhesive cardstock is to run it through your printer as a print & cut. Or, you can skip the registration marks and use your PixScan™ mat. I filled my door and window shapes with a red stripe pattern in Silhouette Studio, put them as close to the edge of my page as my printer will print, then printed the page on adhesive cardstock (trimmed to 8.5″ wide to fit my printer). Then I trimmed the paper down further and saved the rest for another project–no registration marks and non-cuttable area to limit my space. I scanned the PixScan™ mat, put a clear-filled set of duplicate shapes on top of the scanned image in Studio to provide cut lines (no tracing necessary this time), loaded my PixScan™ mat into my CAMEO machine, set it for adhesive cardstock, and cut it!
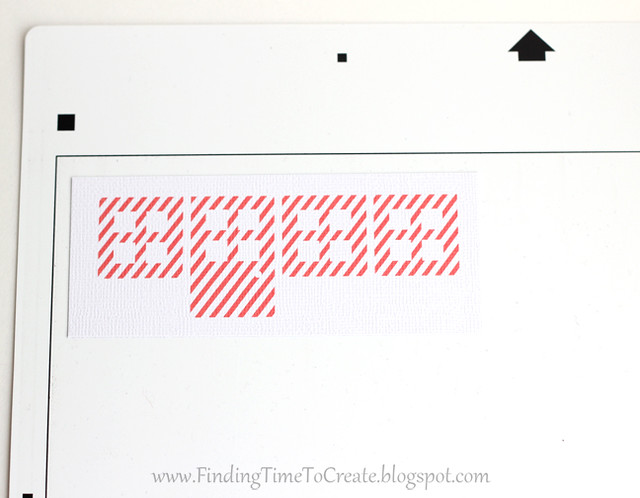
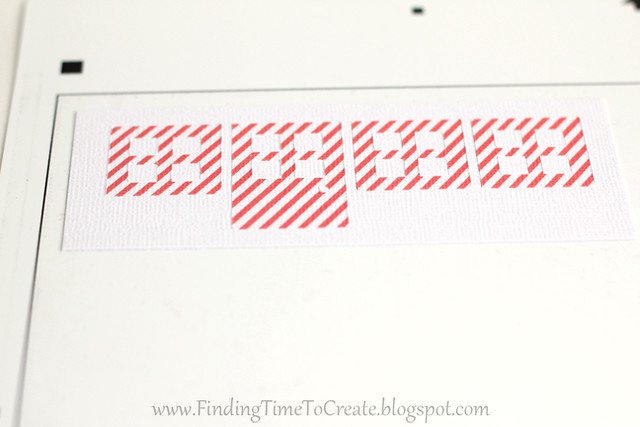
Note: I made a matching striped roof and chimney on regular white textured cardstock since I didn’t want those pieces to be sticky on the entire back side.
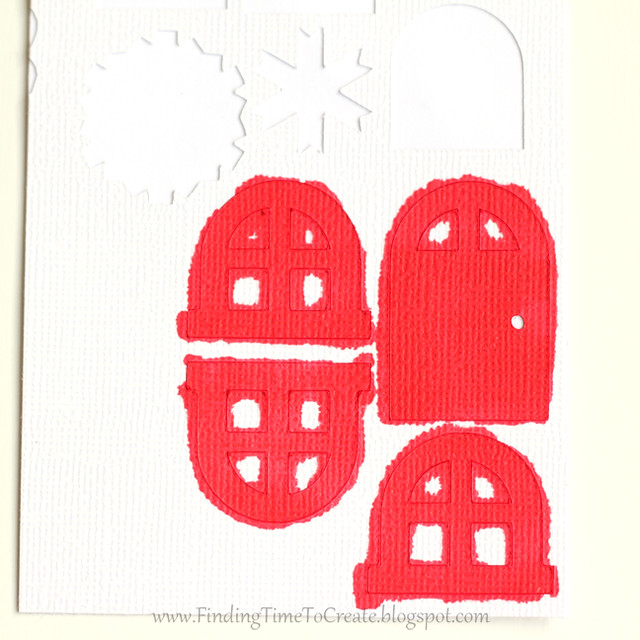
Here’s another fun trick to get the most out of white adhesive cardstock. I simply colored some of my white adhesive cardstock with an alcohol marker to make it the right color of trim. You probably don’t want to do this for large cutouts, but for small bits like this, it’s really convenient to make a custom color. (All the bleeding stays behind when you lift the cut shape from its backing.)
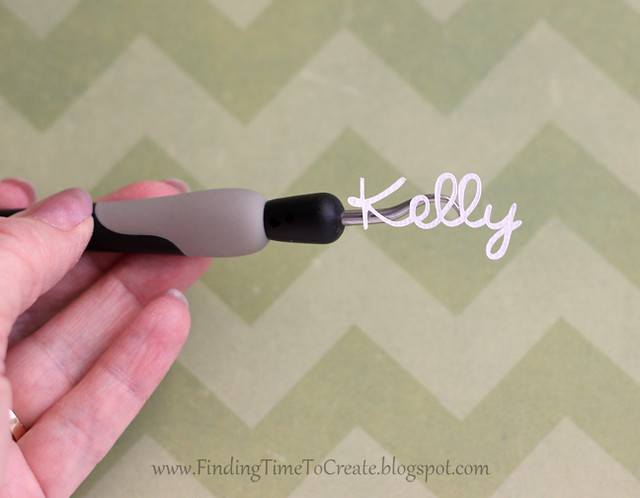
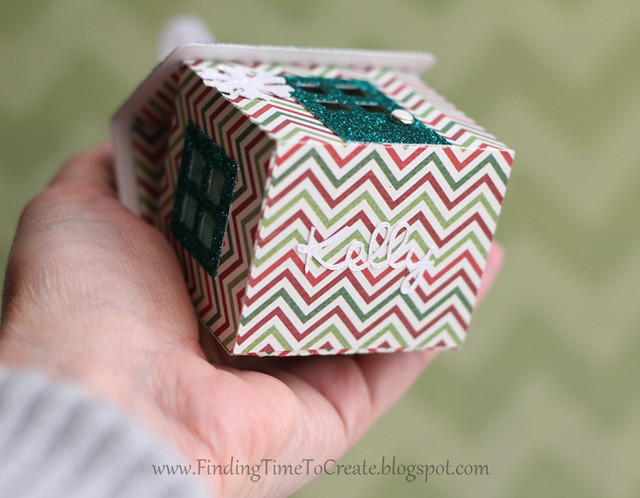
And last, but not least, I love using adhesive cardstock (any color) for cutting intricate shapes that don’t need added glue. No gloppy mess, no sticky residue around the edges…just clean and perfect. I added a tiny name to the bottom of each house. This is cut from the font SNF Lollipop (welded). These letters are about 3/8″ tall. You can see how skinny they are relative to my Silhouette hook tool.
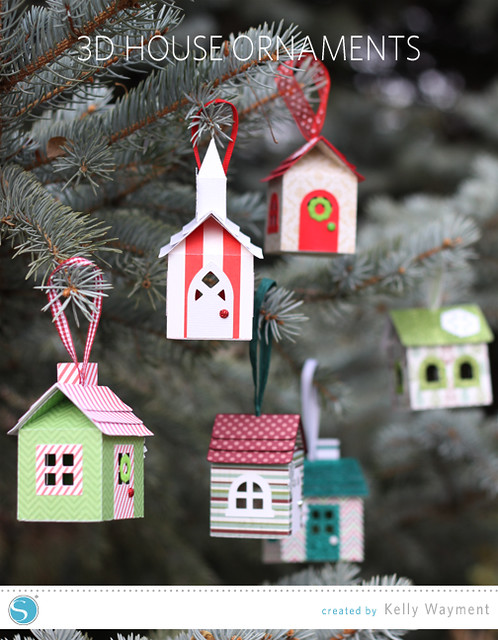
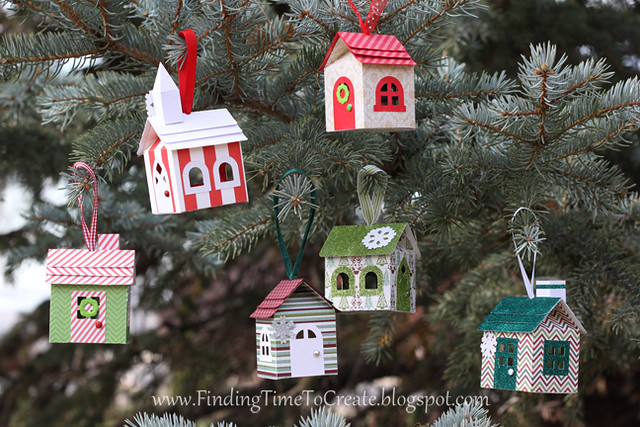
Are you ready to see my six little houses? I made one for each member of my family.
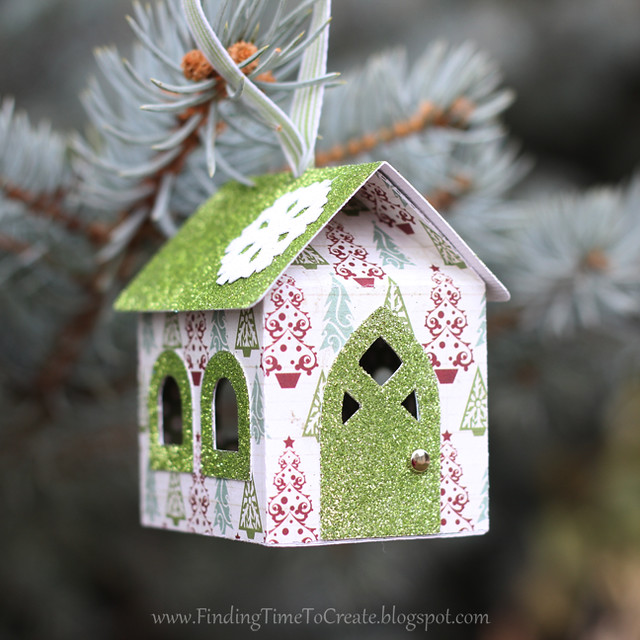 (White adhesive cardstock flipped over and glitter added to door, windows, roof, and snowflake.)
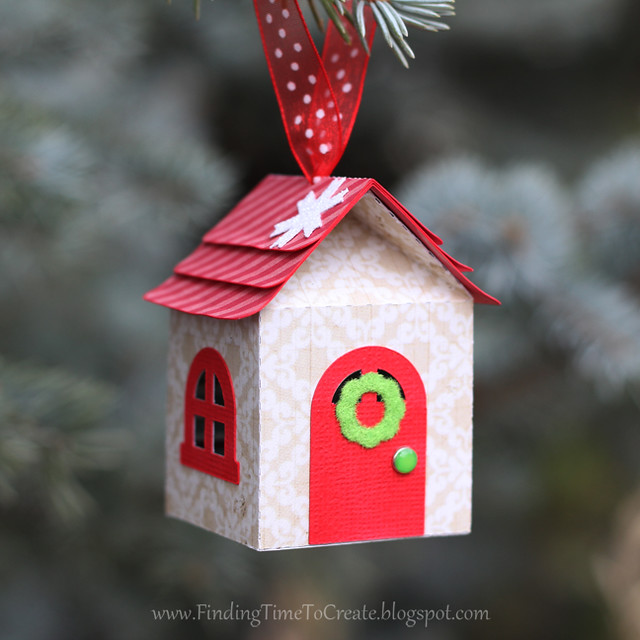
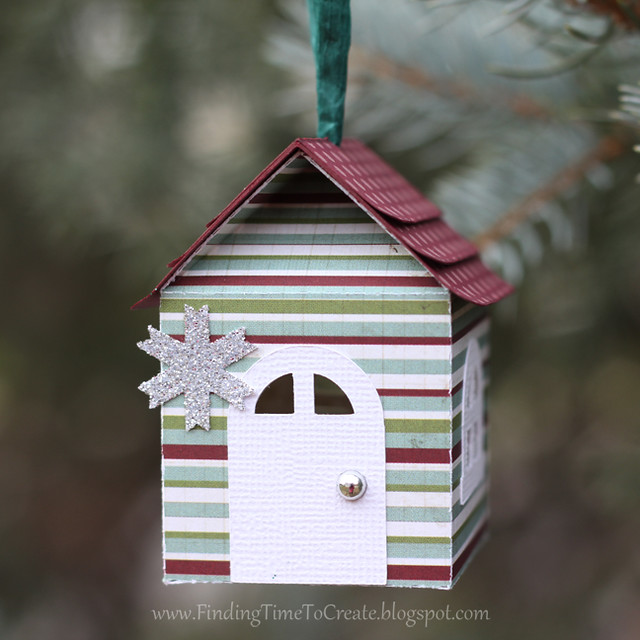 (White adhesive cardstock for door and windows, white adhesive cardstock flipped over and glitter added to the snowflake.)
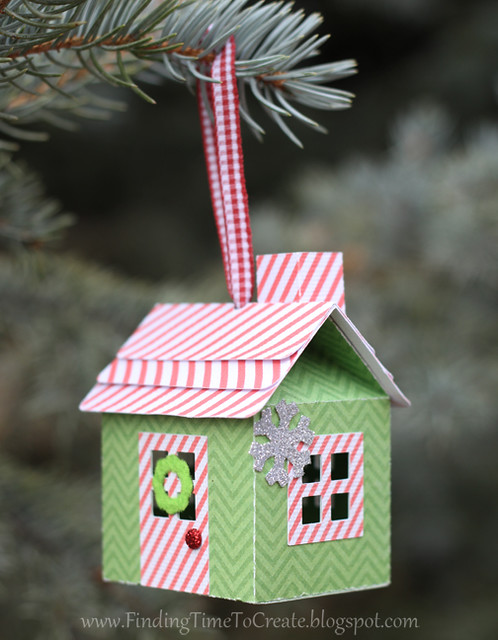
 (White adhesive cardstock flipped and glitter added to door, windows, and roof.)
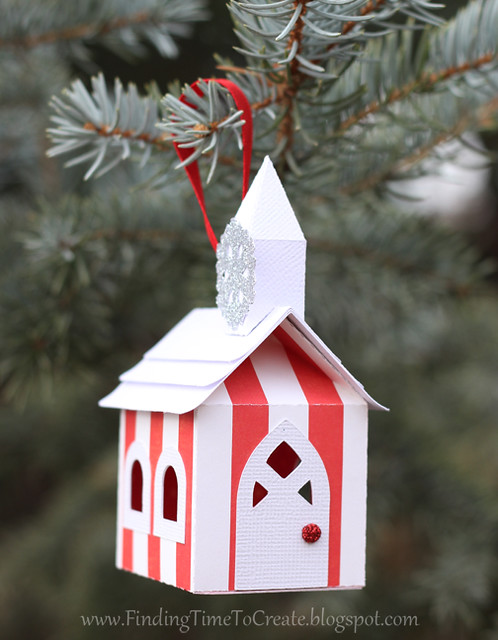
 (White adhesive cardstock colored with red marker for door and windows, white adhesive cardstock flipped and flocking added to wreath, glitter added to snowflake.)
You can see many other projects I’ve done using adhesive cardstock {here}.
Do you want to try out adhesive cardstock for yourself now? I’m giving away a package of white adhesive cardstock to one lucky winner, courtesy of Silhouette America. Here are the rules*. Follow me on Pinterest, follow me on Instagram, and follow Silhouette on Instagram (enter below). I’d also love to hear a comment about how you might use adhesive cardstock or what other projects or tutorials you’d like to see from me, but that’s not required. I’ll let you get on your way to the other blogs along the hop!
a Rafflecopter giveaway (closed)
Your next stop is Parental Perspective with the talented Analisa Murenin. Have a great time, and I hope to see you again soon! (I’ll announce a winner on Saturday, December 6th.)
Here’s a master list of our design team’s blog hop posts in case you get lost along the way:
Designs Used:
Red stripe pattern (#54006)
3D House Christmas tree ornament (#69519)
3D House Christmas tree ornament (#69520)
3D House Christmas tree ornament (#69521)
Font: SNF Lollipop (#8757)
*Giveaway ends 12/5/2014. Open to US/Canada Residents, 18 & older.
Void where prohibited.
Giveaway is not associated with Facebook, Instagram, or Pinterest. Prizes will be fulfilled by Silhouette America.
Winner cannot have won another Silhouette America giveaway in the past 90 days.
Winners should expect their prize to arrive within 4-6 weeks.

Those 3D houses are so cute! I love using white cardstock for sentiments on cards, having already adhesive cardstock instead of adding glue myself would be much easier!
Thank you! That's probably how I use adhesive cardstock most often, as well. Perfect for card sentiments.
Great ideas! I don't have instagram but, I think those little houses are so cute!
Thanks, Lisa!
Fabulous Ornaments! would love to join the giveaway but the raffle copter is not working for me on ANY of the blogs in the hop!! any help plz???? thanks!
Apparently Rafflecopter chose today of all days to be glitchy. 🙁 I've never used it before today, but it seems like the problems have passed for the moment. This giveaway for all the design-team bloggers goes through December 5th, so I hope you are able to enter.
Love the 3D houses you made. And you're right, adhesive cardstock is the best. Thanks for sharing.
Thank you, Wendy!
These are adorable Kelly…I love the little flocked wreaths too!
Thanks, Annie! I'm headed your way soon to check out your frosted glass bulbs that I saw on Instagram.
Absolutely adorable, Kelly! You made my day!
Thank you, Lori! Your house designs (well, all your designs) are so fun to work with!
These are so adorable! I haven't used adhesive cardstock yet, but I think it would be great for making cards. Thanks for the chance to win 🙂
You will love it once you try it! Good luck!
Thanks for the wonderful tips for these adorable houses. They will be so useful when I get my Cameo 2 for my birthday later this month.
Yay! I'm so excited for you, and happy birthday!
Oh wow. I need some classes to really improve my knowledge… obviously I am not using my Cameo fully!!
Those houses are so stinking cute! I downloaded them a few days ago but haven't had a chance to play with them yet. Now I can't wait! The glitter tip is amazing by the way. I will have to give it a try.
These are darling Im for sure getting these thanks for the tips and tricks!!!!!!
how do I enter the giveaways? sorry to ask such a silly question, but i am new to all this
Christine, towards the bottom of the post you can enter the giveaway through the Rafflecopter widget. I believe it will ask you to sign in via facebook or with your email, then click on each link to be directed to following on Instagram or Pinterest. Once you've done those requirements, click Enter in the Rafflecopter box. Rafflecopter will pick a winner, which I will announce on Saturday the 6th. Good luck!
I love the little houses. Down right jolly. I'd use the adhesive cardstock and glitter to make borders for giftbags and giftboxes.
Thanks for all the great tips! Love your little ornaments.
Love these little tree ornaments! I've yet to try the adhesive papers but will give them a try! Thanks for the inspiration.
I just ordered my Silhouette. I am so excited to begin learning these new skills! TFS!
Adorable and each is so special for your family! Thanks for all the tips too!
Awesome idea.
I am a bit obsessed with 3D houses and churches and yours are wonderful!
Thanks for the great tips and love your houses!
WOW these are super cute! TFS
Great tips. Very helpful. Thanks!
Oh Kelly……..
Cuteness and beyond.
Thank you for the idea………..
**U** Nance
I love your little houses, the attention to detail is amazing! Thank you for sharing all the different ways to utilize the adhesive card stock.
Your ornaments are adorable! All the details you used are so creative, love them all.
These are begging for a battery tea light!
These little house ornaments are super cute Kelly! Love all the little extras you did with them using the adhesive cardstock.
You have the best ideas!! I have a question regarding the pixscan mat. When you say you scanned the mat, do you mean you used your computer scanner or you took the picture and uploaded it? I just got my pixscan mat so I am a little confused. Thanks
Rhona, I use my flatbed scanner for my PixScan mat (it is more precise for me than taking a picture, but either choice is an option). You may be interested in reading my PixScan tutorial here.
Very cute!
So adorable. Your tree looks fab!
Oh, those houses are so cute! I've only had my machine for a month and a half and have yet to try this product.
Love your houses what a neat idea for the Christmas tree
These are awesome!
Your little house ornaments are just fabulous. Love your ideas on how to color with markers and love the glitter too!!
Super cute ornaments. Thanks for sharing and inspiring.
SewCalGal
http://www.sewcalgal.blogspot.com
Those are so cute. What a wonderful idea to use it to add the glitter. So easy! thanks for the inspiration.
Love these. Need to save for later
Adorable houses….love them all! Really cute way to decorate your tree!!!
Jan
Alot of work, but well worth it! These are adorable….
Thank you, Cindi! These houses are actually on the easier side of the scale for 3D projects I've tackled. Adding the glitter was the most difficult and time-consuming part, but as you say, well worth it!
These are darling. Looks like a lot of fun to make! Adhesivie card stock is a great idea! Thanks for sharing.
Adorable!!
super cute! thanks for sharing your tips and tricks.
Love all the ideas I see. I would love the Cameo!
Thanks for posting
These are adorable and so creative.
The Bird houses are adorable!! As a new to Silhouette person, I am floored at all it creates. The adhesive cardstock to very neat. I cant wait to try it!! Thank you for all the tips and ideas. I have learned something new!! 🙂
What great house ornaments! Definitely on my make-for-Christmas list!
Fabulous project! Thanks for the sharing all the info….especially the sweet 'welded' font that you used for your name! I'm totally admiring the nice clean cut (mine are usually a mess and end up in the trash!)
These are a-dor-able!!
Thank you for sharing all of your tips, they're so helpful;)
Adorable houses:)
Love the use of the "backwards" glitter technique!
Awesome job Kelly. I love the houses and all the work you put into them is great. Love the idea of using the cardstock for glittering.
Can't wait to try the glitter technique.
These little houses are just darling! Love that you made one for each family member. That is so sweet.
How sweet!! I have never tried adhesive cardstock but you have shown me a lot of possibilities! Thanks for sharing!
I love seeing the finished product- I purchased the design and now I feel motivated to give it a try!- great job adorable
Wow!!!! It's beautiful!!!!!!
Such cute houses!
I haven't tried the adhesive cardstock yet but you just sold me on it so I am going to order some asap! Your houses are absolutely adorable! 🙂
Love it…so glittery!
I LOVE your project! Pick me! Pick me!
I'm obsessed with little houses!
What a great project and tutorial! I always wanna try this adhesive cardstocks and you have so many inspirations! THANK YOU!!!!
Does anyone know how to make a comment on this with your name? When it asks me to select a profile, they ask for a URL name. What???
Those little houses are so cute 🙂
These are so adorable! I haven't used adhesive cardstock yet, but I think it would be great for making cards
Wawww I really Love your houses!!!!! pretty!!!
wow, these are so super cute!!!
Oh my goodness! The glitter idea is so clever! And I've still never used the adhesive card stock and I never thought about printing it. Duh!