Tutorial: Grandma Word Album
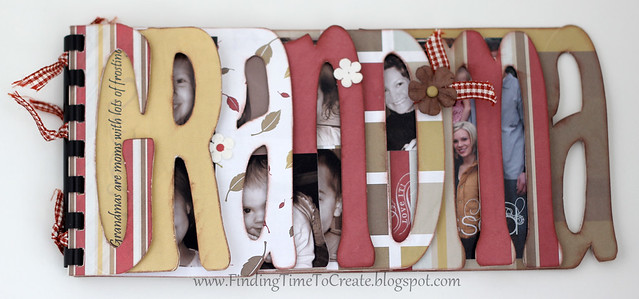
Here is the tutorial I promised for making your own Grandma Word Album with Silhouette Studio. This can be adapted to make an album out of any word you choose. Just so you know, National Grandparents Day is September 9, 2012. (It’s the first Sunday after Labor Day each year.)
Download the free Cafe Rojo font here.
Video Tutorial using Silhouette Studio prior to version 3.0:
1. Type GRANDMA with your text tool in the Cafe Rojo font.
2. Stretch a side handle of the text to make it 11″ wide.
3. Ungroup (Ctrl/Cmd U).
4. Make each letter 3.9″ tall in your Scale Window, but do not lock the aspect ratio.
5. Select all the letters, and in your Align Window choose Align Bottom.
6. Drag each letter in towards the first letter so each slightly overlaps (about 1/4″) the letter next to it.
7. In your Align Window, (with all the letters selected) choose Align Bottom and Space Horizontally.
8. Draw a rectangle from the left edge of the first letter to the last letter so it overlaps the left edge of the last letter but doesn’t cover any holes in the last letter. (The rectangle should be approximately 3.725″ tall and 7.5+” wide.)
9. Select the first letter and the rectangle. Choose Align Left.
10. Select all the letters and the rectangle. Choose Align Bottom.
11. Select the rectangle. Make a copy (Ctrl/Cmd C) and paste the copy on top (Ctrl/Cmd F) six times. (This results in one rectangle for each letter.)
12. Click off to the side to deselect. Click on a rectangle. Drag the right edge in to overlap the first letter.
13. Add the G to your selection by holding Shift while you click on the letter G.
14. Group (Ctrl/Cmd G).
15. Repeat this process (steps 12-14) for each letter in your album so each letter has its own rectangle slightly overlapping and grouped with it.
16. Fill each letter with color in the Fill Window, then bring the letters forward by choosing each (starting from the end) and pressing Ctrl/Cmd ] until it comes to the top.
17. Select each letter except the first, and click Weld for each letter, one at a time.
18. Bring out the letter G and Ungroup it from its rectangle.
19. Make a copy of the G and its rectangle.
20. In the Modify Window, with the G and its rectangle, choose Divide.
21. Pull out the extra piece that covers the open area of the letter.
22. Select the unmodified G and its rectangle, and choose Weld.
23. Use the extra piece from step 20 and place it over the welded letter G (bring to front if necessary). Zoom in so you can place it exactly over the portion you want to cut out.
24. Select the extra piece and the welded G, and choose Subtract.
25. Move the G back to its place with the other letters. Align Left, Align Bottom (in the Align Window).
26. Delete the extra divided G pieces.
27. Clean up a few flaws and sharp points on the letters with Point Editing.
28. Select all of the letters. In your Replicate Window: Duplicate Below, and Mirror Left.
29. One copy is for cutting from thin chipboard or layers of cardstock, one copy is for filling with patterns for print & cut or for cutting from pattern paper, and the mirror is for filling with patterns or cutting from pattern paper for the back side of each letter.
30. Add photos (crop as small as 1.75″ x 1.75″) and embellishments. Bind as desired.
(Download printable PDF instructions by clicking here.)
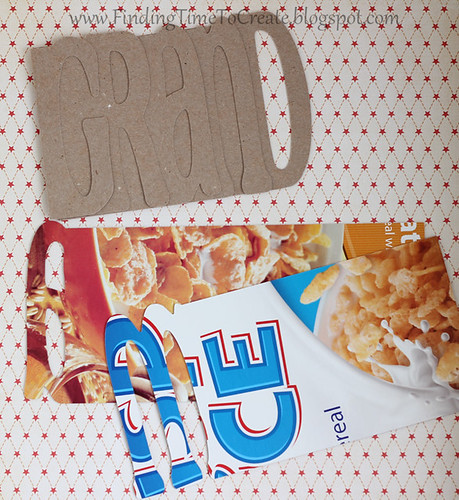
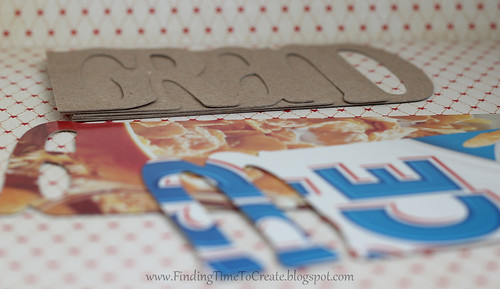
Some notes about cutting thin chipboard:
You can cut the chipboard with a Silhouette Cameo using “coverstock” blade settings, but if you don’t have a Cameo you can cut several layers of each letter in cardstock to glue together, or trace and cut chipboard by hand. My first albums I cut everything by hand (pre-Silhouette days) and it is sooo much easier to have the Cameo do the work! (Coverstock blade settings are speed 1, thickness 33, blade turned to 7, check the box for double cut.)
I cut these pieces out of actual cereal boxes. They do come in different weights, but if you have several choices then always go with the thinnest. These are cut from Walmart’s “Great Value” brand cereal boxes.
Now here are some freebies for you if you don’t want to tackle designing immediately:
Grandma Album File (Studio format)
Summer Album File (Studio format)
Grandma Album pieces ready to print (PDF format)
Mom Album pieces ready to print (PDF format)
Mother Album pieces ready to print (PDF format)
More photos of a pink version of my Grandma Mini Album are available here.
If you like this project, you may also like this Princess Mini Album.
If you have any questions, please let me know!
UPDATE 8-24-12: I’ve added a follow-up tutorial here for those who use Silhouette Studio to create this album without a Silhouette machine and need to know the tips for printing it out. Once you’ve cut all these pages out by hand, you’re going to want a Silhouette more than ever! 🙂
UPDATE 11-26-12: I didn’t realize this project would spread so far on Pinterest and elsewhere, and I want to make this exact album available to everyone who wants it. I wrote the tutorial to help anyone wanting to make their own album using any word, but Grandma is popular so I’ve made a PDF file you can print and use as a template if you don’t want to bother with Silhouette Studio.
You can download a printable PDF (click here) that includes all the letters to “grandma” in regular and reverse to cut by hand as much as you please. Enjoy! I’d really love to see your versions of this album if you use my file.
Update 4/20/2015: I have an assembly tutorial for this Grandma Album HERE.

Wow, you really give such clear instructions. Thanks for the tutorial
Thanks, SueZee! I'm always happy to hear my instructions are clear. It always sounds good when I already know what I'm talking about. 🙂
Only way I could Comment is by Replying here. I done this project last year and my mother (his gma) has it displayed in her guest room, and every time I see it, it catches my eye. I did a good job: You did a good job instructor-wise. It is time consuming, but so worth it! Thank you
I’m so glad to hear it! Thanks for letting me know!
Kelly, Thanks so much for this really great tutorial I just made two albums for my granddaughters!
I'm so glad to hear that, Anita!
The instructions are really clear & simple! I'm eager to get started. Where can I find Silhouette studio?
Billie, you can download Silhouette Studio for free to design this, but unless you have a Silhouette cutting machine, you'll be unable to cut it. If you want to use Studio to print a template to cut by hand, let me know and I'll give you some extra instructions for printing only.
Yes! I would like to print it. If I like how my finished product looks I will be purchasing a cutting tool to make all my nieces & nephews one!
You can download Silhouette Studio HERE. Will you send me an email so I can explain the longer instructions to you via email, Billie? And do you want to print just the outline and cut from manufactured pattern paper, or do you want to print the pages from digital pattern paper? Silhouette Studio has its own pattern fills if you like them.
I've added a video tutorial for printing. It was easier to record all the tips than to type it out. The link for the additional tutorial has been added to the bottom of this blog post.
I finished doing the album with Silhouette Studio for free, but I really want to print it out. How do I do it?
I've made a new tutorial for that, so come back later today or tomorrow to watch!
Wow…..what a detailed, awesome tutorial. Thanks so much for sharing.
This is fantastic! I will admit though, it still makes me nervous to even think about cutting chipboard with my Cameo.
I was nervous the first couple of times, too, but my Cameo seems to handle it just fine. I don't plan on doing it very often, just in case the wear and tear is harder on the machine. But for the perfect album, it's worth it! 🙂
I have downloaded the Cafe Rojo font, but how do I get it onto my Silhouette Studio????? HELP?
Silhouette Studio uses TTF fonts and OTF fonts that are installed on your computer. You just need to install the Cafe Rojo font on your computer as you would any other font. If you don't know how to install a font, please let me know what operating system you're using and I can give you basic instructions.
If you have Studio open when you install the font, you'll need to close out and re-open Studio before it will show up in your fonts there.
Hi, Kelly. This is a question that might answer itself, but I'm waiting on my Cameo to get here (I still have DAYS to wait, augh!) and I followed your instructions to design one of these (I can't wait to show it to you when it's done!), but here is what I don't understand: When you finish the entire design, you have three sets of letters to cut, but in the video, the letters are still "stacked" on each other, so if it followed the outline, there'd just be one big word instead of a bunch of separate letter/rectangle combos. Does the Cameo just know to separate and cut them? Or do you have to move them physically before you sent it to cut? That's the one thing I can't figure out and I thought I'd ask about it before the cutter gets here. I'm sure it's a silly question but I appreciate the help, and of course, this entire tutorial and the amount of time you put into it. 🙂 – Erin
Congratulations on getting a Cameo, Erin! Yes, you do move everything off the "workspace" except for the pieces you want to cut at that moment. You have a red boundary all along the edges of your workpage in Studio, and anything outside of that boundary won't cut. That makes it easy to select and size a lot of related pieces for a project on the same page, but then move them aside when you just want to cut certain pieces one or a few at a time.
Not a silly question at all. I hope the wait for your machine isn't too long!
It showed up today! But. I'm having a hard time with getting things off of the sticky mat — the paper gets all curly and that's bugging me. Going to play around with that for a bit.
Thank you SO MUCH for all the tutorials and the studio files, and most especially for your quick reply to my question. I'll let you know how this goes with getting the project cut. 🙂
– Erin
Erin, the mat doesn't stay ultra-sticky for very long. You can just put up with it (even iron your curly paper to flatten it again) for several sheets, or you can dab a lint-free cloth on your mat to make it less sticky.
I'm so glad you find my blog and tutorials helpful. Have lots of fun with your new toy!
Oh, Kelly. I think I'm going to send this thing back (assuming the seller will accept a return). I don't know if I got a dud or what, but I just don't have the patience for it. I had designed a couple of things while I was waiting for it to arrive, and it seems like it's just problem after problem…it doesn't want to hold the paper right–on everything I've tried to cut so far (pp, textured cardstock, regular cardstock, and vinyl), it's slipped. Sometimes it's just a tiny bit, but on the vinyl, it slipped on the very last letter on my 12×24 sheet, slicing right across the vinyl field and ruining it. I'd have to go buy an entirely new sheet of vinyl just to get my design completed.
I'm sure that it's a great machine for people who have the patience to do a bunch of trial and error and troubleshooting, but I do not have that kind of patience. I have done the old-school xacto for years and would actually rather go back to that than deal with all this nonsense. So I'll probably send the cutter back and keep the installation of the software and just do things that way. 🙂 But seriously, thank you SO MUCH for all the tutorials and I hope you keep enjoying your cutter!! – Erin
Erin, it's too soon to send it back! Make sure you're loading the material correctly. There's a little raised guide towards the left side of the machine near the round blade adjuster. Line up the left side of your mat with that, and your mat should be centered between the white roller bars. Use the "load cutting mat" option on your Cameo's display.
If you're using vinyl without the mat, adjust your rollers one step in to the 12" position and center your 12" vinyl between the rollers as evenly as possible. Getting a good grip between the rollers is critical to prevent your mat or vinyl from slipping. Use the "Load Media" option for cutting vinyl without a mat.
If your cuts are skipping or slicing where they shouldn't, set your Packet Size to 500 in File>Preferences>Advanced.
Erin, the software might have a bit of a learning curve, but getting the machine itself to cut well shouldn't take that much trial and error. I would hate to see you lose out on all the good things a Cameo can do and go back to exacto-knife cuts.
Feel free to email me for more troubleshooting, if you need it. (My email is on the "About Me" tab at the top of my blog.)
Thank you, Kelly!! Luckily, my fella showed up right after I sent you the message and helped me troubleshoot some things that went wrong. He has infinitely more troubleshooting patience than I do. 🙂
I think we figured out where the vinyl went wrong, and then he helped me get my rollers adjusted (I hope they loosen up a little over time, because it's really hard for me to get a grip on mine to adjust it, but at least now I know it *can* be done. I was seriously thinking I had lost my mind because I couldn't move the right-side roller at all even though the book said to use that for the vinyl. He got it loose somehow and I can move it, but it's still really hard to turn.) I think I had my vinyl design too close to the very end of the vinyl because I just didn't realize the rollers were going to pull it past the edge of the vinyl during the cut. After it tried to push the vinyl back out, that's when it slipped out of the right-side roller and got sliced all across (because it was cutting the long spine of the "E," but the page was all askew by the time it started that slice.
This morning, I cut the same snowflake using a bunch of different blade settings and speeds until I got it just right, and then I made a note of the settings. I also found a list of cut settings online to use for other materials.
I definitely want to take your classes to really get to understand all the features of the Cameo, so I'll keep checking back to see when the next class will be offered. Thank you so much for all the moral AND technical support! I will get the hang of it, I'm sure. 🙂 -Erin
I'm sure glad your fella was able to help you. 🙂 The rollers should loosen up with use. I've heard of people using grippy jar openers or needle pullers to help move the stiff rollers until they get easier. I'm in the process of breaking down my current classroom basic lessons into shorter segments for online classes, so please do keep checking back to see when I set dates.
I'm very happy you didn't drop kick your Cameo out the window, or send it back for a refund. 🙂 It will get easier and more fun with practice.
You don't use the cutting mat to cut the chipboard, do you? Have had my silhouette for a couple months and I LOVE it, but I still have a lot to learn. Thank you thank you for such a great tutorial! Great gift idea!!!
Yes, I do use my cutting mat to cut chipboard. Anything that doesn't have a backing (like vinyl) needs the blade to be set high enough to cut all the way through. If the blade cuts all the way through, you don't want it to cut into your machine's black cutting strip; you want it to have the mat underneath for protection.
I'm glad you like this project!
Hi there! I am trying to do this base (I make word URLAUB which means Vacation). I ma doing it step by step but I have problems – do you have this part also as youtube video? Sorry but only reading helps me unfortunatelly none at all :/ Or could You send me it with pictires step by step for an e-mail? Or maybe a ready to print version? I don"t have so much time it alone to try :/ I have 2 little children and this tutorial above I'm making for about 2 hours and always in the same place it stops :/
Hi, Joanna. I'm sorry this is turning into a hard project for you to do. My second video I made had some problems (on the other post you've been asking questions about), and I think the language barrier is making the written instructions difficult to follow. Also, Silhouette changed some of the features of the software since I made these tutorials. 🙁
I would love to make your word "URLAUB" for you to just open the document in Studio and print. Do you want this same font? I'm not sure if the pattern papers I use will convert to your computer, but we can try it. Or would you like just the outline of the letters that you can trace or print on to your own paper?
You can send me an email to kellyslater42 (at) yahoo.com to let me know about the font and fill pattern, and I'll get started on this.
Many thanks! I send you a message. I will this album for my brother-in-low machen. He and his wife are travellers and I have some of Photos (they were in Las Vegas, San Francisco, Carribean etc.) and I wanted to make a beautiful word book for them. I am still learning:P
I am having the hardest time figuring this out. I tried to download the one have if you don't want to tackle the designing and I can't even figure out how to download it… I am not very computer savvy so maybe that is my problems… do you have any suggestions on how I can do this.
Do you have Silhouette Studio? The files I provided are meant to be cut with the Silhouette digital cutter and will only open in Silhouette Studio.
I really want to make this, but I am going to do it by hand. I really need to know the height of the letters and the length of each board if that is possible. And I am not quite sure what chip board is. Do you think that heavy weight poster board would work. I do not have Silhouette, I have Adobe Photoshop but I can not figure it out. I watched your video and it is very complicated for me. I thought I would just print the letters and trace them on the boards and cut them out by hand and use mod podge and scrapbook paper. What do you think?
Would you like me to email you a PDF of these letters, ready to print out? Heavy-weight poster board or an actual cereal box would work for the heavy base layer. The way you intend to do it is the way I did it originally, for the most part, so that should work just fine. My email address is found in the "About Me" tab at the top of my blog; if you email me I can send these in PDF format to you.
Thank you so much!
I got medium weight chipboard but it seems pretty thick. Do you know what weight you used?
I don't know the actual weight, but it's quite thin for chipboard. I've used the thin chipboard that comes in Coscto photo enlargements and I've used "Great Value" (Walmart) brand cereal boxes, as well. Most cereal boxes would probably work.
Hi!! I'm Ashton. I LOVE this project!! I've taken on this craft as a Christmas gift for my Mom and MIL. The instructions were so easy to follow and the videos helped tremendously. I'm cutting everything by hand and so far have made 3 different sizes because I kept wanting something a little bit bigger. And I'm using soda boxes rather than the cereal boxes because, well I have more access to the soda boxes rather than the cereal ones. Ha! I was having people save cereal boxes for me, but then I grew concerned with them not being the same thickness that I decided to stay with what I knew would be same and that was the soda boxes. They are certainly thicker and my hand really hurt after doing it so many times, but it seems pretty durable being a bit thicker.
Anyway, I have a couple questions, 1) what kind of adhesive did you use for putting the pattern paper on the chipboard? The only things I have readily available are tacky glue, stick glue and mod podge (which I've only used once.) If I had more time available I'd probably just figure it out using trial and error, but I really don't want to feel pressed for time getting these finished in time for Christmas that they look less than stellar. And 2) what did you use to punch the holes for the spiral binding? Probably the Silhouette cutter? Any ideas off-hand about what I could use? I'm thinking I may just have to measure it and cut it with the exacto by hand too, right?
Thanks for all the help!! I'd love to show you my finished product, but am unaware to do so since I don't really craft or have a blog. Will have my hubby help me with that 🙂
Hi, Ashton. 🙂 I've used Aleene's tacky glue for things like this. Mod Podge would probably work. I'd avoid a glue stick.
I punched the holes in this with a binding system. This was probably a Carl Tozicle binding system, but you can also use a Bind-it-All, a Cinch, or just punch your own holes and put rings or ribbon through the holes.
Is there a way to line up the punch holes with the Tozicle punch. I bought the system (blue) a decade ago and cant figure out how to line the holes up. I need to punch more that the 4 holes it punches at a time. I cant see that there is a line up guide. If I could figure out how to punch the 11 inch side I could made a guide for myself. Can you help?
Do you still have the instructions, Mercedes? And do you still have the whole system? There’s a blue punch that punches four holes at a time, but there’s also a long punch guide and binder that’s about 12-13″ long. My binding portion has a bright green strip on top with concave notches, which is where you place the convex notch on the punch. I can post the instructions, and possibly a video if you have both parts.
I'm a Cameo newbie, but do I need to separate the letter sections in order to cut everything?
Yes, just move the other pieces off the workpage while you cut them a section at a time. The only thing that will cut is what is within the red boundaries on your workpage.
Kelly this is a great project and I would love to make it, but I can't seem to get it to print the PDF. I keep getting a message that the pdf is not a valid Win32 application. Do you know anyway around this or any other way I can get it to print? Thank you…Sharon
Sharon, I Googled that message and the most likely culprit is that the file didn't download correctly. You can try to download it again, or you can email me (see the "About Me" tab below my blog header) and I will email the PDF files to you. Hopefully that will work. 🙂
Hi there! I love this project, and would like to make "Sister" "Mother" and "Cousins" but don't have the proper programs to make this possible. Are you familiar with any Microsoft programs that might be similar to your instructions? Any ideas? Thanks! lil_hop5 at yahoo
You might be able to do it in Microsoft Publisher, but it's a lot more work than the instructions for Silhouette Studio. Silhouette Studio is a free program to download, and you can design then print your own words to cut by hand. Please use the link on my 8-24-12 update at the end of the post above. There's no comparable way to do this in Microsoft Word.
for someone who may not be as crafty would you be willing to make and one?
I'm not sure could afford me. 🙂 I priced it out once before including my time, and I would charge about $15 + shipping, plus I'm not available for orders on projects until May. If you're still interested, you can send me an email (see the "About Me" tab at the top of my blog).
Hi Kelly,
I've achieved it!!! I'm so proud of myself. I did it with your tutorial video on my tablet, next to the laptop and step by step I've created Laura instead of Grandma. This is so much fun to do. It is my first project on making something myself in the Designer Studio, but probably a lot of projects will follow. Thank you so much for inspiring me!
Kind regards, Marja from the Netherlands
Marja, thank you for letting me know of your success! Way to go! I hope it's the first project of many that you design yourself. 🙂
Hi Kelly,
I was going to see if you had the word MOM in a PDF. I was going to try it with my computer but it keeps on freezing on me. I want to use this with my class so they can make it for their mom's. Do you think that you can help me! I really need!
Rita, here are the PDF files to make a MOM album. Click here to download. Good luck!
I keep trying to download your grandma PDFs and I can't get to them…it keeps taking me to a website to download media fire??? Any help is appreciated!!!
Media Fire is the site that holds my freebies to download. You should look for the download button that is close to the name of my document, which for the grandma PDF is called "grandma album PDF print_krafting kelly". I apologize that most of those free media download sites are nuisance to navigate, but it sounds like you are getting to the correct place.
do you have the word MOTHER already just for downloading it?
I do have a MOTHER album made. Do you want the PDF version for printing only, or do you want the Silhouette Studio file?
the PDF version please!! 🙂
I've added it to the list of download versions above. 🙂
Hey Kelly!! I've been trying for a while now to figure out a crafty project for the men in my family and this seems like a pretty good one with pictures and what not. Do you think you could e-mail me the words Father and Grandpa??? As well do you have any suggestions for other cratfy male gifts?
I think these would made great male gifts, but unfortunately my time is extremely tight this time of year and I don't have time to create those for you. I hope you can use the tutorial above to create your own!
Hi! I am wondering if anyone has done this with a Cricut? That is what I have and really want to make something like this. I want to do names or other things…
Suggestions?
Do you have any design software that works with your Cricut? Basically you're welding a rectangle to each letter, and each rectangle is a little wider than the one before it so the letters can peek out from behind one another.
Thank you so much for a great idea. I try and do all homemade gifts each year and this year, I'm keeping it simple because we're due with our daughter a few days after Christmas. My great grandmother loves pictures and stuff but I'm tired of just making calendars for her and wanted something special. I think the next one I make will be a "BRAG" book for my grandmother's birthday so she can have pictures of her great grand babies to brag about.
Hi I'm trying to attempt this with my silhouette studio for a Christmas gift this year. I have finished the design but when I cut it out it is really small. How big is it really supposed to be? I want to make sure I'm doing this right. It just looks so small.
The largest letter should be about 10" wide. If you resize any of it, make sure all the pieces are selected at the same time while resizing so they are enlarged proportionately. Let me know if you still have questions.
Thanks Kelly for getting back to me so soon! I really appreciate it. How tall are all the letters and if the largest letter, A at the end of grandma, is the widest how wide is G? I'm trying to figure out how to proportion the letters so that they still all look good.
Hi Kelly, I'm new to the Silhouette and can't figure out how to resize all of the letters at the same time. Is there anyway you could explain this to me or maybe email me the files so that I can print them at the right size. I stopped at the end of your illustration so if I print the letters individually from there they come out so small. I'd like to have the letters 7' tall if not bigger.
Sorry you're having trouble. Did you design the files yourself, or are you using the Studio download from above? If you design them yourself using the instructions, they will be just a little different from mine.
To select the letters all at the same time, you can either hold Shift while clicking each letter with your mouse or you can drag a selection box around all of them at the same time. If you have the reverse letters, you would want to select those as well. Once everything is selected (it should have a big bounding box around the whole thing), click and drag a corner handle to resize it. You can only make them as big as the largest/longest letter will fit on a single page.
With the file I made, cutting on a 12×12" paper, the last A is about 11.5" long and all the letters are about 5.25" tall. That makes my first G about 1.985" wide. If you stretch them much taller, they can start to look awkwardly skinny. If you're working with letter-size paper they will have to be smaller.
This is all assuming you're working with the word "Grandma" in the Cafe Rojo font. A shorter word would allow you to make the letters bigger overall.
Does that help?
I designed them myself using your instructions. Thank you so much!!! I was able to figure it out with your explanation! I truly appreciate it.
I'm glad you were able to figure it out. 🙂
Just a quick question: I have seen this project and am excited to get started for my grandmothers 101 Birthday. Im just curious about the way you insert the pictures into your album. Do you use actual pictures that are glued to the final cut pieces, or do you use digital images? If you use digital images, could you explain your technique.
I use small actual photos and adhere them to the assembled album pages. Have fun making one for your grandmother! 101 is impressive!
I downloaded the pdf file but it will not open at all. Any ideas?? I really want to make this for my mother-in-law and mom for mother's day! 🙂
I'm not sure what to tell you about that, except you can send me an email and I will attach the PDF directly and see if that works any better. See the "about me" tab above for my email address.
Okay. I will do that now 🙂 Thank you
I came across this tutorial on Pinterest and immediately I knew I had to do this for Mother's Day. Your tutorial was very easy to follow. I am excited to finish it and send it to my Mother-in-law. Where did you find those great quotes? Can I use them as well on my project?
Thank you again for posting this awesome tutorial!
I'm happy for you to use the quotes. 🙂 I think I had most of them on an old set of stickers or rub-ons. I'm glad this tutorial was helpful and that you're making this for your Mother-in-law!
After trying to get started on this project a few times…I am finally able to get to it. First I wasn't able to download the file on the computer I was working with and then I tried to do something similar with a different program but it didn't work. So, new computer, file is downloaded and I'm ready to begin. I was wondering if you would be able to create a pdf file with a different word though.We have three grandmas in our family and each go by something different, one is Grandma, one is Nanny and one is Sweets. Any possiblity? Its just such a great project, I'd love to do one for all three!
I'm sorry, but my work load right now has me backed up 1-2 weeks for custom requests. If you want to make them before Mother's Day, I can't commit to having the word designs to you in time.
If you want to try designing them in Silhouette Studio yourself based on these instructions, you can download the software for free HERE–just be sure to scroll to the bottom of the page and choose the Legacy version 2.9.45.
My tips for printing using Studio without a Silhouette machine are provided when you follow the link at the bottom of my blog post in the 8-24-12 update notes.
Thank you so much! I appreciate it!
How do you suggest binding this? I made one with more letters. Plus where do you get your binding materials. Love the tutorial. So easy to follow. I have actually made 5 sets already just need to bind them.
I've used an inexpensive comb binding machine, a Bind it All, and a Cinch machine at different times for books like this. Check out binding machines on Amazon, in scrapbook or craft stores, or see if a local copy/print shop will bind them for you.
I'm so glad you're enjoying this project!
Wow, I've been looking for how to do this for ages…only been able to produce word books from CDs available in UK. This tutorial is really well written and soooo easy to follow! Thank you for sharing this.
You're welcome! I'm happy to hear it was helpful. 🙂
Hi i love this project idea, but my computer refuses to download the silhouette software with some sort of invalid issue? any ideas as to how or what this may be? Im wondering if this problem is my computer? is it possible to create these letters in another software program? thanks. also, I will be printing and cutting by hand. thanks
I'm not sure what the problem might be. You could contact Silhouette America customer service to see if they have any suggestions on downloading the software. Are you trying to download the Legacy version 2.9.45? Their email is support@silhouetteamerica.com.
I think I may have tried this at first in Photoshop Elements and it was O.K., if you have that program. If you want to create your own word, you'll need some kind of graphics program like Studio or Photoshop. If you just want a pre-made PDF of "grandma" then you can download it here.
so.. I am using a family members computer and I just ran a check, and it turns out, it is in dire need of many updates, including several for internet explorer. I am performing these now, and will try the download again when it is done. Hopefully this corrects the issue, because I really want to create my own words, we don't call my mom grandma, for example. I will let you know if I am able to get it downloaded. I love this idea, so thanks for sharing the tutorial, even if Im not able to try it for a while!
After a few frustrating hours, I am happy to say I have finally downloaded the silhouette software and cant wait to try this project! thank you so much for sharing!
I'm so glad to hear it! Good luck!
Hi! I was hoping you would have included assembly in your tutorial 🙂 I would like to know how you adhered the layers? Glue, sticker maker, spray adhesive etc? Thank you for your amazing tutorial! !!
Any adhesive or glue will work. I probably used an adhesive dispenser that lays out a continuous line of adhesive that's quick, easy, and mess-free. Never a glue stick because it doesn't hold together well over time. 🙂
I'm having trouble downloading the pdf file for the grandma template. Is it possible for you to email it to me latoyaholley01@aol.com. Thanks
Nevermind I tried a different computer and was able to download the file. I can't wait to start this project for my mother and mother in law .
I'm glad you were able to get the file, and I hope you have fun with the project!
Can you use Silhouette Portrait instead of Cameo?
Yes, Emmy. You can cut these from letter-size paper, which fits in the Portrait. The Portrait also cuts chipboard just as well as the Cameo. 🙂
Hi Kelly! Thank you for sharing such a creative idea. I completed the letters in the Silhouette Studio following your youtube tutorial; however, now I am unable to print the letters. Do I need a special printer? Any recommendations or ideas would be greatly appreciated!
You shouldn’t need a special printer. I’ve got an Epson inkjet and an HP printer that I use. You should be able to access your printer options through the printer icon. Also, did you change the lines to “print lines of selected shapes” in your Line Style Window? Be sure to read my tutorial linked above on the “UPDATE 8-24-12” note, after the main body of the post.
Hi Kelly! Great instruction! I made a THANKS album instead. Was wondering if I would have to follow the same steps with the T as you did with the G? Maybe I am not covering the letter enough? Maybe it is not needed since it is a different shape? I am stuck on this last part and am not sure if there is a way around it. Thoughts?
The T as the first letter would be a different process than the G just because it’s a different letter. I’m away from my computer and can’t try the steps to give exact instructions, but you probably just need to weld a rectangle to the T to give a place for binding to the rest of the book.
If it looks good, you can bring the rectangle edge all the way over to the midpoint of the T before welding. That would effectively absorb the left half of the T, but with the whole word there you should still be able to tell it’s a T. No need to do all the extra steps of making extra copies and subtracting, etc. You could reserve a copy of just the T before welding to cut from a different paper and add on top of the T page when assembling, just to make sure the T stands out enough. I hope that makes sense.
I’m glad you were able to use these instructions to make your own custom album!
Thanks so much Kelly! No need to try it on your end. I played around last night and came to the same conclusion the extra steps would not be needed. 🙂 I have a copy of the T and will add it over the cover to make it pop a little more. I have it all ready to cut out tonight! Yes, very very good instructions… Take care and thanks again!
Wonderful! I’m so glad to hear it!
Is there any way you could make a printable pdf of the word “mother”?
Hi Sommer. It’s already up there and ready for download, called “Mother Album pieces ready to print (PDF format)”. It’s the last one on the list of freebies below the bottom photo. Enjoy!
Hi! Is there a way to convert this into an svg file for cricut?
Already done! 🙂 I’ve got an SVG version available to download on this newer post, just below the top photo under the “Downloads” heading. http://www.findingtimetocreate.com/2015/04/grandma-album-assembly-tutoria/
I just made this for my grandmother! Although I used google drawings and I printed out black and white stencils, I then glued on designed fabric paper!
Sounds like a fun alternative! I hope she loves it!